background image

SPLITMUX Quad Screen Video Splitter 

37 


USING THE TEXT MENU 

The text menu can be reached either by using a serial command through the RS232 port or a Telnet command through an 
Ethernet connection.  Either way, a text menu with full feature control can be reached by any administrative user.  

Text Menu Navigation  


To move up and down the numbered menu items or toggle through field options, use the arrow keys. 


To jump from menu item to another quickly, press the numbered key above the QWERTY keys (

the numberpad number 

keys are not used

). 


To move from menu list to action key (such as “Save” in Figure 35), press <

Tab

>. 


To exit an action or menu, press <

Esc

>. 


To select a highlighted item or move to another field in a configuration page, press <

Enter

>. 


Be sure to Tab to “

Save

” and press <

Enter

> when configuration changes are made. 


To return from “Save” back to a field on the configuration page, press <

Tab

>. 


From a terminal connection

 to the “RS232” port, enter the command  “CF SA”  (where SA is the serial address of the 

SPLITMUX) and press <

Enter

>.  

From an Ethernet connection through the LAN

, enter the Telnet command “CF”  (provided you already have a Telnet 

connection as described on page 36) and press <

Enter

>. 


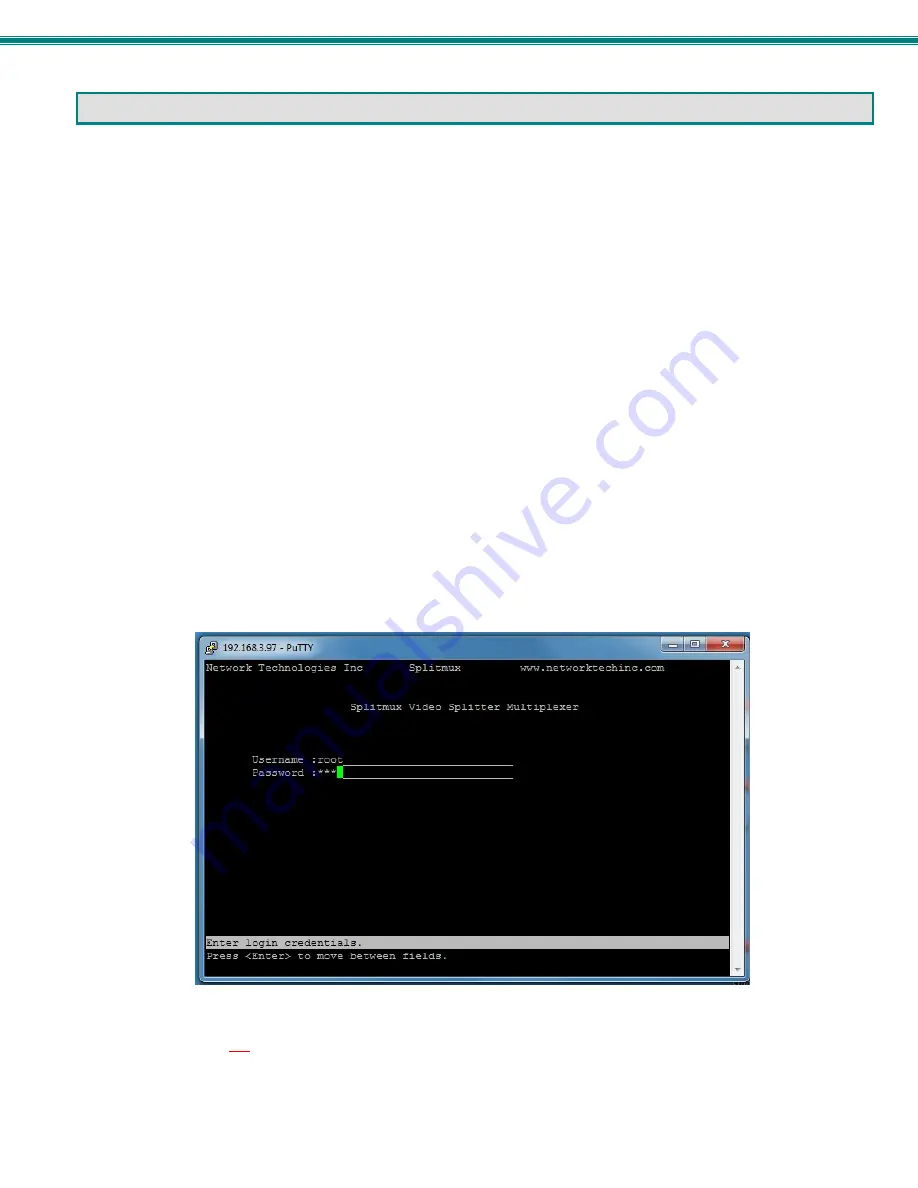
You will be presented with a login screen. 


1. At  “

Username

” type <

root

> (all lowercase letters) and press <

Enter

>. 

2. At “

Password

” type  <

nti

>


(all lowercase letters)


 and press <

Enter

>.  


If you are an administrative user, alternatively enter a valid username and password to also access this menu. 


                                                                   Figure 33- Text Menu- Login screen 

Note:   User names and passwords are case sensitive.   It is important to know what characters must be capitalized and 
what characters must not.  


Содержание SPLITMUX Series SPLITMUX-HD-4RT

Страница 1: ...MAN225 Rev Date 3 30 15 SPLITMUX HD 4RT Quad Screen Video Splitter Installation and Operation Manual SPLITMUX Series SPLITMUX HD 4RT SPLITMUX HD 4RT R...

Страница 2: ...75 Danner Drive Aurora Ohio 44202 CHANGES The material in this guide is for information only and is subject to change without notice Network Technologies Inc reserves the right to make changes in the...

Страница 3: ...Operation via Web Interface 14 Log In and Enter Password 14 Administration System 16 Administration Network 18 Administration Input Settings 19 Administration Output Settings 20 Audio Level and Gain 2...

Страница 4: ...64 Save and Recall 65 Multiple Switch Control 65 Technical Specifications For IRT UNV 65 Troubleshooting the IRT UNV 65 Example of Cascaded Configuration 66 Specifications 69 Index 69 TABLE OF FIGURES...

Страница 5: ...s 40 Figure 39 Text Menu OSD Screen Settings 40 Figure 40 Text Menu Restore Default Settings 41 Figure 41 Text Menu Network Configuration 41 Figure 42 Text Menu IPv4 Network Settings 42 Figure 43 Text...

Страница 6: ...ave or Load a Custom Layout 63 Figure 72 OSD System Information Page 63 Figure 73 View of cascaded configuration from Master 66 Figure 74 View of cascaded configuration from Slave at IP 192 168 3 173...

Страница 7: ...ot included o Use DVIA HD CNVTR LC or DVI HD CNVTR DVI Audio to HDMI Converters to pass and independently switch audio signals to the multiviewer Supports digital DVI with DVI HD xx MM cables not incl...

Страница 8: ...al Materials Included with SPLITMUX HD 4RT R same as SPLITMUX HD 4RT plus the following 2 MP4829 Ear Brackets 2 MP4826 Long Rack Ears 1 MP4825 Cable Tray 12 HW5133 6 32x1 4 Flat head Screws Materials...

Страница 9: ...Red LED To indicate when the SPLITMUX is powered ON Green or in Standby Red 5 PWR STBY Rocker switch For switching the SPLITMUX between ON I and Standby O 6 5VDC 3A 2 1x5 5mm Power Jack For connection...

Страница 10: ...brackets to the SPLITMUX The holes in the brackets should line up with pre threaded holes in the sides of the SPLITMUX Tighten the screws securely Note If the ear brackets are applied to the rear the...

Страница 11: ...e 3 Attach rack ears Figure 4 Assembled unit ready to mount in rack 2 Install 4 cage nuts provided to the rack in locations that line up with the holes in the mounting ears on the SPLITMUX 3 Secure th...

Страница 12: ...far left side of the left SPLITMUX and right side of the right SPLITMUX using the 6 32 x 1 4 screws provided Then install a connector plate to join the two SPLITMUXs in the front Figure 5 Attach ears...

Страница 13: ...onnector plates can be attached Figure 7 Assembly method for SPLITMUX with cables facing forward Figure 8 Assembled SPLITMUX HD 4RT 2R 3 Tighten all screws securely The SPLITMUX HD 4RT 2R is ready for...

Страница 14: ...20 more seconds the LED will change from red to green ON and the SPLITMUX will be ready to use Figure 9 Video Source Display Connections Terminal Connection for RS232 If control via serial connection...

Страница 15: ...twork connect a CAT5 5e 6 Ethernet cable with RJ45 male connectors on the ends wired straight through pin 1 to pin 1 pin 2 to pin 2 etc Up to 8 users can connect to the SPLITMUX using the Ethernet at...

Страница 16: ...rate sets of functions depending upon what mode the SPLITMUX is in Standard Mode or OSD Mode Standard Mode In Standard Mode the left 4 buttons control which video source is viewed as the active image...

Страница 17: ...yed with the active source being displayed in its entirety on the full screen and the remaining selected images at a reduced resolution for simultaneous viewing The position of the reduced images can...

Страница 18: ...QUAD buttons at the same time To exit the OSD menu press them again Figure 12 Front Panel Button Functions Reset Resolution In the event an incompatible resolution setting is applied to the SPLITMUX t...

Страница 19: ...displayed Tip If your Windows program asks which program to open the NTIDiscover jar file with select the Java program Figure 13 Device Discovery Tool Click on the Detect NTI Devices button to start t...

Страница 20: ...e unit is powered up If the SPLITMUX does not find a DHCP server the address entered into the static IP address field page 18 default address shown below will be used If a DHCP server on the network h...

Страница 21: ...ode is Quad PIP or Custom the Input Channel selected indicates which input will pass audio through to the output provided the audio mode for each input is set to Automatic page 21 Function Description...

Страница 22: ...privileges passwords contact settings and schedule settings Firmware For updating the firmware of the SPLITMUX when improved software becomes available System Information Provides firmware version MA...

Страница 23: ...t and log in again Note The IP address will be set to the IP address in the file and may be different Note Before overwriting the existing configuration consider whether the existing configuration sho...

Страница 24: ...de Primary DNS Address Enter preferred name server for Static Mode Alternate DNS Address Enter alternate name server for Static Mode Server Settings Description Enable Telnet Place a checkmark in the...

Страница 25: ...oose to Enable or Disable the video input for this channel EDID Mode Choose to get EDID data for channel x from Default 1 the default EDID table Copy from Output once from the display on the output ch...

Страница 26: ...e see table below for resolutions to choose from HDCP Mode Choose between Force HDCP Video is encrypted whether the source is encrypted or not Auto HDCP Video to all ports is encrypted as long as at l...

Страница 27: ...the SPLITMUX Drag the slide button to the left or right to adjust the audio level If the Audio level indicates 96dB for an input channel it means there is no audio at that source Note If sliding the...

Страница 28: ...n seconds each channel will appear at full screen range is 0 999 Scan input 1 Enable or disable to include input 1 in the scanning sequence Scan input 2 Enable or disable to include input 2 in the sca...

Страница 29: ...t channel will be in PIP lower right position PIP Horz Position Position of PIP images from the right side of the screen range is 0 90 of screen width PIP Vert Position Position of uppermost PIP from...

Страница 30: ...appear on the display Figure 24 Custom Screen Mode Settings 10 Preset Layouts View of display positions by channel Download to save layout Restore saved layout Configure the size position appearance...

Страница 31: ...e grid points for easy alignment of the displayed images The distance between grid points is adjusted by changing the numbers of Rows and Columns default is 10 Click the radio button Move Scale the de...

Страница 32: ...king on the arrow Control the level of transparency for an input by sliding the Transparency button to the right Use the Zoom slider to zoom in on the image to enlarge your view of the source Zoom ran...

Страница 33: ...ut to update with your custom layout and click on Update Note If you don t want to overwrite an existing preset save that layout to a file on your PC before updating the preset layout with your custom...

Страница 34: ...ion To cascade SPLITMUXs simply connect the output port of any downstream SPLITMUXs to the input port of an upstream SPLITMUX Any input sources will be viewable from the monitor connected at the most...

Страница 35: ...e will determine what video is viewed and audio is heard at the master level regardless of what the custom mode layout is set at The configuration menu for each slave is accessible from the web interf...

Страница 36: ...or disable this users access to the SPLITMUX Note a user that is not enabled will not be able to log in to the SPLITMUX Password enter a password for this user to login with Confirm re enter the pass...

Страница 37: ...c com download d hdmi multiviewer html to a location on your PC 2 Click on the Browse button and locate and select the firmware file for the SPLITMUX splitmux hd 4rt vx x bin for example 3 Click on th...

Страница 38: ...UX This information is particularly helpful when the IP mode is set to DHCP the default setting because it displays the DHCP server assigned settings regardless of the network setting applied on the N...

Страница 39: ...Downloads link will take you to the Firmware Downloads page for the SPLITMUX on the NTI website All versions of firmware for the SPLITMUX will be found there available for immediate download to your...

Страница 40: ...the CPU and the first switch and between each switch as shown in Figure 31 Baud Rate The baud rate can be changed using the OSD menu page 54 using Telnet commands page 36 from the RS232 commands page...

Страница 41: ...below 10 must have a leading 0 ex 1 01 Legend All numbers must be two digits SA Serial Address 01 15 br Baud Rate Code ip Input Port 01 04 CR Carriage Return Hex 0xD mode 01 FULL 02 QUAD 03 PIP 04 CU...

Страница 42: ...ernet Note Telnet must be enabled through the web interface page 18 for a connection via Telnet to be possible To open a telnet session to the SPLITMUX Issue the following command from the command lin...

Страница 43: ...ation page press Enter Be sure to Tab to Save and press Enter when configuration changes are made To return from Save back to a field on the configuration page press Tab From a terminal connection to...

Страница 44: ...pear on the display Mode Configuration Configure how each mode will behave Load Save Layout Choose to save custom layout up to 10 different layouts or load one of saved custom layouts System Informati...

Страница 45: ...provides 3 categories of settings to configure and provides an option to restore the SPLITMUX configuration to default settings Figure 36 Text Menu System Configuration The Unit Settings page provides...

Страница 46: ...115200 bps and the assigned serial address 1 5 Figure 38 Text Menu Serial Port Settings The OSD Screen Settings page provides values for the placement of the OSD menu on your screen Values of the Hori...

Страница 47: ...fault values or not Be careful here but the default answer is No for your protection Figure 40 Text Menu Restore Default Settings Network Configuration The Network Configuration screen Main Menu 3 is...

Страница 48: ...for Static Mode Default Gateway Enter valid default gateway for Static Mode Primary DNS Address Enter preferred name server for Static Mode Alternate DNS Address Enter alternate name server for Stati...

Страница 49: ...ure HTTP requests The default is disabled HTTP Port Port to be used for standard HTTP requests default is 80 HTTPS Port Port to be used for HTTPS requests default is 443 Web Timeout Number of minutes...

Страница 50: ...e user will use to login Password enter a password for this user to login with Confirm re enter the password this user will login with Enabled Yes or No to enable this user to access the SPLITMUX Admi...

Страница 51: ...nput Channel x Port Name Enter a port name to associate with the video source on Input 1 Enable Choose to Enable or Disable the video input for this channel EDID Mode Choose to get EDID data for chann...

Страница 52: ...Port Name Enter a port name to associate with the display Output resolution Select the output resolution to send to the display see table on next page for resolutions to choose from or select Auto to...

Страница 53: ...iguration Audio Output Configuration Input 1 Audio Mode Select the audio mode for the Input between enabled disabled automatic Input 2 Audio Mode Select the audio mode for the Input between enabled di...

Страница 54: ...the SPLITMUX will be presented Mode characteristics will determine how the images will look on the display Figure 50 Text Menu Mode Settings Menu Figure 51 Text Menu Default Mode Configuration Power...

Страница 55: ...unt of time in seconds each channel will appear at full screen range is 0 999 Scan input 1 4 Select Yes or No to include input 1 2 3 or 4 in the scanning sequence Figure 53 Text Menu Quad Mode Setting...

Страница 56: ...el will be in PIP lower right position PIP Horizontal Position Position of PIP images from the right side of the screen range is 0 90 of screen width PIP Vertical Position Position of uppermost PIP fr...

Страница 57: ...border around each input from 0 50 pixels Custom Input Width Select the width of the input in pixels up to 1920 Custom Input Height Select the height of the input in pixels up to 1080 Custom Input Hor...

Страница 58: ...ble saved layouts or load one of up to 10 previously viewed and saved layouts System Information Select System Information from the main menu Main Menu 9 to view the port status network configuration...

Страница 59: ...rd The TAB button is used to move from one field to another in the menus The button is used to advance the field to another option or increase a numeric value by one The button is used to decrement th...

Страница 60: ...he display Mode Configuration Configure how each mode will behave Load Save Layout Load or Save Custom Layout configurations System Information Display firmware version MAC address network settings an...

Страница 61: ...ct a value between 1200 and 115200 bps Serial Address Serial Address for RS232 commands and for the IR Remote select value from 1 15 OSD Screen Settings Horiz Offset Position OSD Horizontal Offset fro...

Страница 62: ...ter preferred name server for Static Mode Alternate DNS Address Enter alternate name server for Static Mode Note If you select DHCP for the mode make sure a DHCP server is running on the network the S...

Страница 63: ...t Settings Input Channel x Port Name Enter a port name to associate with the video source on Input 1 Enable Choose to Enable or Disable the video input for this channel EDID Mode Choose to get EDID da...

Страница 64: ...encrypted or not Auto HDCP Video to all ports is encrypted as long as at least one source is encrypted otherwise none are encrypted Disable HDCP Encrypted video from a source is not passed through at...

Страница 65: ...Hz 640x480 85Hz 1280x720 50Hz 1400x1050 85Hz 1680x1050 60Hz 800x600 60Hz 1280x720 60Hz 1600x1200 50Hz 1920x1200 40Hz 800x600 75Hz 1280x1024 50Hz 1600x1200 60Hz 1920x1200 50Hz 800x600 85Hz 1280x1024 60...

Страница 66: ...to automatically switch from one channel to another Scan time Set the dwell time while scanning the amount of time in seconds each channel will appear at full screen range is 0 999 Scan input 1 4 Sel...

Страница 67: ...channel will be in PIP lower right position PIP Horizontal Position Position of PIP images from the right side of the screen range is 0 90 of screen width PIP Vertical Position Position of uppermost...

Страница 68: ...se the width of the border around the input 0 50 pixels Custom Width Select the width of the input in pixels up to 1920 Custom Height Select the height of the input in pixels up to 1080 Custom Horiz P...

Страница 69: ...can be saved and re loaded as needed System Information Select System Information from the main menu to view the current network settings MAC address and port status This is particularly helpful when...

Страница 70: ...sed to initiate change of mode SYS Pressed to select the desired SPLITMUX to be controlled Only used when controlling multiple systems Must be followed by a system number 1 15 SAVE Pressed to save a c...

Страница 71: ...trolled All switches will have the capability to allow the user to set the switch address 0 15 see page 16 40 or 54 Each switch to be separately controlled must be set to a different address prior to...

Страница 72: ...units connected In order to make edits to the configuration of slave units either change the IP address in the URL bar or double click on the channel where slave units are indicated In Cascade Settin...

Страница 73: ...d through channel 2 Input 2 These are of course IP 192 168 3 125 and IP 192 168 3 183 Any edits made using the web interface configuration menu at this level will directly and only impact the SPLITMUX...

Страница 74: ...iguration of the master or upper level slave click on the appropriate tab Figure 76 View of custom configuration of Slave at IP 192 168 3 183 In Figure 75 we see that there are no slaves connected to...

Страница 75: ...ity 17 to 90 non condensing RH Power 120VAC or 240VAC at 50 or 60Hz 5VDC 3A AC Adapter Power consumption 15W Dimensions WxDxH in SPLITMUX HD 4RT SPLITMUX HD 4RT 2 R w o rackmount kit SPLITMUX HD 4RT 2...

Отзывы: