NordicTrack NTL29010.0 Скачать руководство пользователя страница 24

24

HOW TO USE THE MAINTENANCE MODE

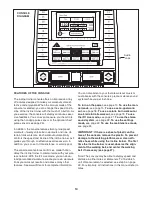
The console features a maintenance mode that allows

you to calibrate the incline and speed of the incline

trainer, restore factory defaults, calibrate the screen,

update the console firmware, and view technical infor-

mation.

1. Select the settings mode.

See step 1 on page 22.

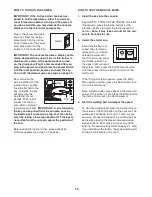
2. Select the maintenance mode.

Press the Maintenance

button in the lower right

corner of the screen to

enter the maintenance

mode.

3. Calibrate the incline system of the incline

trainer.

Press the Calibrate Incline button. The incline

trainer will automatically rise to the maximum in-

cline level, lower to the minimum incline level and

then return to the starting position. This will recali-

brate the incline system. Press the Begin button to

calibrate the incline system or the Cancel button to

return to the maintenance mode. When the incline

system is calibrated, press the Back button.

IMPORTANT: Keep pets, feet, and other objects

away from the incline trainer while the incline is

calibrating. In an emergency, pull the key from

the console to stop the incline calibration.

4. Restore factory defaults.

If necessary, press the Restore Defaults button to

reset the firmware to the original factory firmware.

This will erase all firmware updates that you have

downloaded. Press the Begin button to restore the

default firmware or the Cancel button to return to

the maintenance mode.

When the restoration is complete, the words

PLEASE CYCLE POWER will appear in the grey

box. Press the power switch into the off position.

Wait for several seconds, and then press the

power switch into the reset position. It may take a

minute for the console to be ready for use.

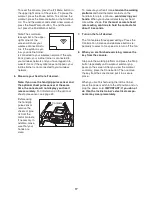
5. Calibrate the screen.

If the screen is not properly calibrated, it will be dif-

ficult to press the buttons on the screen. To cali-

brate the screen, press the Calibrate Screen button

and then press the Begin button. Press the Cancel

button to return to the maintenance mode.

Using a pencil eraser or other small object, press

the center of the small target on the screen. Then,

press the next two targets. After several seconds,

the console will return to the start menu.

6. Calibrate the speed of the incline trainer.

Calibrate the speed of the incline trainer only if in-

structed to do so by an authorized service repre-

sentative.

Note: The Calibrate Speed button may not be en-

abled on your incline trainer.

7. Update the console firmware.

For the best results, regularly check for

firmware updates.

Press the Firmware Update button. Press the

Begin button to check for updates or the Cancel

button to return to the maintenance mode.

A status bar will appear in the grey box on your

screen. When the update is complete, the words

PLEASE CYCLE POWER will appear in the grey

box. Press the power switch into the off position.

Wait for several seconds, and then press the

power switch into the reset position. It may take a

minute for the console to be ready for use.

8. View technical information.

Press the Technical Info button to view the total

number of hours that the incline trainer has been

used and the total number of miles that the walking

belt has moved. After you view the information,

press the Finish button.

9. Exit the maintenance mode.

To exit the maintenance mode, press the Back but-

ton repeatedly.

Содержание NTL29010.0

Страница 1: ...STORE please contact Customer Care IMPORTANT Please register this product see the limited warranty on the back cover of this manual before contacting Customer Care CALL TOLL FREE 1 888 825 2588 Mon Fr...

Страница 2: ...er LIMITED WARRANTY Back Cover NordicTrack is a registered trademark of ICON IP Inc 2 This drawing shows the locations of the warning decals If a decal is missing or illegible call the telephone numbe...

Страница 3: ...ord into a surge suppres sor not included and plug the surge sup pressor into a grounded circuit capable of carrying 15 or more amps No other appliance should be on the same circuit Do not use an exte...

Страница 4: ...5 lbs 20 kg to move the incline trainer 22 Do not change the incline of the incline trainer by placing objects under the incline trainer 23 Inspect and properly tighten all parts of the incline traine...

Страница 5: ...lease see the front cover of this manual To help us assist you note the product model number and serial number before contacting us The model number and the location of the serial number decal are sho...

Страница 6: ...ild non abrasive cleaner Assembly requires the included hex keys and your own Phillips screwdriver and adjustable wrench Use the drawings below to identify the assembly hardware The number in parenthe...

Страница 7: ...cate the Frame Wire Harness 130 and Upright Wire Harness 137 in the Upright 101 access hole Connect the Frame Wire Harness 130 and Upright Wire Harness 137 at the front of the Uprights 101 See the ins...

Страница 8: ...4 1 2 Bolts 96 and the 1 2 x 2 1 2 Bolts 95 on both sides 95 101 56 96 124 4 3 Slide the Uprights 101 onto the Base Frame 56 and align the holes in the Uprights with the holes in the Base Frame Be ca...

Страница 9: ...fully tighten the Bolts yet Remove wire the tie from the Upright Wire Harness 137 6 129 51 92 101 101 137 Wire Tie 51 92 5 106 104 131 5 Set the Console Cover 104 face down on a soft surface Remove t...

Страница 10: ...Washers 88 Do not fully tighten the Patch Bolts yet Attach the Right Pulse Handrail 125 to the right Upright 101 as described above Then tighten all four Patch Bolts 98 8 125 103 109 98 107 Hole 88 88...

Страница 11: ...near the Console Cover 104 Insert the wires from the Console through the indicated hole Connect the Upright Wire Harness 137 the Left and Right Pulse Wires 107 109 and the Ground Wire 116 to the wires...

Страница 12: ...1 Attach the Console Back 106 to the Console Cover 104 with two 8 x 1 1 2 Screws 131 and twelve 8 x 3 4 Screws 29 Start all four teen Screws and then tighten each of them Do not overtighten the Screws...

Страница 13: ...is product s power cord has an equip ment grounding conductor and a grounding plug Plug the power cord into a surge suppressor and plug the surge suppressor into an appropriate outlet that is properly...

Страница 14: ...ts create your own workouts track your workout results and access many other features See www iFit com for complete information You can also listen to your favorite workout music or audio books with t...

Страница 15: ...tion of the clip Before using the incline trainer please check for firmware updates see step 7 on page 24 HOW TO USE THE MANUAL MODE 1 Insert the key into the console See HOW TO TURN ON THE POWER at t...

Страница 16: ...eed will be 12 mph when the incline is from 15 5 to 25 the maximum speed will be 8 mph when the incline is from 25 5 to 30 the maximum speed will be 6 mph 5 Monitor your progress The console offers se...

Страница 17: ...nsor see page 23 Before using the handgrip pulse sensor remove the sheets of plas tic from the metal contacts if necessary In addition make sure that your hands are clean To measure your heart rate st...

Страница 18: ...he workout 4 Start the workout Press the Start Workout button to start the work out A moment after you press the button the walk ing belt will begin to move Hold the handrails and begin walking The wo...

Страница 19: ...workout and the number of vertical feet you will climb In addition the screen will show a topographic map of the trail Press the Profile button at the top of the screen near the time display to view a...

Страница 20: ...utton or the Start button The walking belt will begin to move at 1 mph When the next segment of the workout begins the incline trainer will automatically adjust to the speed and incline settings for t...

Страница 21: ...These limits are designed to provide reasonable protection against harmful interfer ence in a residential installation This equipment gen erates uses and can radiate radio frequency energy and if not...

Страница 22: ...e screen to select the settings mode 2 Select the wireless network mode Press the Wireless Network button on the screen You must have your own wireless network and an 802 11b router with SSID broadcas...

Страница 23: ...letter keyboard press the ABC button To capitalize a character press the button with an up ward facing arrow To clear the last character press the button with a backward facing arrow and an X When yo...

Страница 24: ...r several seconds and then press the power switch into the reset position It may take a minute for the console to be ready for use 5 Calibrate the screen If the screen is not properly calibrated it wi...

Страница 25: ...e Tip the incline trainer back until it rolls freely on the wheels CAUTION To de crease the possibility of injury or of damage to the incline trainer do not lift the incline trainer by the front cover...

Страница 26: ...ff during use SOLUTION a Check the power switch see the drawing above If the switch has tripped wait for five minutes and then press the switch back in b Make sure that the power cord is plugged in If...

Страница 27: ...nsert the key and use the incline trainer for a few minutes Repeat until the walking belt is centered c If the walking belt slips when walked on Remove the key and unplug the power cord Using a 7 32 h...

Страница 28: ...If your goal is to strengthen your cardiovascular system you must perform aerobic exer cise which is activity that requires large amounts of oxygen for prolonged periods of time For aerobic ex ercise...

Страница 29: ...lles Stretch With one leg in front of the other reach forward and place your hands against a wall Keep your back leg straight and your back foot flat on the floor Bend your front leg lean forward and...

Страница 30: ...Motor Spacer 43 4 Drive Motor Washer 44 4 Drive Motor Bolt 45 1 Sensor Bracket 46 2 Speed Sensor Nut 47 1 Speed Sensor 48 2 Speed Sensor Bolt 49 2 Sensor Bracket Bolt 50 2 Sensor Bracket Insert 51 4...

Страница 31: ...Spacer 120 2 1 2 Electronics Screw 121 2 Caution Decal 122 1 Hazardous Warning Decal 123 1 Right Accessory Tray 124 4 1 2 Silver Star Washer 125 1 Right Pulse Handrail 126 3 1 2 Stand off 127 1 Acces...

Страница 32: ...RAWING A Model No NTL29010 0 R0710A 32 1 2 3 4 5 6 7 8 9 4 20 5 2 16 2 16 5 14 19 17 12 13 18 20 5 19 5 5 14 1 4 9 2 4 3 5 8 7 6 3 4 22 11 10 25 26 27 23 24 30 16 32 30 28 16 67 27 25 24 10 4 3 21 97...

Страница 33: ...0 39 38 81 77 78 79 38 39 37 91 76 72 73 75 71 69 74 56 62 41 132 55 58 54 5 53 55 54 44 43 42 57 52 44 43 42 43 42 50 49 45 46 48 47 57 58 61 60 59 85 85 85 70 122 121 89 80 80 81 82 84 83 89 121 33...

Страница 34: ...110 110 93 111 103 100 110 111 93 110 93 111 125 109 117 105 98 101 137 98 95 95 96 124 127 134 137 95 96 124 112 100 88 88 51 51 92 92 92 92 31 31 105 117 58 58 57 34 EXPLODED DRAWING C Model No NTL...

Страница 35: ...94 115 102 104 113 116 29 118 123 99 129 131 106 29 131 99 29 29 29 29 29 29 29 29 29 29 29 29 29 29 29 29 131 131 35 EXPLODED DRAWING D Model No NTL29010 0 R0710A...

Страница 36: ...p charge This warranty does not extend to any damage to a product caused by or attributable to freight damage abuse misuse improper or abnormal usage or repairs not provided by an ICON authorized serv...

Отзывы: