background image

18

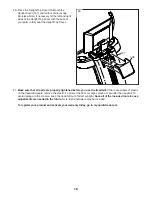
21. Make sure that all parts are properly tightened before you use the treadmill. If there are sheets of plastic 

on the treadmill decals, remove the plastic. To protect the floor or carpet, place a mat under the treadmill. To 

avoid damage to the console, keep the treadmill out of direct sunlight. Save all of the included tools in case 

adjustments are needed in the future. Note: Extra hardware may be included.


To register your product and activate your warranty today, go to my.nordictrack.com.

20

108

107

20. Press the Upright Top Cover (108) onto the 

Upright Cover (107) until all four corners snap 

into place. Note: If necessary, hit the left and right 

sides of the Upright Top Cover with the base of 

your palm to fully seat the Upright Top Cover.

Содержание Commercial X22i

Страница 1: ... all precautions and instructions in this manual before using this equipment Keep this manual for future reference nordictrack com To register your product and activate your warranty today go to my nordictrack com For service at any time go to my iFIT com Or call 1 833 680 IFIT 1 833 680 4348 Mon Fri 6 a m 6 p m MT Sat 8 a m 12 p m MT Please do not contact the store ...

Страница 2: ...locations of the warning decals If a decal is missing or illegible call the telephone number on the front cover of this manual and request a free replacement decal Apply the decal in the location shown Note The decals may not be shown at actual size The decals are attached to both sides of the treadmill NORDICTRACK and IFIT are registered trademarks of iFIT Inc The Bluetooth word mark and logos ar...

Страница 3: ...ill at a time 13 Wear appropriate exercise clothes while using the treadmill Do not wear loose clothes that could become caught in the treadmill Athletic support clothes are recom mended for both men and women Always wear athletic shoes Never use the treadmill with bare feet wearing only stockings or in sandals 14 Plug the power cord into a surge suppressor not included and plug the surge suppres ...

Страница 4: ... not attempt to move the treadmill until it is properly assembled See ASSEMBLY on page 8 and HOW TO MOVE THE TREADMILL on page 31 You must be able to safely lift 45 lbs 20 kg to move the treadmill 26 Do not change the incline of the treadmill by placing objects under the treadmill 27 Never insert any object into any opening on the treadmill 28 Inspect and properly tighten all parts each time the t...

Страница 5: ...5 all STANDARD SERVICE PLANS ...

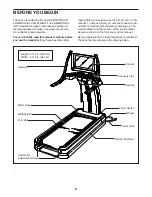
Страница 6: ...the front cover of this manual To help us assist you note the product model number and serial number before contacting us The model number and the location of the serial number decal are shown on the front cover of this manual Before reading further please familiarize yourself with the parts that are labeled in the drawing below BEFORE YOU BEGIN Handrail Console Key Clip Accessory Tray Power Switc...

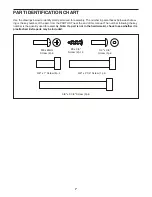
Страница 7: ...of the part from the PART LIST near the end of this manual The number following the key number is the quantity used for assembly Note If a part is not in the hardware kit check to see whether it is preattached Extra parts may be included 8 x 3 4 Screw 2 14 3 8 x 2 1 4 Screw 1 6 3 8 x 1 Screw 6 4 3 8 x 3 3 4 Screw 3 6 M6 x 20mm Screw 4 6 1 4 x 3 4 Screw 5 4 ...

Страница 8: ... the exterior of the treadmill This is normal If there is an oily substance on the treadmill wipe it off with a soft cloth and a mild non abrasive cleaner Left parts are marked L or Left and right parts are marked R or Right To identify small parts see page 7 Assembly requires the following tools the included hex keys one Phillips screwdriver one adjustable wrench one pair of scissors To avoid dam...

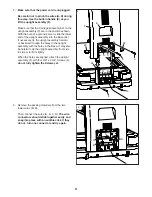
Страница 9: ...sembly forward or backward to align the holes in the upright assembly with the holes in the Base It may also be helpful to tip the upright assembly from side to side or to lift it slightly When the holes are aligned attach the upright assembly F with four 3 8 x 3 3 4 Screws 3 do not fully tighten the Screws yet 3 3 3 3 82 82 64 F 3 Remove the packing materials from the two lower wires B D Then con...

Страница 10: ...Frame 83 If necessary grip both sides of the frame assembly H near the rear and push forward or pull backward to align the holes It may also be helpful to move the frame assembly from side to side or to lift the frame assembly slightly Attach each Carriage Bracket 82 with two 3 8 x 1 Screws 6 only one side is shown start all four Screws and then tighten them as firmly as possible H 82 83 5 ...

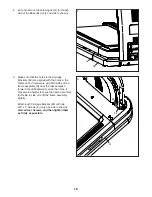
Страница 11: ...Screws 3 Then remove the yellow shipping screw I from each side of the treadmill only one side is shown Discard the shipping screws 7 Press the Motor Hood Cover 65 down onto the Motor Hood 66 until all four corners and the center snap into place I 65 66 3 3 ...

Страница 12: ...o the opening in the upright assembly F Attach the Upright Panel with two 8 x 3 4 Screws 2 Be careful not to overtighten the Screws 2 F 109 2 9 9 Remove the two indicated wingnuts W and bolts J and lift out the shipping tube K Discard these parts K J J W W ...

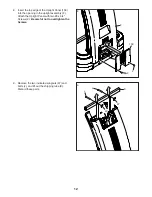
Страница 13: ... N with two 3 8 x 2 1 4 Screws 1 and two 3 8 x 3 3 4 Screws 3 IMPORTANT Insert the Screws horizontally not at an angle into the upper holes O Start all four Screws and then tighten them L M O 1 3 N F 1 3 11 11 Connect the two indicated wires L M The wire connectors should slide together easily and snap into place with an audible click If they do not turn one connector and try again L M ...

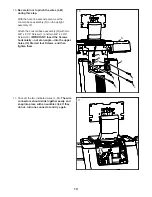
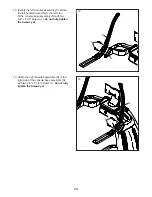
Страница 14: ...the left side of the console base assembly N with two 3 8 x 2 1 4 Screws 1 do not fully tighten the Screws yet 12 1 N P 13 Attach the right handrail assembly Q to the right side of the console base assembly N with two 3 8 x 2 1 4 Screws 1 do not fully tighten the Screws yet 1 13 N Q ...

Страница 15: ...ated 3 8 x 2 1 4 Screws 1 5 5 R P Q 14 15 Tip It may be helpful to use a short phillips screwdriver for this step Identify the Left Handrail Cover 110 Attach the Left Handrail Cover to the left handrail assembly P with four 8 x 3 4 Screws 2 start all four Screws and then tighten them Be careful not to overtighten the Screws Attach the Right Handrail Cover not shown to the right side in the same wa...

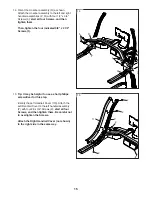
Страница 16: ...four Screws and then tighten them Be careful not to overtighten the Screws 16 119 120 2 17 Be careful not to pinch any wires during this step With the help of a second person attach the con sole assembly S to the Console Plate 133 with six M6 x 20mm Screws 4 start all six Screws and then tighten them 133 4 S 17 4 ...

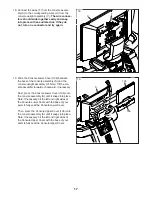
Страница 17: ...and the console upright assembly V Note Tilt the con sole assembly forward or backward if necessary Next press the Console Lower Cover 136 onto the console assembly S until it snaps into place Note If necessary hit the left and right sides of the Console Lower Cover with the base of your palm to fully seat the Console Lower Cover Then press the Console Upper Cover 135 onto the console assembly S u...

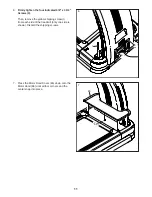
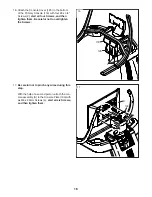
Страница 18: ...ill out of direct sunlight Save all of the included tools in case adjustments are needed in the future Note Extra hardware may be included To register your product and activate your warranty today go to my nordictrack com 20 108 107 20 Press the Upright Top Cover 108 onto the Upright Cover 107 until all four corners snap into place Note If necessary hit the left and right sides of the Upright Top ...

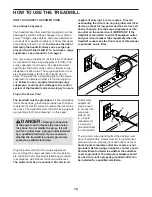
Страница 19: ...rd B into a surge suppressor A and plug the surge suppressor into an appropri ate outlet D that is properly installed and grounded in accordance with all local codes and ordinances The outlet must be on a nominal 120 volt circuit capable of carrying 15 or more amps To avoid overloading the circuit do not plug other electrical devices except for low power devices such as cell phone chargers into th...

Страница 20: ...bscription you can enjoy unlimited access to iFIT s library of thousands of studio and destination workouts You can even create your own workouts record your workout results set and track fitness goals and access many other features When you use the manual mode of the console you can change the speed and incline of the treadmill with the touch of a button As you exercise the console will display i...

Страница 21: ... see HOW TO CHANGE CONSOLE SETTINGS on page 28 For simplicity all instructions in this section refer to miles HOW TO USE THE TOUCH SCREEN The console features a tablet with a full color touch screen The following information will help you become familiar with the tablet s advanced technology The console functions similarly to other tablets You can slide or flick your finger against the screen to m...

Страница 22: ...e The console will check for firmware updates See step 5 on page 29 for more information 5 Calibrate the incline system First touch the menu button three horizontal lines symbol touch Settings touch Maintenance touch Calibrate Incline and then touch Begin to calibrate the incline system See step 6 on page 29 for more information The console is now ready for you to begin working out The following p...

Страница 23: ...speed setting that includes a decimal press two numbered buttons in succession For example to select a speed setting of 3 5 mph press the 3 but ton and then immediately press the 5 button Note This feature will not function when the console is set to metric units 4 Change the incline of the treadmill as desired To change the incline of the treadmill press the incline increase and decrease buttons ...

Страница 24: ...h to exit to the home screen Then remove the key from the console and put it in a secure place When you are finished using the treadmill press the power switch into the off position and unplug the power cord IMPORTANT If you do not do this the treadmill s electrical components may wear prematurely HOW TO USE THE SLED PUSH FEATURE 1 Insert the key into the console See HOW TO TURN ON THE POWER on pa...

Страница 25: ...ation and distance of the workout and the approximate number of calories you will burn during the workout 4 Start the workout Touch Start Workout to start the workout During some workouts an iFIT coach will guide you through a video workout Tap the screen to select separate music trainer voice and volume options for the workout During some workouts the screen will show a map of the route and a mar...

Страница 26: ... draw your own map workout touch Create on the screen 3 Draw your map Navigate to the area on the map where you want to draw your workout by sliding your fingers on the screen Tap the screen to add the start point for your workout Then tap the screen to add the end point for your workout Note If you want to start and end the workout at the same point use the Close Loop or Out Back options You can ...

Страница 27: ...kout library Touch the buttons at the bottom of the screen to select either the home screen Home button or the workout library Browse button To select an iFIT workout from the home screen or the workout library simply touch the desired work out button on the screen Slide or flick the screen to scroll upward or downward if necessary The featured iFIT workouts shown on the home screen will change pe...

Страница 28: ...exercising remove the key from the console See step 7 on page 24 For more information about iFIT go to iFIT com HOW TO CHANGE CONSOLE SETTINGS IMPORTANT Some of the settings and features described may not be enabled Occasionally a firmware update may cause your console to function slightly differently 1 Select the settings menu First turn on the power and insert the key into the console see HOW TO...

Страница 29: ... treadmill off wait for a few seconds and then turn it back on again Note It may take a few minutes for the console to be ready for use Note Occasionally a firmware update may cause the console to function slightly differently These updates are always designed to improve your exercise experience 6 Calibrate the incline system of the treadmill Touch Calibrate Incline and then touch Begin to calibra...

Страница 30: ...1 When the console is connected to your wireless network a checkmark will appear next to the wire less network name To disconnect from a wireless network touch and hold the name of the wireless network and then touch Forget If you are having problems connecting to an encrypted network make sure that your password is correct Note Passwords are case sensitive Note The console supports unsecured and ...

Страница 31: ...tion This equipment generates uses and can radiate radio frequency energy and if not installed and used in accordance with the instructions may cause harmful interference to radio communications However there is no guarantee that interference will not occur in a particular installation If this equipment does cause harmful interference to radio or television reception which can be determined by tur...

Страница 32: ... the treadmill is connected to an AFCI equipped outlet and your circuit breaker trips repeatedly when the treadmill is used see the front cover of this manual to purchase an arc filter b After the power cord has been plugged in make sure that the key is inserted into the console c Check the power switch located on the treadmill frame near the power cord If the switch protrudes as shown A the switc...

Страница 33: ...s a walking belt coated with high performance lubricant IMPORTANT Never apply silicone spray or other substances to the walking belt or the walking platform unless instructed to do so by an authorized service representative Such substances may deterio rate the walking belt and cause excessive wear If you suspect that the walking belt needs more lubricant see the front cover of this manual d If the...

Страница 34: ...zes and does not respond reset the console to the factory default settings IMPORTANT Doing this will erase all of the custom settings you have made to the console Resetting the console requires two people First press the power switch into the off position Next locate the small reset opening E on the top of the console Using a bent paper clip F press and hold the reset button inside the opening and...

Страница 35: ...system you must perform aerobic exercise which is activity that requires large amounts of oxygen for prolonged periods of time For aerobic exercise adjust the intensity of your exercise until your heart rate is near the highest number in your training zone HOW TO MEASURE YOUR HEART RATE To measure your heart rate exercise for at least four minutes Then stop exercis ing and place two fingers on you...

Страница 36: ...6 1 Incline Motor Bottom Cover 47 1 Rear Incline Motor 48 4 Rear Incline Motor Bushing 49 2 Lift Frame Link 50 8 Thick Lift Frame Bushing 51 4 Thin Lift Frame Pivot Bushing 52 1 Lift Frame 53 4 1 Grommet 54 19 Cable Tie 55 4 Base Foot 56 1 Rear Frame Cover 57 1 Belly Pan 58 1 Front Frame Cover 59 1 Power Cord Grommet 60 1 Power Cord 61 2 Wheel 62 1 Power Switch Bracket 63 1 Power Switch 64 1 Base ...

Страница 37: ...e Bottom Right Cover 127 1 Console Base Top Left Cover 128 1 Console Base Bottom Left Cover 129 1 Crossbar Frame 130 1 Crossbar Top 131 1 Console 132 1 Pivot Cover 133 1 Console Plate 134 1 Pivot Back Cover 135 1 Console Upper Cover 136 1 Console Lower Cover 137 1 Console Upright Front Cover 138 1 Console Upright 139 1 Console Upright Rear Cover 140 1 Pivot Bracket Cover 141 1 Console Pivot Bracke...

Страница 38: ... 18 37 37 50 49 52 19 37 32 50 51 51 50 15 18 18 55 50 32 32 64 18 58 55 18 14 18 18 61 36 59 63 14 20 20 57 30 11 31 50 7 7 53 37 66 65 18 20 67 37 55 19 30 55 19 19 20 30 18 18 20 67 20 20 67 20 18 67 20 20 62 60 19 20 19 19 19 19 19 36 61 18 EXPLODED DRAWING A Model No NTL29222 2 R0522B ...

Страница 39: ...3 76 76 25 19 19 19 19 19 22 16 77 19 80 40 6 82 82 19 19 6 143 79 81 19 19 19 81 40 37 35 73 78 73 37 35 22 17 17 17 7 88 16 76 73 37 35 76 54 19 19 19 19 19 19 50 13 19 19 53 76 86 87 85 19 24 84 24 142 142 41 25 142 41 24 19 83 17 17 17 19 24 37 35 50 81 54 16 81 143 33 13 84 154 24 20 152 153 147 147 ...

Страница 40: ... R0522B 1 1 3 3 3 3 3 3 95 18 20 20 20 18 18 18 18 18 18 20 20 20 20 30 21 92 99 9 91 20 97 23 23 8 100 8 23 23 54 105 19 23 18 23 18 102 104 102 103 9 54 18 23 18 89 21 21 54 19 19 54 19 93 21 18 18 23 21 21 21 23 101 23 20 151 20 149 150 148 ...

Страница 41: ...NG D Model No NTL29222 2 R0522B 2 2 106 96 18 20 98 21 21 108 109 107 21 21 91 21 92 21 20 20 18 90 18 18 20 67 18 18 20 67 20 67 67 67 20 20 20 67 18 67 18 18 18 21 20 20 20 30 20 67 94 21 21 20 20 20 67 18 18 20 67 20 ...

Страница 42: ...2 2 110 119 18 120 18 117 112 115 116 111 118 20 20 20 18 129 18 18 18 122 18 18 18 113 18 114 19 19 19 114 20 18 123 21 21 21 18 121 18 125 18 19 127 128 130 126 19 19 19 18 18 18 124 24 146 EXPLODED DRAWING E Model No NTL29222 2 R0522B ...

Страница 43: ...43 4 4 4 4 131 132 29 44 26 133 20 67 20 67 134 20 67 67 136 135 137 39 27 27 38 42 43 42 141 138 28 28 19 140 34 67 67 44 20 20 20 139 26 67 20 19 20 EXPLODED DRAWING F Model No NTL29222 2 R0522B ...

Страница 44: ...rchased or transported outside the USA 3 if any instruction or warning in this manual is not followed 4 if the product is abused or improperly or abnormally used 5 if the product is modified to alter function ality or capability without the written permission of iFIT or 6 if the product is used for commercial or rental purposes No other warranty beyond that specifically set forth above is authoriz...

Отзывы: