background image

© 2006 Nordic ID oy
RF651 User Manual  


Version 1 

June 2006

39

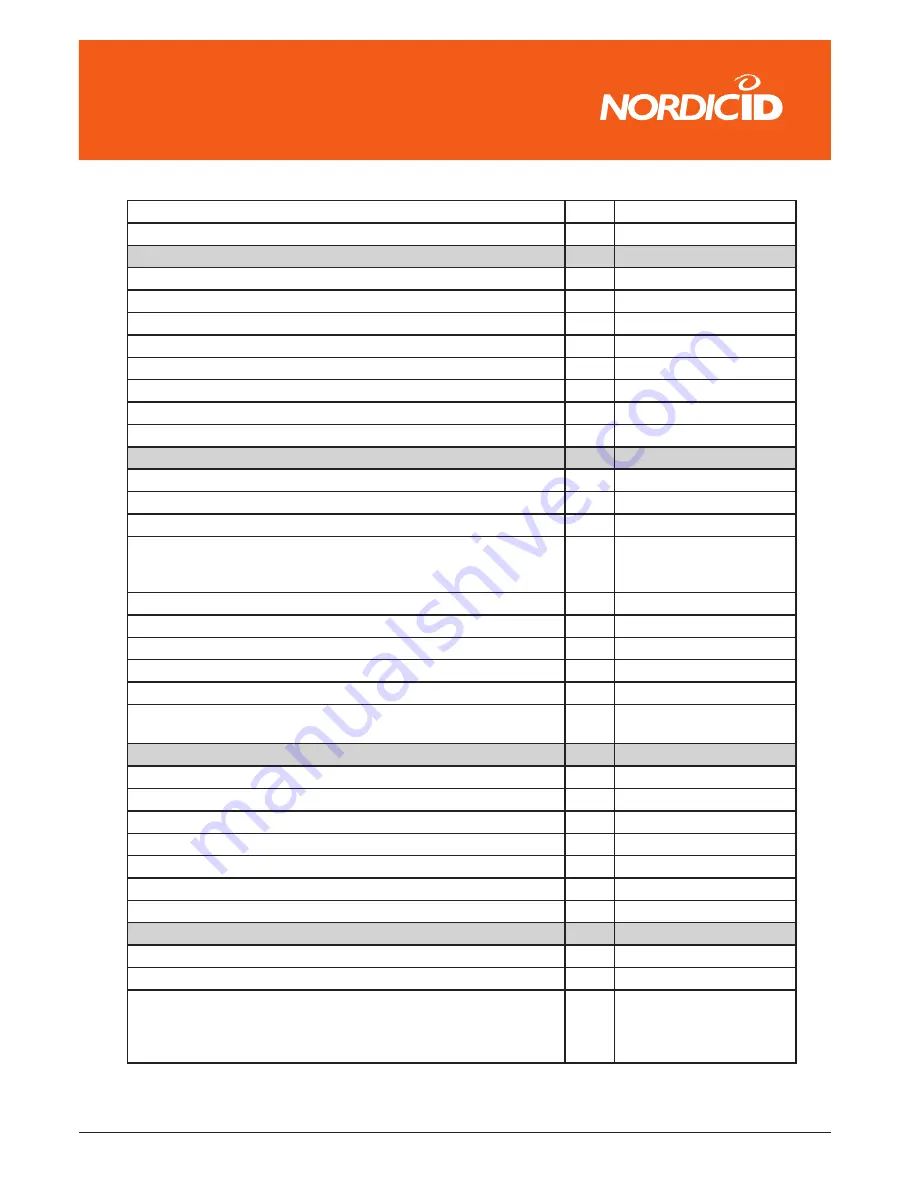
���������������

 length L3  

 52    0  

 length mode  

 53    L1 as minimum length  

MSI Code = 0x46

 activation  

 40    disabled  

 symbology identifier  

 C0    “ B8 “  

 check digit verification  

 4C    Modulo 10  

 check digit transmission  

 54    enabled  

 length L1  

 50    6  

 length L2  

 51    0  

 length L3  

 52    0  

 length mode  

 53    L1 as minimum length  

PDF417 / MicroPDF417 = 0x4C

 PDF417 activation  

 40    enabled  

 control header  

 58    not transmitted  

 file name  

 59    not transmitted  

 segment time stamp sender  

 5A 

5B 
5C  

 not transmitted 
not transmitted not 
transmitted  

 Addressee  

 5D    not transmitted  

 file size  

 5E    not transmitted  

 checksum  

 5F    not transmitted  

 MicroPDF417 activation  

 42    disabled  

 MicroPDF417 Code 128 emulation  

 45    disabled  

 PDF417 symbology identifier MicroPDF417 symbology identifier  

 C0 

C1  

 “ C7 “ “ C8 “  

Plessey Code = 0x47

 activation  

 40    disabled  

 symbology identifier  

 C0    “ C2 “  

 check digit transmission  

 54    disabled  

 length L1  

 50    0 (any length)  

 length L2  

 51    0  

 length L3  

 52    0  

 length mode  

 53    L1 as minimum length  

RSS = 0x4F

 RSS-14 activation  

 40    disabled  

 RSS Limited activation  

 41    disabled  

 RSS Expanded activation RSS-14 symbology identifier RSS Limited 
symbology identifier RSS Expanded symbology identifier  

 42 

C0 
C1 
C2  

 disabled “ C3 “ “ C4 “ “ 
C5 “  

Содержание RF651

Страница 1: ...Nordic ID RF651 USER MANUAL ...

Страница 2: ......

Страница 3: ...ranty and Safety Warnings 3 User Safety 5 Medical Equipment Compatibility 5 Care and Cleaning of the RF651 5 1 The System 6 1 1 Bluetooth 6 1 2 System Description 6 1 3 Principles of Operation 7 1 4 Operation of the Handheld Terminal 7 1 5 Security 8 2 RF651 Handheld Terminal 8 2 1 RF651 Main Features 8 2 2 Communication Requirements 9 2 3 Type Plate 9 2 4 Scanner 10 ...

Страница 4: ...Router 14 3 5 Preparing the RF651 for connection with a Port Router 14 3 6 Initial Display 15 3 6 1 Display Symbols 15 3 6 2 Status Messages 15 3 7 Function Keys 16 3 8 Input Fields 16 3 8 1 Filling Fields with the scanner 16 3 8 2 Locked Fields Buttons 17 3 8 4 Writing Letters 17 3 8 5 Removing Letters 17 3 8 7 Locking the Keyboard 17 3 9 Installing a demonstration environment 17 Preparing the Ch...

Страница 5: ...Indicators 25 5 5 Charging the Batteries 26 5 5 2 Audible Signals and the LED Indicator on the Charger 27 6 Application Development 27 7 Warranty Support Service 27 7 1 Warranty Coverage 27 7 2 Returning the Unit for Service 28 7 3 Extending the Normal Warranty 28 APPENDIX A Troubleshooting 29 APPENDIX C Introduction to the Linear Imager 30 APPENDIX D Programming the Scan Engine 31 APPENDIX B Intr...

Страница 6: ...ic ID will not be held responsible for any injuries or damage resulting from use in contradiction with the safety related instructions stated elsewhere within this manual or which are in contradiction to the general safety Manual lines relating to Class II laser devices Nordic ID urges its customers to arrange proper and adequate user training which includes safety issues for any personnel using p...

Страница 7: ...asonable protection against harmful interference in a residential installation FCC NOTICE Use only the power cord and connector cables supplied by Nordic ID to connect the equipment and the power supply Use only shielded cables to connect I O devices to this equipment Changes or modifications not expressly approved by the party responsible for compliance could void the user s authority to operate t...

Страница 8: ...re the possible loss of data or unwanted changes to data contents are not acceptable such as in life support related systems Warranty will be void if the product is used in any way which is in contradiction with the instructions given in this User Manual or if the housing of the Nordic ID RF651 has been opened or has been tampered The devices mentioned in this manual are to be used only according ...

Страница 9: ...nto the laser module when the beam is active In Accordance with EN 60825 1 A2 2001 IEC 60825 1 Ed 1 2 2001 08 650 nm laser max 1 mW output ENGLISH SUOMI LASER LIGHT VAARA LASERSATEILYÄ DO NOT STARE INTO BEAM ÄLÄ TUIJOTA SÄTEESEEN CLASS 2 LASER LUOKKA 2 LASER DEUTSCH SVENSKA LASERSTRAHLEN VARNING LASERSTÅLNING NICHT DIREKTIN DEN LASERSTRAHL STIRRA EJ IN I STRÅLEN SCHAUEN LASERPRODUKT DER KLASSE 2 K...

Страница 10: ...The scanner will stay on or it will automatically turn off depending on the scanning options which have been selected prior to activating the scan function During normal operation the beam will be switched off immediately after the barcode has been read successfully Medical Equipment Compatibility Medical devices such as pacemakers hearing aids etc are usually manufactured according to the IEC 601...

Страница 11: ...radio link using a globally defined frequency band 2 4 GHz ISM band It has been specifically designed as a low cost and low power radio technology which is particularly suited to short range Personal Area Network PAN applications It is the design focus on low cost low size and low power which distinguishes it from the IEEE 802 11 wireless LAN technology For more information please see the Internet a...

Страница 12: ...to use The commands used to generate modify read and write the forms are described in a document called RF series system developer guide When no forms are used the initial screen of the Hand Terminal shows as a prompt a user writeable header and an input field This field can be filled with data from the keyboard or from the scanner Any text sent by the Host Computer will clear the screen and show the...

Страница 13: ...tation on the Nordic ID RF651 system is based on three factors PIN code 0000 9999 The PIN code defines the Nordic ID RF651 network The PIN code must be the same in the Bluetooth Dongle installed into the Host Computer or on the Bluetooth Access Server s and in the Hand Terminal before they can communicate with each other Bluetooth data link encryption Authorizing scheme at the application side This...

Страница 14: ...d input data or read data to and from the Host Application 2 2 Communication Requirements The RF651 Hand Terminal can communicate with a Host Application when all of the following requirements are met When using the Bluetooth Dongle The Bluetooth Dongle is connected to the Host Computer s USB port and the Bluetooth driver and software are installed and configured properly When using an Access Serve...

Страница 15: ... activated upon pressing the SCAN button The activation of the scanner is also controlled by the currently active input field allow reader activation do not allow reader activation The linear Imager uses the imaging technology to encode the symbology The linear imager encodes the most common barcode types and stacked codes The status message below is visible when the laser reader module is activate...

Страница 16: ... F1 F5 OK shift and Up Down movement key 12 alpha numeric keys and a DEL key Scan key Function keys F1 F5 Alpha numeric keys Del key Up down movement key charging indicator OK key 2 7 Connectors The connectors are located at the bottom of the RF651 Charging connectors I O connector Fig The keyboard of the RF651 Fig Connectors of the RF651 ...

Страница 17: ... channel resending times reception timelimit and what behaviour settings The RF651 needs to be set up for the Bluetooth connection with the USB adapter or the Access Server Use the up down keys to highlight a specific item from the list and press OK key to select it 3 2 Connecting to the Access Server This section describes how to create the Bluetooth connection with the Access Server It is assumed...

Страница 18: ...the Access Server must be known Inquiring Access Servers within the coverage area of the Hand Terminal Select Search and press the OK button in order to start the inquiry process Inquiry will take approximately 10 20 seconds Bluetooth radio module inside the Hand Terminal will now search ALL available Bluetooth devices within the coverage area Note that unwanted Bluetooth devices might also be fou...

Страница 19: ...sets first and then connects to the latest connected device automatically 3 3 Using RF651 with the USB Bluetooth Adapter This section describes how to create the Bluetooth connection with the USB adapter Dongle It is assumed that all configurations and settings are already made on the Dongle and Host Application side The RF651 Hand Terminal HT can communicate via a Bluetooth USB adapter Dongle In or...

Страница 20: ...n 3 6 1 Display Symbols Sometimes the following symbols are shown on the right side of the display SHIFTLOCK This symbol indicates the status of the SHIFTLOCK key The status can be changed by pressing the SHIFT key When visible the shift function of the keyboard is active making it possible to enter letters instead of numbers TRANSACTION This sign shows up when the Hand Terminal is communicating w...

Страница 21: ...D RF651 Hand Terminal has a virtual display page of 12 x 20 characters The actual display size is 8 x 20 characters thus 2 3 of the virtual page can be viewed at a time Rows may be scrolled by pressing the up down keys accordingly Depending on the Host Application the Host Application can send fields to the Hand Terminal These fields may be filled by using the keyboard or the scanner Fields are under...

Страница 22: ...ers are also printed into the keys When a key is pressed once the first printed letter on the key will be generated When pressed quickly twice the second letter printed on the key will be generated etc Pressing a key for at least 1 2 seconds will change the letter from uppercase to lowercase and vice versa 3 8 5 Removing Letters Letters can be removed from a field with the DEL key Pressing the DEL k...

Страница 23: ...are installed including WIDCOMM s one not shipped in the RF651 package it is STRONGLY RECOMMENDED that it will be uninstalled before you install WIDCOMM Bluetooth software from the CD delivered in the RF651 package If you are installing with a clean sheet including exception of Microsoft s Bluetooth software installed Press the Install WIDCOMM Bluetooth software 4 0 1 xxxx button and follow the in...

Страница 24: ...dit field and press StartServer button Green text Clients 1 should now appear in to the FastInventory screen If firewall is enabled a security alert window appears Press the Unlock button in order to allow the TCP IP connection between the Port Router and the FastInventory Do not close the FastInventory or the PortRouter application You can hide those to the system tray by pressing the Hide window b...

Страница 25: ... the barcode or key in the barcode number to field code If you key in the barcode with the keyboard send the information to the host application by pressing OK The scan key sends the information automatically If you select the time and RF651 ID tags on FastInventory the time and RF651 comm ID are saved to the inventory file Open the inventory file with Open and Notepad button Note that the txt file is...

Страница 26: ...ignalled by a beep Settings Managing Bluetooth connections Adjustments Contrast Volume Keypad tone and Battery type adjustments Info Firmware version info and battery status Laser conf Configuring and testing the laser scanner 4 1 Settings Settings contain functionalities for managing Bluetooth connections After selecting Settings from the Main Menu a 4 digit password is required Usually only a rep...

Страница 27: ...nnection again by selecting Connect and pressing the OK button again It may be necessary to repeat this procedure several times before the selected device is actually detected Save The user can edit Name and Addr field manually After modifying the user can save information of the device in to the Hand Terminal memory Device list appears after selecting Save and pressing OK button Delete Deleting a ...

Страница 28: ... 4 1 4 RF settings This menu opens a submenu of the radio settings of the device The submenu contains 4 elements Channel Resending times Reception timelimit and What behaviour Channel When using several Hand Terminals simultaneously with an Access Server each of the Hand Terminals must use different channels Channel numbers between 5 and 31 may be used Resending times If the hand terminal doesn t ...

Страница 29: ... frequency Level 3 is default Level 0 No sounds at all Level 6 Highest possible sound level Frequency 0 255 Default 82 4 2 4 Battery Type Battery type Set to 0 if using NiMH rechargeable batteries Set to 1 when using alkaline non rechargeable batteries 4 3 Information Header Device name and Firmware Version SNO Communication ID CommID is the serial number of the unit Battery Battery charge level F...

Страница 30: ... 1 5 V batteries or by using NiMH type AA size rechargeable batteries Note that the only approved type of rechargeale batteries is listed under topic Warranty and safety warnings in this manual When using NiMH type batteries an optional Desk Top Charger can be used to charger the batteries The information in this chapter applies to the single Hand Terminal Desk Top Charger DTC05 but applies also b...

Страница 31: ...ies WARNING Do not attempt to charge regular or alkaline batteries as this may cause an explosion Do not place a defective Hand Terminal into the charger NOTICE The Desk Top Charger may only be used with the Power Supply types JODEN ELECTRON Co Ltd Models JOD 4101 031 JOD 41B 029 JOD 41U 14A or POWERBOX Model EBH01 119 B1 The Hand Terminal cannot be used during battery charging It is normal for th...

Страница 32: ...polarity marked on the Hand Terminal label inside the battery compartment and then try again If Charging failure message appears every time when placing the Hand Terminal into the charger it is possible that the Desk Top Charger does not work properly It is also possible that the Hand Terminal causes the Charging Failure message 5 5 2 Audible Signals and the LED Indicator on the Charger The status...

Страница 33: ...e returned to the Manufacturer for repair in case the System Integrator or the local Nordic ID dealer cannot help with the problem Each party will bear the cost of freight of the Product to be repaired to the intended destination Please include a detailed description of the problem encountered and a copy of the original purchase order receipt together with full return address and contact informati...

Страница 34: ... required Global technical support Nordic ID HQ Myllojankatu 2A FIN 24100 SALO FINLAND Telephone 358 2 727 7700 Fax 358 2 727 7720 Technical Support Telephone 358 2 727 7790 7 16 CET Fax 358 2 727 7720 email support nordicid com Local support Germany Nordic ID Germany Heidestrasse 50 32051 HERFORD GERMANY Telephone 05221 101 4615 email support nordicid de Nordic ID United Kingdom Nordic ID House C...

Страница 35: ...hat can degrade the performance of your system 4 Center the symbol left to right in the scan line whenever possible 5 Position the symbol so that the scan line is as near as possible to perpendicular to the bars and spaces in the symbol 6 Avoid specular reflection glare off the symbol by tilting the top or bottom of the symbol away from the engine The exact angle is not critical but should be large...

Страница 36: ...he barcode This is called the Digitised Bar Pattern DBP The DBP data is then sent to the decoder board for processing into a host compatible format and further applications are based on the software used The technical specifications of the laser engine used in the RF651 are listed in the table below Table Laser engine technical specifications Item Description Laser Power at 650 nm Scan mode 1 7 mW 0...

Страница 37: ... depends on the barcode size and pitch quality of the barcode print and ambient light conditions as well as the pitch and angle of the laser beam in reference to the barcode surface Further information is available from Nordic ID Technical Support upon request support nordicid com ...

Страница 38: ...nm highly visible LED Symbologies Codabar Codablock A and F Code 11 Code 39 Code 93 93i Code 128 ISBT 128 UCC EAN 128 Industrial and Standard 2 of 5 Interleaved 2 of 5 Matrix MSI PDF417 MicroPDF417 MacroPDF417 Plessey RSS Telepen UPC EAN ISBN emulated DBP mode Codabar Code 11 Code 39 Code 93 93i Code 128 UCC EAN 128 Standard 2 of 5 Interleaved 2 of 5 Matrix MSI PDF417 MacroPDF417 unbuffered mode P...

Страница 39: ...0x91 Medium Frequency Beeper Frequency Adjustment 0xF0 0x91 2500 Hz Laser On Time 0x88 3 0 sec Aim Duration 0xED 0 0 sec Scan Angle 0xBF Wide 47 Power Mode 0x80 Low Power Trigger Mode 0x8A Level Time out Between Same Symbol 0x89 1 0 sec Beep After Good Decode 0x38 Enable Transmit No Read Message 0x5E Disable Parameter Scanning 0xEC Enable Linear Code Type Security Levels 0x4E 1 Bi directional Redu...

Страница 40: ...13 2 55 Code 39 Check Digit Verification 0x30 Disable Transmit Code 39 Check Digit 0x2B Disable Code 39 Full ASCII Conversion 0x11 Disable Code 93 Code 93 0x09 Disable Set Length s for Code 93 0x1A 0x1B 4 55 Code 11 Code 11 0x0A Disable Set Lengths for Code 11 0x1C 0x1D 4 to 55 Code 11 Check Digit Verification 0x34 Disable Transmit Code 11 Check Digit s 0x2F Disable Interleaved 2 of 5 Interleaved 2 ...

Страница 41: ... Convert RSS to UPC EAN 0xF0 0x8D Disable Data Options Transmit Code ID Character 0x2D None Prefix Suffix Values Prefix Suffix 1 Suffix 2 0x69 0x68 0x6A NULL LF CR Scan Data Transmission Format 0xEB Data as is Serial Interface Baud Rate 0x9C 9600 Parity 0x9E None Software Handshaking 0x9F Enable Decode Data Packet Format 0xEE Unpacketed Host Serial Response Time out 0x9B 2 sec Stop Bit Select 0x9D 1 In...

Страница 42: ... 41 disabled Codablock A symbology identifier Codablock F symbology identifier C0 C1 K0 K1 Code 11 0x4A activation 40 disabled symbology identifier C0 C1 check digit verification 4C 1 digit check digit transmission 54 enabled length L1 50 0 any length length L2 51 0 length L3 52 0 length mode 53 L1 as minimum length Code 39 0x42 activation 40 enabled full ASCII conversion 5A disabled reading range sta...

Страница 43: ...y pair of ISBT codes 5B disabled reading range 47 extended Code 128 symbology identifier C0 B3 EAN 128 symbology identifier C1 C9 reading tolerance 4F high check digit verification French CIP 4C disabled length L1 50 0 any length length L2 51 0 length L3 52 0 length mode 53 L1 as minimum length Interleaved 2 of 5 0x44 activation 40 disabled reading range 47 extended symbology identifier C0 B2 check di...

Страница 44: ...mitted not transmitted not transmitted Addressee 5D not transmitted file size 5E not transmitted checksum 5F not transmitted MicroPDF417 activation 42 disabled MicroPDF417 Code 128 emulation 45 disabled PDF417 symbology identifier MicroPDF417 symbology identifier C0 C1 C7 C8 Plessey Code 0x47 activation 40 disabled symbology identifier C0 C2 check digit transmission 54 disabled length L1 50 0 any leng...

Страница 45: ...B activation UPC A 40 enabled activation UPC E 41 enabled activation UPC E1 4C disabled activation EAN 8 42 enabled activation EAN 13 43 enabled ISBN conversion for EAN 13 44 disabled add on digits 5D not required but transmitted if read add on 2 45 disabled add on 5 46 disabled add on 2 5 security 47 10 0Ah check digit UPC A transmitted 54 enabled check digit UPC E transmitted 55 enabled check di...

Страница 46: ...fier C0 A0 UPC E symbology identifier C1 E0 EAN 8 symbology identifier C2 FF EAN 13 symbology identifier C3 F Decoding security 0x71 consecutive same read data validation 40 0 timeout between identical consecutive codes 80 300 ms timeout between different consecutive codes 81 0 ms Reset to default settings EV 15 ...

Страница 47: ...al to any other language including all programming languages using any electrical mechanical magnetic optical manual or other methods or devices is forbidden Nordic ID reserves the right to change the technical specifications or functions of its products or to discontinue manufacturing of any of its products without any written announcement and urges customers to ensure that the information at thei...

Отзывы: