


5
4. AIR SUPPLY
CAUTION
●
Draw off drain before starting operation. If the
drain enters into the tool, it can freeze around
the exhaust port of the tool and result in output
power reduction.
4-1. Air Pressure
Adjust air pressure to 0.6MPa (or 6 kgf/cm2) with
the air regulator. Lower pressure may result in
insufficient performance. Higher pressure may result
in premature worn out of parts. It is important to
maintain the proper pressure with pressure regulator
on air line.
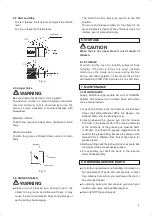
4-2. Air Line (Fig.2)
Use a 9.5 mm (3/8”) I.D. air hose between the
compressor and the tool. Compressed air comes
to be cooled down and its drain be separated, as
soon as the air leaves the compressor. The drain,
however, is condensed in the piping, and can
enter into the tool mechanism, and may cause
malfunction. So, install an air filter and an oiler
between the compressor and the tool.
4-3. oiler
Install an oiler between the compressor and the tool.
Use machine oil ISO VG-10 for lubrication and rust
prevention. Negligence of the oil supply may cause
damages on the tool. Lubricating the tool with high
viscosity oil reduces the tool performance.
4-4. Lubrication (Fig.2)
Before starting the tool, disconnect air hose from
the tool and supply a few drops of machine oil
ISO VG-10 to the air inlet port of the tool. Then
reconnect and make idle running for a few seconds
so that the oil should reach every part in the tool.
$LU5HJXODWRU
2LOHU
$LU)LOWHU
&RPSUHVVRU
/XEULFDWLRQ
7RRO
PPµ,'
+RVH
&XSOD
Fig. 2
5. OPERATION
WARNING
●
Be sure to wear eye protection during operation.
Use a dust mask if operation is exposed to dust.
●
Always turn off the air supply and disconnect the
air supply hose beforehand whenever replacing the
Back-up Pad and/or Abrasive Papers.
●
Never touch any moving parts of the tool when
running.
5-1. MOUNTING AND REMOVING THE PAD AND
ABRASIVE PAPER
(1)Pad
Removing
To loosen the pad, fix the Spindle with a Spanner 14
and then turn the Chuck Nut counterclockwise with
another Spanner 14.
Mounting
To attach the Pad, push its axis all the way into the
Spindle, fix the Spindle with a Spanner 14, turn the
Chuck Nut clockwise with another Spanner 14, and
then tighten it securely.
(2) Abrasive Paper
Removing
To detach the Abrasive Paper, take a grip on its edge,
turn it counterclockwise.
Mounting
Align the center of the Abrasive Paper with that of the
Pad.Turn the Paper clockwise to lock it.
Turn the Paper clockwise to lock it
Turn the Paper counter clockwise
Fig. 3
15.+/2+01]KJQ+0.]CĦڧٖǞħ,glbb3
/2,//,448..815NK


