6
5-2. Start and Stop
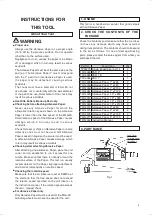
To start, release the lock lever and grasp the throttle
lever.
To stop, release the throttle lever.
ロックレバー
ON
OFF
スロットルレバー
Lock Lever
Throttole Lever
Fig. 4
5-3. Adjust Valve
WARNING
Be sure to keep hands clear of moving parts.
The desired number of rotation between maximum
rpm and minimum rpm is obtained by turnig the
groove of valve clockwise or counterclockwise with
screwdriver.
Maximum rotation
Position the groove of Adjust Valve horizontal to main
body.
Minimum rotation
Position the groove of Adjust Valve vertical to main
body.
Minimum
Maximum
Adjust Valve
Fig. 5
5-4. GRINDS STEELS
WARNING
●
Please do not pressed by a strong force to the
object to be ground and Abrasive Paper. It may
cause the pad and Abrasive Paper and damage of
each part may be damaged.
The Hold the body, Move the switch to the ON
position.
You work and pressed lightly on the object to be
ground Abrasive Paper. Work efficiency does not
improve even if pressed strongly.
6. STORAGE
CAUTION
When tool is not used, store it out of reach of
children.
6-1. STORAGE
Avoid storing the tool in a location subject to high
humidity. If the tool is left as it is used, residual
moisture on the inside can cause rusting. Before
storing, and after operation, oil the tool at the air inlet
with machine oil ISO VG-10 and run it for a short time.
7. MAINTENANCE
7-1. MAINTENANCE
Supply additional appropriate amount of SUMICO
Sumitec 305 Grease into the Gear Case with about
once a month interval.
1. Loosen the Screw 4x12 and remove the Exhaust
Cover, the Toothed Washer CW-4, the Spacer, the
Exhaust Plate, and the Packing Cover.
2. Inject grease with a grease gun into the Grease
Port next to the Exhaust Port. The outside diameter
of the nozzle tip of the grease gun must be 3mm
or smaller. The nozzle for grease nipple cannot be
used for this grease filling, because the shape of the
Grease Port is different from that of the nozzle for
grease nipple.
3. Before putting back the Exhaust Cover, execute idle
running and wipe out excessive grease.
4. For assembly, put back the parts in the reverse
order of disassembly.
8. ORDERING SERVICE PARTS
●
For further operational and handling information or
for replacement of parts and components, contact
the company from whom you purchased the tool or
an authorized dealer.
●
In ordering parts and components give each part
number, part name and quantity required.
●
Use only NITTO genuine parts.
15.+/2+01]KJQ+0.]CĦڧٖǞħ,glbb4
/2,//,448..817NK


