background image

 A-8 - FORM NO. 56041556 - Retriever

 6250 / SR 1800

A-8 / ENGLISH

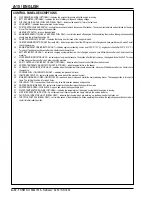
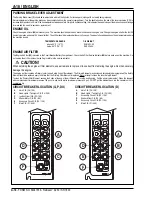
CONTROL PANEL

36

Oil Pressure Gauge (optional)

37

Battery Meter (optional)

38

Fuel Gauge (Gas, Dual Fuel and Diesel Only)

39

Hourmeter

40

Dust Control / Shaker Switch

41

Headlight Switch

42

Engine Speed Switch (Gas, LP and Dual Fuel Only)

43

Dump Door Indicator Light

44

Check Engine Indicator Light

45

Engine Temperature Indicator Light

46

Battery Indicator Light

47

Oil Pressure Indicator Light

57

36

38

40

42

41

39

37

54

58

53

55

56

52

57

36

38

41

40

39

37

60

58

53

55

56

52

Retriever

 6250/SR 1800: G, P, DU

Retriever

 6250/SR 1800 D

48

Dust Control Filter Indicator Light (optional)

49

Hopper Temperature Indicator Light (optional)

50

Hydraulic Filter Indicator Light

51

Propane Fuel Low Indicator Light

52

Ignition Key Switch

53

Main Broom Raise / Lower (ON /OFF) Lever

54

Fuel Selector (Dual Fuel Only)

55

Hopper Raise / Lower Lever

56

Hopper Door Open / Close Lever

57

Water Temp. Gauge (optional)

58

Air Filter Service Indicator

59

Glow Plug Indicator Light (Diesel Only)

60

Throttle Control (Diesel Only)

Содержание Retriever 6250

Страница 1: ...Nederlands Retriever 6250 SR 1800 Advance MODELS 56419420 propane 56419421 gas 56419422 diesel Nilfisk MODELS 56418004 propane 56418005 gas 56418006 dual fuel OBSOLETE 56418007 diesel Instructions Fo...

Страница 2: ...A 13 Emptying the Hopper A 13 After Using the Machine After Use A 14 Shutting Down the Gasoline Engine A 14 Shutting Down the Propane Engine A 14 Shutting Down the Dual Fuel Engine A 14 Shutting Down...

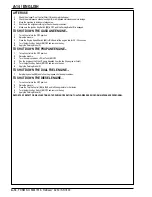
Страница 3: ...the Preparing the Machine For Use section of this manual then fill the fuel tank 6 Place a ramp next to the front end of the pallet 7 Read the instructions in the Operating Controls and Operating the...

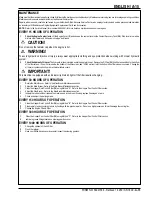
Страница 4: ...ing and eye protection when working with or near hydraulic system Turn the key switch off O and disconnect the battery before servicing electrical components Never work under a machine without safety...

Страница 5: ...an adjustable tow valve This valve prevents damage to the hydraulic system when the machine is being towed pushed short distances without use of the engine To access the valve open the left front door...

Страница 6: ...he location of an item mentioned in the text 1 Operator s Seat 2 Engine Cover 3 Parking Brake Lever Foot Brake 4 Hopper Safety Support Pull Rod 5 Hopper Safety Support 6 Hopper Cover 7 Hopper Cover Pr...

Страница 7: ...e Tank 24 Fuel Tank 25 Jacking Locations 26 Engine Oil Drain 27 Muffler 28 Coolant Recovery Tank 29 Engine Oil Dipstick 30 Engine Air Filter 31 Engine Access Door 32 Circuit Breaker Battery Compartmen...

Страница 8: ...Pressure Indicator Light 57 36 38 40 42 41 39 37 54 58 53 55 56 52 57 36 38 41 40 39 37 60 58 53 55 56 52 Retriever 6250 SR 1800 G P DU Retriever 6250 SR 1800 D 48 Dust Control Filter Indicator Light...

Страница 9: ...on the Back of the pedal to move the machine Backward Push down on the Front of the pedal to move the machine Forward The SPEED of the machine will increase as the pedal is pushed closer to the floor...

Страница 10: ...LIGHT indicates loss of engine oil pressure 10 seconds after the light comes on the engine will shut itself off Turn key off and have your Advance Service Center check the machine 48 DUST CONTROL FIL...

Страница 11: ...hine Before removing the cap from the tank wipe all dust and dirt from the cap and from around the filler neck to keep the fuel as clean as possible Fill the tank with unleaded 87 octane regular gasol...

Страница 12: ...ush the Throttle Control Switch to the FULL THROTTLE position lll and move the machine around for 2 or 3 minutes at a slow speed to warm up the hydraulic system STARTING THE DUAL FUEL ENGINE 1 The mac...

Страница 13: ...machine usually indicates that the machine is moving too fast the broom needs to be adjusted or the hopper is full NOTE If there is debris on the floor too large to be swept up open the Litter Door 8...

Страница 14: ...and remove the key 5 Apply the Parking Brake 3 TO SHUT DOWN THE PROPANE ENGINE 1 Turn all controls to the OFF position 2 Raise the brooms 3 Turn the service valve on LP Gas Tank 23 OFF 4 Run the engi...

Страница 15: ...een If the oil level is below the bottom of the filler screen add 10W30 motor oil until the bottom of the filler screen is covered Change the oil if major contamination from a mechanical failure occur...

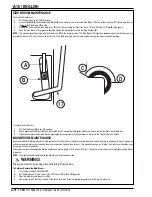
Страница 16: ...lding the side broom on and remove the broom and plastic disc 3 Install the new broom and plastic disc by aligning the three alignment pins and pushing on Re install the T Handle Nut and tighten MAIN...

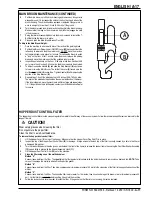
Страница 17: ...broom If the strip is tapered move the machine to a different area and repeat steps 1 5 If the polished strip is still tapered contact your Nilfisk Advance Dealer for service HOPPER DUST CONTROL FILT...

Страница 18: ...cator 58 before each use of the machine Do not service the air filter unless the red flag is visible in the service indicator CAUTION When servicing the engine air filter elements use extreme care to...

Страница 19: ...the possible causes listed below are not the source of trouble it is a symptom of something more serious Contact your Nilfisk Advance Service Center immediately for service MACHINE WILL NOT MOVE Poss...

Страница 20: ...lmotors B 12 Kehren B 13 Entleeren des Schmutzaufnahmebeh lters B 13 Nach dem Einsatz der Maschine Nach dem Einsatz B 14 Abstellen des Benzinmotors B 14 Abstellen des Propanmotors B 14 Abstellen des D...

Страница 21: ...gen im Abschnitt Vorbereitung der Maschine zum Einsatz in diesem Handbuch und f llen Sie daraufhin den Kraftstofftank 6 Bringen Sie am vorderen Ende der Palette eine Rampe an 7 Lesen Sie die Anweisung...

Страница 22: ...N he des hydraulischen Systems passende Kleidung sowie Augenschutz zu tragen SchaltenSiedenSchl sselschalterauf Aus O undunterbrechenSiedieVerbindungzurBatterie bevorSieanelektrischen Komponenten Wart...

Страница 23: ...spumpe der Maschine ist mit einem einstellbaren Abschleppventil versehen Durch dieses Ventil wird vermieden da beim Abschleppen Schieben der Maschine ber kurze Abst nde ohne Einsatz des Motors das hyd...

Страница 24: ...ahrersitz 2 Motorhaube 3 Hebel der Feststellbremse Fu bremse 4 Zugstange der Sicherheitshalterung des Schmutzaufnahmebeh lters 5 Sicherheitshalterung des Schmutzaufnahmebeh lters 6 Abdeckung des Schmu...

Страница 25: ...ter 23 Propanbeh lter 24 Kraftstofftank 25 Anhebestellen 26 Motor labla 27 Auspuffd mpfer 28 Auffangbeh lter f r K hlfl ssigkeit 29 Motor l Me stab 30 Motor Luftfilter 31 Motorwartungsluke 32 Luke zu...

Страница 26: ...ilters auf Wunsch erh ltlich 57 36 38 40 42 41 39 37 54 58 53 55 56 52 57 36 38 41 40 39 37 60 58 53 55 56 52 Retriever 6250 SR 1800 G P DU Retriever 6250 SR 1800 D 49 Anzeigelampe f r die Temperatur...

Страница 27: ...igkeit und der Fahrtrichtung der Maschine Beim Dr cken auf den hinteren Teil des Pedals bewegt sich die Maschine r ckw rts Beim Dr cken auf den vorderen Teil des Pedals bewegt sich die Maschine vorw r...

Страница 28: ...Lampe wird sich der Motor selbstt tig abschalten Schalten Sie den Schl ssel auf Aus und lassen Sie die Maschine durch Ihr Advance Servicezentrum berpr fen 48 ANZEIGELAMPEDESSTAUBEIND MMUNGSFILTERS AU...

Страница 29: ...hen Sie bitte jeglichen Staub und Schmutz vom Deckel und vom Bereich um den Einf llstutzen damit der Kraftstoff so rein wie m glich bleibt F llen Sie den Tank mit unverbleitem Normalbenzin mit der Okt...

Страница 30: ...ebenSiedenMotordrehzahlschalterindieVollgas Position FULLTHROTTLE lll undbewegenSiedieMaschinef r2oder3Minutenbeiniedriger Geschwindigkeit um das hydraulische System aufzuw rmen STARTEN DES DUAL KRAFT...

Страница 31: ...am Boden Abf lle liegen die zum Aufkehren zu gro sind ffnen Sie bitte die Abfall Luke 8 und werfen Sie die Abf lle in den Schmutzaufnahmebeh lter ENTLEEREN DES SCHMUTZAUFNAHMEBEH LTERS BITTEBEACHTENS...

Страница 32: ...ssel ab 5 Aktivieren Sie die Feststellbremse 3 ABSTELLEN DES PROPANMOTORS 1 Schalten Sie alle Bedienungselemente auf Aus OFF 2 Heben Sie die Besen 3 Stellen Sie das Betriebsventil des Beh lters f r f...

Страница 33: ...s der Boden des Einf llsiebes bedeckt ist Nehmen Sie einen lwechsel vor wenn eine schwerwiegende durch mechanisches Versagen hervorgerufene Verunreinigung vorliegt WICHTIG Diese Maschine ist mit einer...

Страница 34: ...ernenSiedaraufhin den Besen und die Kunststoffscheibe 3 Installieren Sie den neuen Besen und die Kunststoffscheibe indem Sie die drei Pa stifte ausrichten und dr cken Installieren Sie erneut die Querg...

Страница 35: ...te der polierte Streifen noch immer spitz zulaufen wenden Sie sich bitte an den Nilfisk Advance Service STAUBEIND MMUNGSFILTER DES SCHMUTZAUFNAHMEBEH LTERS DerStaubeind mmungsfilterdesSchmutzaufnahmeb...

Страница 36: ...Fahne an der Wartungsanzeige erscheint VORSICHT Bei der Wartung der Luftfilterelemente des Motors ist u erste Vorsicht geboten um zu vermeiden da loser Staub in den Motor gelangt Staub kann zu einer s...

Страница 37: ...Retriever 6250 SR1800 P Retriever 6250 SR 1800 D Modellnummer 56418006 56419421 56418005 56419420 56418004 56419422 56418007 Ger uschpegel ISO 3744 dB A 20 Pa 85 85 85 85 Gesamtgewicht lbs kg 4 201 1...

Страница 38: ...el C 12 D marrage du moteur Diesel C 12 Balayage C 13 Vidange de la tr mie C 13 Apr s utilisation de la machine Apr s utilisation C 14 Pour arr ter le moteur essence C 14 Pour arr ter le moteur au pro...

Страница 39: ...en si n cessaire 4 V rifiez le niveau d huile hydraulique et ajoutez en si n cessaire 5 Lisez avec attention la section Pr paration de la machine puis remplissez le r servoir de carburant 6 Placez une...

Страница 40: ...de celui ci veillez porter une tenue appropri e et des lunettes de protection afin d viter tout risque de blessures ou toute projection d huile Positionnez la cl de contact sur off O et d connectez le...

Страница 41: ...vederemorquager glable Cettederni repermetdenepasendommagerlesyst me hydraulique de la machine lorsque celle ci est tract e pouss e sur de courtes distances sans que le moteur soit utilis Pour acc der...

Страница 42: ...avec pr cision un l ment mentionn dans le texte 1 Si ge de l op rateur 2 Capot moteur 3 Levier de frein de stationnement frein au pied 4 Tige d entra nement du support de s curit de la tr mie 5 Suppor...

Страница 43: ...age 26 Evacuation de l huile de moteur 27 Silencieux 28 R servoir de r cup ration du liquide de refroidissement 29 Jauge d huile de moteur 30 Filtre air du moteur 31 Panneau d acc s au moteur 32 Porte...

Страница 44: ...2 41 39 37 54 58 53 55 56 52 57 36 38 41 40 39 37 60 58 53 55 56 52 Retriever 6250 SR 1800 G P DU Retriever 6250 SR 1800 D 48 Voyant lumineux filtre de d poussi rage en option 49 Voyant lumineux temp...

Страница 45: ...Appuyez sur l arri re de la p dale pour d placer la machine vers l arri re Appuyez sur l avant de la p dale pour d placer la machine vers l avant La VITESSE de la machine augmente mesure que vous enfo...

Страница 46: ...te de pression de l huile de moteur Le voyant s allume et 10 secondes plus tard le moteur s teint automatiquement Eteignez votre machine et demandez une personne du service Advance de v rifier votre m...

Страница 47: ...ur essence le r servoir 24 se situe l arri re de la machine Un autocollant situ pr s du col de remplissage stipule le type de carburant utiliser avec la machine Avant d enlever le capuchon du r servoi...

Страница 48: ...r gime III et faites circuler la machine vitesse r duite pendant 2 ou 3 minutes afin de chauffer le syst me hydraulique D MARRAGE DU MOTEUR DUAL FUEL 1 La machine peut tre d marr e avec l un ou l autr...

Страница 49: ...rapidement soit que la brosse doit tre r gl e ou encore que la tr mie est remplie REMARQUE Si les d bris se trouvant sur le sol sont trop grands pour tre balay s ouvrez la porte d chets 8 et jetez les...

Страница 50: ...Serrez le frein de stationnement 3 POUR ARR TER LE MOTEUR AU PROPANE 1 Positionnez toutes les commandes sur OFF 2 Levez les brosses 3 Fermez la valve d alimentation du r servoir de G P L 23 4 Laissez...

Страница 51: ...le de remplissage Si le niveau d huile est sous la grille de remplissage ajoutez de l huile pour moteur grade SAE 10W 30 jusqu ce que le fond de la grille de remplissage soit recouvert Si l huile est...

Страница 52: ...e 3 Installezlanouvellebrosseetledisqueenplastiqueenalignantlestroisgoupillesdepositionnementetenlesenfon ant Replacezl crouenTetserrez le ENTRETIEN DE LA BROSSE PRINCIPALE Etant donn que le moteur de...

Страница 53: ...5 de la proc dure Si le r sultat est toujours identique contactez votre revendeur Nilfisk Advance FILTRE DE D POUSSI RAGE DE LA TR MIE Nettoyez r guli rement le filtre de d poussi rage de la tr mie a...

Страница 54: ...lisation de la machine Ne proc dez pas l entretien du filtre air tant que le drapeau rouge n appara t pas sur le t moin d entretien PRUDENCE Lorsdel entretiendes l mentsdufiltre airdumoteur preneztout...

Страница 55: ...NNAGE Si les causes num r es ci dessous ne sont pas la source du probl me cela signifie que vous tes confront une panne plus s rieuse Contactez imm diatement le centre de support Nilfisk Advance LA MA...

Страница 56: ...Dieselmotor starten D 12 Vegen D 13 Vuilcontainer legen D 13 Na gebruik Na gebruik D 14 Benzinemotor uitzetten D 14 Propaanmotor uitzetten D 14 Omschakelbare motor uitzetten D 14 Dieselmotor uitzette...

Страница 57: ...ie en voeg zo nodig olie toe 5 Lees de aanwijzingen in het hoofdstuk Machine gebruiksklaar maken van deze handleiding en vul daarna de brandstoftank 6 Plaats een afrit tegen de voorkant van de pallet...

Страница 58: ...n een veiligheidsbril te dragen wanneer u in de buurt van of met het hydraulische systeem werkt Zet het contactslot uit en ontkoppel de accu voordat u onderhoud verricht aan elektrische onderdelen Wer...

Страница 59: ...n het hydraulische systeem niet beschadigd raken als de machine op korte afstand zonder de motor te gebruiken wordt gesleept of geduwd Om toegang tot deze klep te verkrijgen opent u het paneel links v...

Страница 60: ...l zich bevindt 1 Bestuurdersplaats 2 Motorkap 3 Hendel van de handrem 4 Uitklapscharnier van hoppersteun 5 Vuilcontainersteun 6 Vuilcontainerdeksel 7 Scharnier van vuilcontainerdeksel 8 Deurtje voor g...

Страница 61: ...antank 24 Brandstoftank 25 Opkrikpunten 26 Aftappunt motorolie 27 Geluiddemper 28 Opvangtank voor koelvloeistof 29 Oliepeilstok 30 Luchtfilter van de motor 31 Motorpaneel 32 Toegang tot zekeringenpane...

Страница 62: ...57 36 38 40 42 41 39 37 54 58 53 55 56 52 57 36 38 41 40 39 37 60 58 53 55 56 52 Retriever 6250 SR 1800 G P DU Retriever 6250 SR 1800 D 48 Waarschuwingslampje voor stoffilter optioneel 49 Waarschuwing...

Страница 63: ...et pedaal om de machine naar achteren te laten rijden Druk op het voorste gedeelte van het pedaal om de machine naar voren te laten rijden De SNELHEID van de machine wordt verhoogd naarmate het pedaal...

Страница 64: ...n de motorolie te laag is geworden 10 seconden nadat dit lampje gaat branden gaat de motor vanzelf uit Zet het contactslot uit en laat de machine door uw Nilfisk Advance servicedienst nakijken 48 WAAR...

Страница 65: ...het vulpijpje wordt op een plaatje aangegeven welk soort benzine voor de machine moet worden gebruikt Voordat u de dop van de tank haalt dient u alle stof en vuildeeltjes van de dop en rond het vulpi...

Страница 66: ...om het hydraulische systeem warm te laten lopen OMSCHAKELBARE MOTOR STARTEN 1 De machine kan met elk van beide soorten brandstof worden gestart 2 Kies de gewenste soort brandstof 54 en volg de aanwij...

Страница 67: ...s er afval op de vloer ligt dat te groot is om opgeveegd te kunnen worden opent u het deurtje voor groot afval 8 en gooit u het in de hopper VUILCONTAINER LEGEN OPMERKING De MINIMUM plafondhoogte die...

Страница 68: ...uteltje eruit 5 Trek de handrem 3 aan PROPAANMOTOR UITZETTEN 1 Zet alle functies uit 2 Breng de borstels omhoog 3 Zet de kraan van de propaantank 23 uit 4 Laat de motor net zolang draaien dat er zich...

Страница 69: ...em van het vulfilter Als het oliepeil zich onder de bodem van het vulfilter bevindt voegt u 10W30 motorolie toe totdat de bodem van het vulfilter bedekt is Ververs de olie als deze erg vuil is geworde...

Страница 70: ...rote T sleutel waarmee de zijborstel 13 wordt geborgd en haal de zijborstel en plastic schijf eruit 3 Plaats de nieuwe zijborstel en plastic schijf door de drie pennen op de juiste positie te plaatsen...

Страница 71: ...heef is verplaatst u de machine naar een andere plek en herhaalt u stap 1 5 Als het opgewreven strookje dan nog steeds scheef is moet u voor reparatie contact opnemen met uw Nilfisk Advance dealer STO...

Страница 72: ...egang tot het zekeringenpaneel en de accuruimte Controleer voordat u met de machine gaat werken altijd eerst de indicator voor onderhoud van het luchtfilter 58 Verricht geen onderhoud aan het luchtfil...

Страница 73: ...r iets ernstigers aan de hand is Neem in dat geval onmiddellijk contact op met uw Nilfisk Advance servicedienst voor onderhoud of reparatie MACHINE RIJDT NIET Mogelijke oorzaken 1 De handrem 3 is aang...

Страница 74: ...s and standards Esta m quina ha sido fabricada en conformidad a las siguientes normativas Machine Directive 98 37 EEC Normativa de la m quina 98 37 CEE EMC directive 89 336 EEC 92 31 EEC 93 68 EEC Nor...

Страница 75: ...t Floor Lorong 19 1A 46300 Petaling Jaya Selangor Darul Ehsan 03 7568188 03 7568189 03 7568388 Fax03 7566828 NEDERLAND Nilfisk Advance B V Flevolaan 7 Postbus 341 1380 AH Weesp 0294 462121 Fax 0294 43...

Отзывы: