background image

 9 - FORM NO. 56041365 / Micromatic

 17B

MAINTENANCE SCHEDULE

Maintenance Item

Daily

Weekly Monthly Yearly

Clean the Recovery Tank

X

Clean the Float Screen

X

Clean the Solution Tank & Screen

X

Clean the Squeegee

X

Inspect Tanks and Hoses

X

Charge the Batteries

X

Check Battery Water Level

X

Lubrication

X

*Check Vacuum Motor Brushes

X

*Have your Advance Dealer check the carbon motor brushes once a year or
after 300 operating hours.

9

Store the machine in a clean, dry place.

CHARGING THE BATTERIES

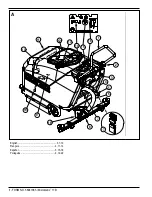
Charge the batteries when the Battery Condition Indicator (15) is glowing RED.

CAUTION!

Do not allow the batteries to sit in a discharged condition.  Doing
so will greatly reduce battery life.

WARNING!

Do not fill the batteries before charging.
Charge batteries in a well-ventilated area.
Do not smoke while servicing the batteries.

Disconnect the batteries.  Push the connector from the charger into the Battery
Connector / Charger Plug (17) on the batteries.  Follow the instructions on the
battery charger.

CAUTION!

To avoid damage to floor surfaces, wipe water and acid from the
top of the batteries after charging.

CHECKING THE BATTERY WATER LEVEL

Check the water level of the batteries at least once a week.
After charging the batteries, remove the vent caps and check the water level in
each battery cell. Use distilled water in a battery filling dispenser (available at
most auto parts stores) to fill each cell to the level indicator (or to 3/8” (10 mm)
over the top of the separators).  DO NOT over-fill the batteries!

CAUTION!

Acid can spill onto the floor if the batteries are overfilled.

Tighten the vent caps.  Wash the tops of the batteries with a solution of baking
soda and water (2 tablespoons of baking soda to 1 quart / 1 liter of water).

LUBRICATING THE MACHINE

Once a month, apply oil to lubricate the:

Front Swivel Casters

Squeegee Pivot Points

Brush Lift Linkage

Rear Wheel Bearings

Solution Valve Linkage

VACUUM MOTOR BRUSHES

Have your Advance Dealer check the carbon motor brushes once a year or after
300 operating hours.

IMPORTANT!

Motor  damage  resulting  from  failure  to  service  the  carbon
brushes is not covered under warranty.  See the Limited War-
ranty Statement.

C - SQUEEGEE CARTRIDGE ROTATION OR REPLACE-
MENT

If the squeegee leaves narrow streaks of water, it is probably dirty or damaged.
Remove the squeegee, rinse it under warm water and inspect the squeegee
blades.  Rotate the squeegee cartridge if the rear blade is cut, torn, or worn to
a radius.  Replace the squeegee cartridge if both blades are cut, torn, or worn
to a radius.

To Rotate the Squeegee Cartridge...
1

Raise the Squeegee Assembly (8).

2

Remove the Squeegee Assembly (8) from the machine.

3

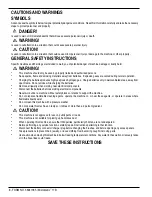
Remove the squeegee cartridge from the Squeegee and rotate it as
shown (or replace if both blades are severely worn or torn).

4

Reinstall  the  cartridge  into  the  Squeegee  Assembly  (8)    and  the
Squeegee Assembly (8) onto the machine.

NOTE:  The Squeegee Assembly (8) is not adjustable.

Содержание Micromatic 17B

Страница 1: ... 9312 or 800 331 3339 MI OH IN only 2011 N High St Lansing Michigan 48906 Fax 517 484 9836 Email CustServ Michco com Web site www Michco Com Parts Web site www FloorMachineParts Com Order Parts on Line at www FloorMachineParts Com Directly to Parts Service By Email Shop Michco com By Fax 517 702 2041 By Voice Use numbers above Serving the Cleaning Industry Since 1922 Notice All copyrighted materia...

Страница 2: ...9 96 revised 8 00 Form Number 56041365 English Français Español Português Micromatic 17B Advance MODEL 56302100 Instructions For Use Mode d emploi Instrucciones de uso Manual de Utilização ...

Страница 3: ...1 FORM NO 56041365 Micromatic 17B A 1 2 3 5 6 7 8 9 11 12 14 15 16 10 4 13 17 18 19 English 3 7 10 Français 4 11 14 Español 5 15 18 Português 6 19 22 ...

Страница 4: ...FORM NO 56041365 Micromatic 17B 2 B FRONT C D 1 2 3 ...

Страница 5: ... Do not smoke while charging the batteries Remove all jewelry when working near electrical components Disconnect the batteries before servicing electrical components Never work under a machine without safety blocks or stands to support the machine Do not dispense flammable cleaning agents operate the machine on or near these agents or operate in areas where flammable liquids exist Do not clean thi...

Страница 6: ... travaillez près des composants électriques Déconnectez les batteries avant l entretien des composants électriques Ne travaillez jamais sous une machine sans cales de sécurité ou une plateforme pour porter la machine N utilisez pas d agents nettoyants inflammables n utilisez pas la machine sur ou près de ces agents ou ne l utilisez pas dans des zones où ces liquides inflammables existent Ne nettoy...

Страница 7: ...ama No fume mientras carga las baterías Despójese de todas las joyas cuando trabaje cerca de los componentes eléctricos Desconecte las baterías antes de hacer el mantenimiento a componentes eléctricos No trabaje nunca debajo de una máquina sin colocar soportes o bloques de seguridad para sostener la máquina No aplique agentes limpiadores inflamables ni haga funcionar la máquina sobre estos agentes...

Страница 8: ...trabalhar nas proximidades de componentes eléctricos Desligue as baterias antes de fazer a manutenção aos componentes eléctricos Nunca trabalhe debaixo de uma máquina sem blocos ou suportes de segurança para segurar a máquina Não utilize produtos de limpeza inflamáveis nem trabalhe com a máquina sobre estes produtos ou à beira deles bem como em áreas onde existam líquidos inflamáveis Não limpe est...

Страница 9: ...ES WARNING Use extreme caution when working with batteries Sulfuric acid in batteries can cause severe injury if allowed to contact the skin or eyes Explosive hydrogen gas is vented from the batteries through openings in the battery caps This gas can be ignited by any electrical arc spark or flame When Servicing Batteries Remove all jewelry Do not smoke Wear safety glasses Work in a well ventilate...

Страница 10: ...h is turning 7 Re adjust the Solution Flow Control Lever 16 so a thin even layer of solution can be seen in front of the Squeegee Assembly 8 8 TheRecoveryTank 9 hasanAutomaticFloatShut Off 13 toblockthe vacuumsystemwhentherecoverytankisfull Youcantellwhenthefloat closes by the sudden change in the sound of the vacuum motor When the float closes the recovery tank must be emptied The machine will no...

Страница 11: ...vailable at most auto parts stores to fill each cell to the level indicator or to 3 8 10 mm over the top of the separators DO NOT over fill the batteries CAUTION Acid can spill onto the floor if the batteries are overfilled Tighten the vent caps Wash the tops of the batteries with a solution of baking soda and water 2 tablespoons of baking soda to 1 quart 1 liter of water LUBRICATING THE MACHINE O...

Страница 12: ...shows 3 different machine operation conditions as follows Indicator Light OFF Motors shut off Indicator Light ON Motors run Indicator Light flashing at 4 flashes per second Motor overload condition same as tripped circuit breaker Ifanoverloadoccurs determineandcorrectthecauseoftheoverload The machine has an internal electronic circuit breaker built into the control board Toresettheelectroniccircui...

Страница 13: ...HINE A LA MISE EN SER VICE B INSTALLER LES BATTERIES ATTENTION Faites preuve d une extrême prudence lorsque vous travaillez avec les batteries L acide sulfurique des batteries peut causer de graves blessures s il rentre en contact avec la peau ou les yeux Legazhydrogèneexplosifestventilédepuisl intérieurdes batteries par des ouvertures dans les bouchons de la batterie Ce gaz peut prendre feu par u...

Страница 14: ...allumera NB Appuyez encore sur l interrupteur vers la droite pour arrêter les brosses 5 Appuyez vers la gauche sur la fonction double de l Interrupteur ON OFF de l Aspiration des Brosses 14 pour démarrer le moteur d aspiration La lumière verte d alimentation ON s allumera NB Appuyez encore sur l Interrupteur vers la gauche pour arrêter l aspiration 6 Empoignez le Guidon de l Opérateur 1 et poussez...

Страница 15: ...ur dans la Prise de Raccord Charge de la Batterie 17 sur les batteries Suivez les instructions sur le chargeur de batterie PRUDENCE Pouréviterdesdommagessurlessurfacesdesol essuyezl eau etl acidesetrouvantsurlehautdesbatteriesaprèslechargement CONTROLER LE NIVEAU D EAU DE LA BATTERIE Contrôlez le niveau d eau de la batterie au moins une fois par semaine Aprèslechargementdesbatteries retirezlesbouc...

Страница 16: ...ateur d Aspiration Brosse signale 3 conditions différentes du fonctionnement de la machine comme suit Lumière de l Indicateur ETEINTE Moteurs coupés Lumière de l Indicateur ALLUMEE Moteurs allumés Lumière de l Indicateur clignotante à 4 éclats par seconde Condi tion surchargée du Moteur pareil que défaut de disjoncteur Si une surcharge se produit déterminez et corrigez la cause de la surcharge La ...

Страница 17: ...retroceso PREPARE LA MÁQUINA PARA SU USO B INSTALACIÓN DE BATERÍAS ADVERTENCIA Preste una atención extrema al trabajar con baterías El ácido sulfúrico de la batería puede causar serias lesiones si entra en contacto con la piel o los ojos Se evacua hidrógeno gaseoso explosivo desde las baterías por las aperturas situadas en los tapones de las baterías Este gas puede entrar en combustión por cualqui...

Страница 18: ...n 16 en un posición media para prehumedecer el suelo 4 Pulse el conmutador de encendido apagado de aspirador cepillo 14 función doble hacia la derecha para arrancar el motor del cepillo Se encenderá el piloto verde de alimentación ON NOTA Pulsedenuevoelconmutadorhacialaderecha paradesconectar el cepillo 5 Pulse hacia la izquierda el conmutador de encendido apagado de aspirador cepillo defuncióndob...

Страница 19: ...las escobillas de carbono del motor una vez al año o tras 300 horas de trabajo 9 Almacene la máquina en un lugar seco y limpio CARGA DE LAS BATERÍAS Cargue las baterías cuando el indicador de estado de la batería 15 esté en ROJO intermitente PRECAUCIÓN No permita que las baterías permanezcan descargadas De lo contrario reducirá mucho la vida de la batería ADVERTENCIA No llene las baterías antes de...

Страница 20: ... 19 voltios los motores del cepillo y aspiración se apagarán inmediatamente El piloto rojo parpadearádurante5segundosparaindicarqueexisteunfalloporbajovoltaje Revise el estado de las baterías y recárguelas FUNCIONES DEL PILOTO INDICADOR DEL CONMUTADOR DE ASPIRADOR CEPILLO El piloto indicador verde del aspirador cepillo muestra tres situaciones de funcionamiento de la máquina de la manera siguiente...

Страница 21: ...S BATERIAS AVISO Tenha muito cuidado quando trabalhar com baterias O ácido sulfúrico das baterias pode causar graves ferimentos se entrar emcontactocomapeleouolhos Élibertadogáshidrogéniodas baterias através de aberturas nas tampas das mesmas Este gás pode inflamar se através de qualquer arco voltaico faísca ou chama Para Fazer a Manutenção das Baterias Retire todas as jóias Não fume Use óculos pr...

Страница 22: ...Interruptor de LIGAR DESLIGAR Vácuo Escova 14 função dupla para a direita para accionar o motor das escovas A luz verde de energia LIGADA irá acender se NOTA Empurre o interruptor novamente para a direita para desligar a escova 5 Empurre para a esquerda o Interruptor de LIGAR DESLIGAR Vácuo Escova de função dupla 14 para accionar o motor de vácuo A luz verde de energia LIGADA irá acender se NOTA E...

Страница 23: ...o motor uma vez por ano ou após 300 horas de funcionamento 9 Guarde a máquina num local limpo e seco CARREGAMENTO DAS BATERIAS Carregue as baterias quando o Indicador de Estado da Bateria 15 estiver VERMELHO CUIDADO Não deixe que as baterias estejam montadas sem estar carregadas Isso reduz bastante a duração da bateria AVISO Não encha as baterias antes de as carregar Carregue as baterias numa área...

Страница 24: ...ateria descer abaixo dos 19 volts os motores da escova e de vácuo desligam se automaticamente A luz vermelha irá piscar também durante 5 segundos para indicar um estado de falha de baixa potência Verifique o estado das baterias e volte a carregá las FUNÇÕES DA LUZ DO INDICADOR DO INTERRUPTOR DE VÁCUO ESCOVA A Luz verde do Indicador de Vácuo Escova indica três estados diferentes de funcionamento da...

Страница 25: ...Nilfisk Advance Inc 14600 21st Avenue North Plymouth MN 55447 3408 www nilfisk advance com Phone 800 989 2235 Fax 800 989 6566 2000 Nilfisk Advance Inc Plymouth MN 55447 3408 Printed in the U S A ...

Отзывы: