background image

16

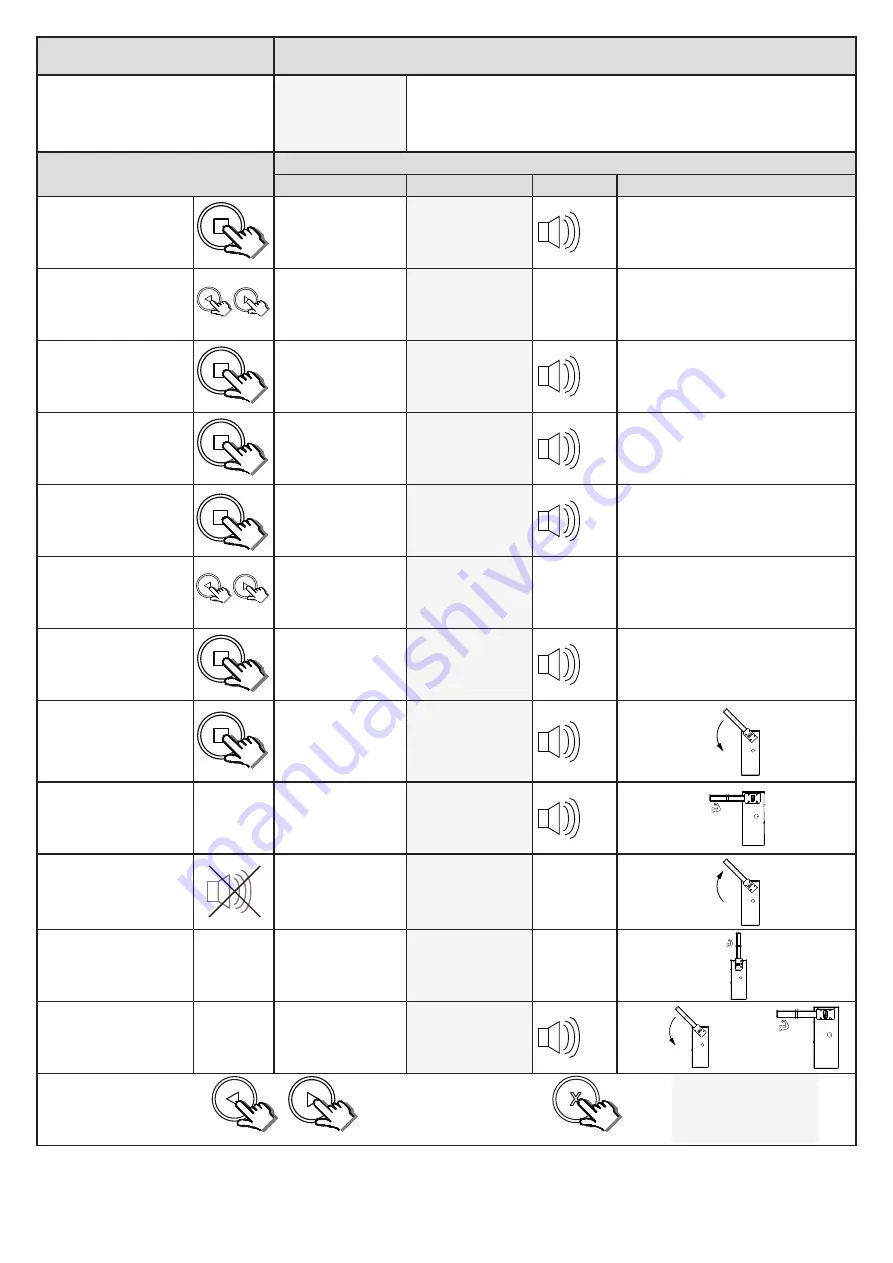
Runtime Setup

Setting up the profile and runtime. (Mandatory)

From Standby status

- Standard mode -

- Standby

Before continuing with the runtime setup ensure the soft stop switch-

es are activating momentarily before the physical end stop is reached. 

This  can  be  done  in  manual mode.  Re-engage  the  gearbox  with  the 

boom pole at 45o

Action

Response

Description

Display

Buzzer

Barrier

To enter the program 

menu. Press and hold the 

 button until buzzer 

beeps.

Display and buzzer 

confirms.

Programming menu

<or> for options

Scroll < or > to select the 

runtime setup option.

Display scrolls 

through options.

Runtime setup

<Limits NOT set>

Press and release the 

 

button to select runtime 

setup.

Display asks you to 

select the barrier 

model. 

Set Boom Type

< Wide M >

Scroll < or > to select the 

matching model.

Display scrolls 

through options.

Set BoomType

< Wide L >

Press and release the 

 

button with the correct 

model on the display.

Display confirms the 

selection is saved.

Type Setting 

Wide L saved

Scroll < or > to select 

the matching boom pole 

length.

Display asks you to 

select the required 

boom pole length.

Set Boom Length

< 1-2M >

Press and release the 

 

button with the correct 

length range on the 

display.

Display confirms the 

setting is saved.

Length Setting

Saved

Press and release < or > to 

confirm either left or right 

hand closing installation. 

(Page 9) 

The boom closes 

slowly.Display and 

buzzer confirms.

Finding Closed

Stopper

When the closed position 

is reached

The boom stops. 

Display and buzzer 

warn the profiling is 

about to begin.

WARNING!

Profiling.

Once warning tone has 

stopped.

The boom begins 

running open at 

full speed.Display 

confirms.

Opening.

Profiling.

When the open position is 

reached.

The boom stops and 

begins closing again 

at full speed. Display 

confirms.

Closing.

Profiling.

When the closed position 

is reached once again.

The boom stops. 

Display and buzzer 

confirms.

Runtime setup. 

<Limits set>

x2

x1

x1

x1

x1

x1

x1

x1

Scroll left or right to next 

program option.

OR

“Selected” mode

- Standby

EXIT back to standby 

status

Содержание WIDE L

Страница 1: ...ET NICE WIDE INSTRUCTIONS 2018 001 Installer Instructions High Traffic Battery Back up Traffic Barrier www niceforyou com za...

Страница 2: ...ty infra red beams setup Page 20 Selecting a BT operating mode and adjusting the BT auto close time Page 22 Receiver programming and setup Page 29 Advance programming options and their definitions Ope...

Страница 3: ...chanical ends of travel stoppers 5 Ensure all fixed mounting points such as the wall above the door in a garage door system or the posts in a swing barrier system are sound and strong enough to allow...

Страница 4: ...Is proficient in testing the unit s safety obstruction sensing system 7 Is aware of what to check for with regards to wear and tear that may need to be attended to from time to time by the service pro...

Страница 5: ...reflective strips 69x92x5150mm Galvanised steel exten tion coupling joint Red rubber impact pro tection strips 1m lengths Wide M 4m 1 pc 8 lengths Wide L 5m 1 pc 10 lengths Wide L 6m 2 pcs 1 pc 12 len...

Страница 6: ...er 15 15 Operation regularly interrupted by the Emergency Stop circuit trigger 15 15 Speed set to above 50 15 15 Safety overload force level set to above 50 10 10 0 100 000 200 000 300 000 cicli di ma...

Страница 7: ...as per manufacturers cabling requirements 1 Courtesy lights Twin earth 1 0mm back to control card and isolator switch 5 Infra red safety beam RX 3 core 0 5mm stranded back to barrier housing 2 Interco...

Страница 8: ...uits Ref Cable requirements on previous page Fasten the 4 J bolt anchors onto the base plate with one nut above and one nut below the base plate NB the nut below the base plate must be threaded all th...

Страница 9: ...the concrete do the following Position the cabinet in the required positions e Mark out the 4 mounting points f Remove the cabinet and drill the correct size holes for your expansion anchors Not supp...

Страница 10: ...n requires a right hand configuration complete the following 3 steps Factory default LH Closing Top view Right hand closing Top view Left hand closing Opening for boom pole at top Opening for boom pol...

Страница 11: ...k the gearbox in this position A Unlock the gearbox B Move the boom pole to 45 o C Leave the boom pole to rest on the spring tension If the boom poles remains steady without rising or falling move on...

Страница 12: ...12 Adjusting the end stops...

Страница 13: ...ing the AC voltage The ACDC power supply requires 220Vac at the operator This 220Vac must be circuited through a weatherproof all pole isolator switch This isolator switch must be installed within 1 5...

Страница 14: ...el 12Vdc 15A Motor fuse 2A Auxiliary relay fuse BLU Com N C N O 100 Safety beam RX Com N C N O N O N O Loop detector Non polarity sensi ve termina on for 2 wire Bluebus devices For example safety beam...

Страница 15: ...dby Test BT mode when in standby or exit all the way back to standby without saving when in programming Enter programming advance to next level of option on display save value on display Control card...

Страница 16: ...play Display confirms the selection is saved Type Setting Wide L saved Scroll or to select the matching boom pole length Display asks you to select the required boom pole length Set Boom Length 1 2M P...

Страница 17: ...to programming menu options list Overload Setting change x2 x1 x1 Scroll left or right to next program option OR Selected mode Standby EXIT back to standby status x2 Safety infra red beams setup Beam...

Страница 18: ...x Scroll or to the required BT mode option Display changes respectively BT Mode Setting Simplex BT Mode Setting Simplex Auto BT Mode Setting Complex With required setting displayed press and release I...

Страница 19: ...Receiver Setup Quick learn With Quick learn on the display press and release Display prompts you to select a function Select function BT Full opening Scroll or to the required receiver function chann...

Страница 20: ...ess and hold any button on the remote transmitter All four buttons must be set to the same format for this to work in the same way as this example While still transmitting with the remote button press...

Страница 21: ...display press and release Display prompts you to select an available user address Select address 1 used Scroll or to select an available user address Display changes respectively Select address 2 Wit...

Страница 22: ...he display press and release Display shows first erase option Erase Remotes Select Address With Select Address on the display press and release Processor scans the memory and then displays the first a...

Страница 23: ...ss Scroll or to select the Erase ALL memory option Display scrolls through options Erase Remotes Erase ALL memory With Erase ALL memory on the display press and release Display then prompts you to pre...

Страница 24: ...nd release Display prompts you to press and release a remote button Diagnose Remotes Press Remote After prompt Display shows a signal strength graph and waits for a remote transmission Signal Not reco...

Страница 25: ...display press and release Display shows receiver setup options Receiver Setup Quick learn Scroll or to select the Receiver info option Display changes respectively Receiver Setup Receiver info With R...

Страница 26: ...he text and the background of the LCD display Adv Beam Setup In the case of a safety beam circuit being installed without an end of line resistor it is still possible to meet the stringent CE safety s...

Отзывы:

Похожие инструкции для WIDE L