NI Climbing Frames Highlands Commercial Скачать руководство пользователя страница 1

The Highlands Commercial (6ft Triple) Climbing Frame Instruction Manual 


Содержание Highlands Commercial

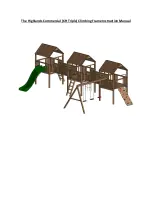
Страница 1: ...The Highlands Commercial 6ft Triple Climbing Frame Instruction Manual...

Страница 2: ...Parts List Item Number Description Image Quantity 1 9ft post cut at 40 angle 12 2 9ft post cut at 60 angle 2 with 32mm hole pre drilled 3 12ft Swing Beam 1 4 1575mm post 6...

Страница 3: ...5 1755mm x 1170 mm roof panel 6 6 6 x 1 small board for roof 6 7 6 x 1 large board for roof 6 8 1755mm x 1755mm base 3 9 1575mm x 3 x 1 5 timber 6 20 for picnic table...

Страница 4: ...10 1755mm 3 x 1 5 timber 13 2 for picnic table 11 Railings Open Railing Closed Railing 14 12 for towers and 2 for bridge 12 Decking screws Approx 500...

Страница 5: ...13 200mm index screws 42 14 120mm screws 60 15 Set of steps 2 16 Screw covers 60 17 M12 swing hook 6 as standard depends on swing choices...

Страница 6: ...18 Rock wall with baton 2 19 Commercial Slide with fixings 1 20 Swing varies depending on customers choice 3 as standard...

Страница 7: ...21 Decking Boards 32 or 64 3 x 1 5 slats 22 2450mm x 3 x 1 5 doubled up 4 23 1575mm x 3 x 1 5 doubled up 4...

Страница 8: ...24 4ft Cargo Net with fixings 1 25 2 Thick Fireman s Pole 1 26 6x60 screws 2 Other components included Handgrips telescope steering wheel...

Страница 9: ...den 2 Allow for at least 2m clearance beyond the end of the slide and 1 5m clearance for the other modules 3 Once you are happy that the layout is correct remove the swing bar and slide 4 Mark out cle...

Страница 10: ...step Step 1 H Frame Assembly Lay 2 x 9ft posts that are cut at a 40 angle on a level surface Ensure the cut angle is facing the same way on both posts and the holes are on the outside Step 2 Place a...

Страница 11: ...ark to each post 1800mm down from the top of the posts Using a piece of 1755mm 3 x 1 5 timber and the 65mm decking screws screw the timber to the 9ft posts at the 2 1m mark you made on the posts this...

Страница 12: ...n the top of the post and screw into place using the 65mm decking screws Steps 3 and 4 strengthen the H frame structure without this additional support at the top and bottom the frame will twist once...

Страница 13: ...eavy lifting please use at least 2 people Lift both H frames into the holes that have been cut out in the ground Make sure the H frames are orientated correctly to ensure that the roof will be able to...

Страница 14: ...Step 7 Using 2 pieces of 1575mm x 3 x 1 5 timber connect the two H frames together using decking screws...

Страница 15: ...own Lift the base and place it onto the two horizontal posts The 3 x 1 5 base supports should sit onto the horizontal posts Secure the base to the posts using the 120mm screws provided They should be...

Страница 16: ...ing on the desired layout of the frame The tall rails are for the bridge entrance They should fit tightly into place between the upright posts and on the base The double timbers on the railings should...

Страница 17: ...sitting on them the decking screws should be screwed in from beneath at an angle between each of the 3 x 1 5 base supports Step 10 To secure each railing to the upright posts screw through the upright...

Страница 18: ...Step 11 Repeat steps 9 and 10 for each railing...

Страница 19: ...Assembly Place one of the 1755mm x 1170mm roof panels directly onto the ground so that the shingled part is facing downwards Using the v boards provided assemble the two roof panels together using de...

Страница 20: ...e and ensure it is positioned evenly on all sides before securing the roof to the top of the post using 2 x decking screws for each 2 x 1 support of the roof panel Secure the two middle 2 x 1 supports...

Страница 21: ...Step 14 Repeat steps 1 13 for the other towers and make sure there is 2160mm between the towers and that the frames are orientated correctly for the bridges to connect to...

Страница 22: ...ubled up place these on the underside of the bases They are to be placed 310mm measured from the outside of the timber to the left and right of the centre point of the base 480mm in between Screw thes...

Страница 23: ...doubled up 2 45m lengths of 3 x 1 5 and between the 9ft vertical posts Screw upwards into the two doubled up 2 45m lengths of 3 x 1 5 using the 120mm screws Drill 32mm holes about 30mm deep on the out...

Страница 24: ...Step 17 Bridge Assembly Step 3 Screw the decking boards down into the two doubled up 2 45m lengths of 3 x 1 5 using decking screws...

Страница 25: ......

Страница 26: ...embly Step 4 Secure each end of the bridge railings with 120mm screw through the high tower railing and into the decking of the bridge with 60mm screws you may need to trim the bridge railings slightl...

Страница 27: ......

Страница 28: ......

Страница 29: ...Step 19 Repeat previous steps to assemble the 2nd bridge...

Страница 30: ...ends together so that it forms an A shape Using the 200mm index screws screw the ends together so the two posts meet nice and flush on all sides Step 21 Measure down from the top of the A post 900mm...

Страница 31: ...ep 22 Cut the 1755mm 3 x 1 5 timber so that it is flush on both sides of the A frame Step 23 Place each swing hook through the pre drilled holes of the 12ft post and secure using the appropriate spann...

Страница 32: ...s on the ground should then be marked and the A frame should be sunk into its place so that the swing bar is level If your garden is level holes about 250mm 300mm will suffice If your garden is runnin...

Страница 33: ...Step 25 Once this is achieved no easy task then secure both ends into place screw 120mm screws down into the railing and 200mm index screws down into each leg of the A frame...

Страница 34: ......

Страница 35: ...p and sides of the steps into the base of the tower Ensure these holes are well pre drilled to avoid splitting The holes and screws will have to be angled to the surface of the steps Also the bottom o...

Страница 36: ......

Страница 37: ...ies with grip and grasp regulations The rock wall is typically made slightly longer than required to allow for a slope Place the rock wall against the bottom of the railing flush to the top of the bat...

Страница 38: ......

Страница 39: ...he slide in the desired position then mark and drill two 8mm holes where the centre of the bracket is meeting the base Then it is just a matter of tightening down the bracket using M8 bolts and washer...

Страница 40: ...out the same distance as the turn in the pole itself Dig a hole about 10 deep and 10 in diameter Place the fireman s pole into the hole and cut off any excess length so that the pole can be secured i...

Страница 41: ...Step 30 Cargo Net Assembly Use the fixings that come with the armoured cargo net to secure the net to a 1575mm post that make up one of the H Frames of a tower...

Страница 42: ...all the posts into the ground The frame should be left overnight before it is used to ensure the postcrete has dried Once dry you can clean of any excess concrete on the post We would normally leave...

Страница 43: ...Step 33 Remove H Frame Supports Remove the H Frame supports that were added during steps 3 7...

Страница 44: ...give everything a good sand down to avoid the children getting splinters from any rough edges All screws should also be checked to ensure they are flush to the surface they are securing and press the...

Страница 45: ...used on your climbing frame has been pressure treated This essentially means that it has been put into a pressurised vessel and has been impregnated with wood preserve With time and due exposure to w...

Отзывы: