background image

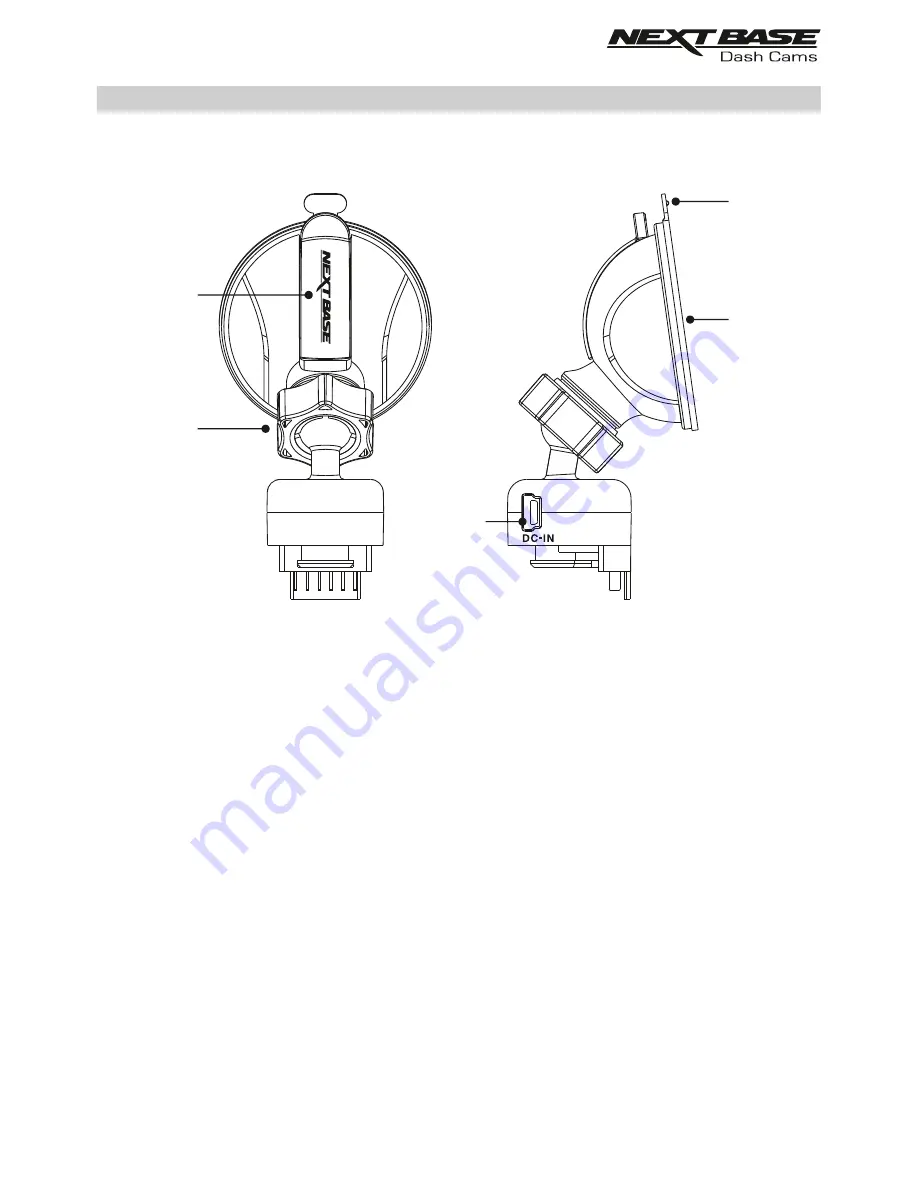
POWERED GPS MOUNT

  
Please see below to identify the parts of the supplied powered mount.

1.    Locking lever

        The locking lever is used to attach and release the window mount to your vehicles windscreen. 
        Pull the lever down to prepare the window mount for use. Once the mount is firmly upon the 
        windscreen (in a suitable location) push the lever to lock the mount in place.

2.    Locking ring

        Loosen the locking ring to adjust the Dash Cam position if required, remembering to 
        re-tighten before use.

3.    DC-IN socket

        Connect the supplied car power cable here. 
 

4.    Suction cup

        This is used to attach and release the window mount to your vehicles windscreen.
        Affix to a clear piece of windscreen where there is no paint effect applied.

5.    Suction release tab

        Once the locking lever has been opened use this release tab to break the seal between 
        the mount and windscreen.

4

5

1

3

2

8

Содержание NBDVR612GW

Страница 1: ...Instruction Manual...

Страница 2: ......

Страница 3: ...Mode The default mode when the camera is turned on for video recording Photo Mode Allows you to take still photographs Playback mode Allows you to view recorded video or photographs upon the Dash Cam...

Страница 4: ...PRODUCT PRODUCT SPECIFICATION PACKAGE CONTENTS PRODUCT FEATURES POWERED GPS MOUNT CAMERA PARTS CONTROLS IN VEHICLE INSTALLATION FIRST TIME USE TOUCH SCREEN VIDEO MODE PHOTO MODE PLAYBACK MODE SETTINGS...

Страница 5: ...u encounter any operational problem 1 Ensure that the windscreen is free of dirt or grease before placing mount upon it Do not obscure the view of the road ahead or impede the deployment of any airbag...

Страница 6: ...inition Type C Socket Video Audio Lithium ion 3 7V 260mAh approx 15mins recording time Battery design allows the Auto Power Off feature to function in event of power loss within the vehicle It is not...

Страница 7: ...viewed using the supplied Windows Mac playback software NEXTBASE Replay 3 The software is also available to download from www nextbase co uk Wi Fi Connectivity Connect your smartphone or tablet device...

Страница 8: ...e lever to lock the mount in place 2 Locking ring Loosen the locking ring to adjust the Dash Cam position if required remembering to re tighten before use 3 DC IN socket Connect the supplied car power...

Страница 9: ...ur and contrast levels to help capture important number plate detail The filter has a rotating bezel so you can adjust the polarising filter exactly how you need in your vehicle To set the polarising...

Страница 10: ...e battery This will shut down battery charging should the Dash Cam s internal temperature exceed 70degrees This can happen during normal use and is not a cause for concern When the NTC is active the o...

Страница 11: ...ld for 2 seconds to turn on off the Dash Cam 8 DC IN USB socket located under the dust cover Connect the supplied car power cable or USB data cable here Note Normally the car power cable is connected...

Страница 12: ...ambient light level and will adjust the screen brightness accordingly Turned on and off within the Setup Menu 10 Reset button In the unlikely event the Dash Cam becomes unresponsive press the RESET bu...

Страница 13: ...the memory card This 30 second recording contains the 10 seconds prior to the protection taking place and the following 20 seconds thereafter Note The original recording will also be saved to the mem...

Страница 14: ...object to push the memory card in place if required Take care that card has clicked into place a second push inwards will release the memory card Do not remove or insert the memory card when the Dash...

Страница 15: ...contact between the glass and suction cup Release the locking lever of the mount by pulling down and then whilst holding the suction cup onto the glass push the lever up to secure the mount to the win...

Страница 16: ...but does have a 5Vdc USB Outlet this can be used instead Connect the USB cable supplied with your Dash Cam in place of the car power cable You MUST however connect the USB cable to the mount NOT direc...

Страница 17: ...ure that the Dash Cam power cable does not interfere with the drivers operating controls such as the steering wheel pedals or gear levers Do NOT mount the Dash Cam in front of an airbag field of deplo...

Страница 18: ...the First Time Use menu has been completed the Dash Cam will then open in Video mode and be ready for use The default settings within the Dash Cam have been set to allow you to use the Dash Cam withou...

Страница 19: ...options within the Main Menu screen are as follows 1 Mode Tap here to open the Mode select screen from which you can then choose from video photo or playback modes 2 Settings Tap here to open the Set...

Страница 20: ...w for details of the various icons seen on screen when in Video mode 1 Recording Seen on screen during recording 2 Protected Seen on screen when the current recording has been protected either by acti...

Страница 21: ...strength of the connection Yellow flashing not connected searching for available satellites Yellow connected weak connection with 3 satellites Orange connected average connection with 4 satellites Gre...

Страница 22: ...The default settings within the Dash Cam have been set to allow you to use the Dash Cam without the need to change any settings Should you wish to change any settings then tap the screen to open the...

Страница 23: ...n selected then you are ready to take photos by tapping the red shutter release icon Unlike the other modes the controls will remain on screen whilst in photo mode this is so the shutter release icon...

Страница 24: ...e 30 second recordings that have been created by either G Sensor activation or by pressing the Protect button manually during recording 2 Videos This folder contains normal recordings 3 Photos This fo...

Страница 25: ...or over written as part of the card looping logic Playback must be paused before the recording can be protected and or unprotected Note This will not change the file location for example the newly pr...

Страница 26: ...o normal playback 3 Stop Tap to stop playback Paused playback Once playback has been paused the controls will refresh as seen below Whilst paused the file can be protected by tapping the protect icon...

Страница 27: ...ings and return to video mode Note The screen number is seen as the door number 3 Next settings screen Move to the next settings screen Tap on the required option to open the settings there are two ty...

Страница 28: ...Plate Enter the registration number for your vehicle this will then be shown on the video file 3 Parking Mode When Parking Mode has been turned on the Dash Cam enters standby mode when the 12Vdc suppl...

Страница 29: ...able in English Turning on Announcements will turn off the Device Sounds 5 Speed Display When turned on the screen will display current speed after 30 seconds of button inactivity tap the screen to re...

Страница 30: ...ity of the recorded video Options 4K 1440P 60FPS 1440P 1080P 60FPS and 1080P Default Setting 4K 2 Exposure Adjust exposure level for different light conditions Options 2 1 0 1 and 2 Default Setting 0...

Страница 31: ...s and 30 Minutes are the recording durations NOT the playback time Playback time will be1 6th of the live recording time 5 Dual Files During normal recording there will be two files saved to the SD Ca...

Страница 32: ...On 2 Speed Stamp Turn On Off the Speed Stamp shown on recorded files Options On and Off Default Setting On 3 GPS Stamp Turn On Off both the GPS co ordinates and speed stamp that are shown on recorded...

Страница 33: ...efault Setting On 5 Screen Dimming Turn Off On the automatic screen brightness when driving in low level light conditions Options On and Off Default Setting On 6 Rotate Display Rotate the display 180...

Страница 34: ...become GMT 1 If your required Country is not available select Other This will take you to the Time Zone DST menu from there you can manually select your Time Zone Options United Kingdom Belgium Denma...

Страница 35: ...ithin the First Time Use menu 5 Speed Units Select whether to record and display speed in KMH or MPH Options KMH and MPH Default Setting MPH 6 Auto Power Off Adjust the timing of the Auto Power Off fu...

Страница 36: ...ew the SSID network name and Password of your Dash Cam 4 G Sensor Turn Off or adjust the sensitivity of the built in G Sensor The G Sensor detects forces which will automatically protect the current r...

Страница 37: ...upon the MicroSD card within the Dash Cam Note The Dash Cam is a read only device therefore uploading files to the SD card when in Mass Storage mode is not possible Turn off the camera before disconne...

Страница 38: ...ery a full charge will take approximately 2 hours Note ALWAYS turn Off the Dash Cam before disconnecting from your computer Update Windows and Mac When this option is selected it is for use with the N...

Страница 39: ...ase contact your local NEXTBASE dealer for accessory purchases Please note that recording is NOT available whilst using the HD Out function Note Turn off the Dash Cam before disconnecting the HD cable...

Страница 40: ...to push the card using your finger nail until you hear and feel a small latch Release pressure and the card will stay retained within the device Use the edge of a small coin if you have difficulty Wi...

Страница 41: ...c conditions and the proximity of buildings trees obscuring the sky The SD card has been formatted in another device and the Cluster Size is not compatible There may also be an error on the card Use t...

Страница 42: ...t Codecs from www nextbase co uk Ensure that Audio setting is turned ON within the Settings of the Dash Cam Turn off the Time Lapse Recording within the Settings of the Dash Cam Hold the camera still...

Страница 43: ...ninstall the NEXTBASE Cam Viewer app and re download again from your devices App Store Ensure that the Dash Cam is in Wi fi Mode and that your mobile device has connected to the Dash Cam Wi fi connect...

Страница 44: ...NOTES 44...

Страница 45: ...NBDVR612GW IM ENG R1 www nextbase co uk...

Отзывы: