background image


R2Lv1.0 – October 6, 2014 2014 


Ready2Lift | 33 

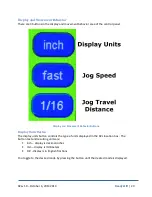
Jog Speed Fast 

The Jog Speed Fast parameter setting sets the speed of travel of the R2L when the ‘fast’ 
movement behavior button is selected on the home panel.  This parameter is only associated 
when this button is invoked.  You can in fact enter a value that is less than a value entered for 
the Jog Speed Medium and/or Jog Speed Slow parameters. 
 

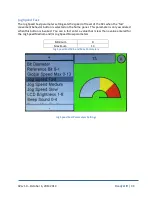
Minimum 

Maximum 

13 

Jog Speed Fast Min and Max Parameters 


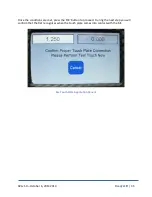
Jog Speed Fast Parameters Settings 


Содержание Ready2Lift

Страница 1: ......

Страница 2: ...nual are available at www nextwaveautomation com Ready2Lift and the configuration of these products are either registered trademarks or trademarks of Next Wave Innovation Software copyright by Next Wa...

Страница 3: ...assumption that the owner is familiar with the basic aspects and operation of a router and router table as well as techniques for the safe operation of woodworking power tools Information in this manu...

Страница 4: ...R2Lv1 0 October 6 2014 2014 Ready2Lift 2 Serial Number Information Record your Ready2Lift serial number here for safe keeping Ready2Lift Serial Number ____________________________________________...

Страница 5: ...mbly Instructions 10 Ready2Lift Checkout and Jog 14 Ready2Lift Control Panel 17 Control Panel Layout 17 Position and Movement 18 Position Calculator Panel 19 Display and Movement Behavior 20 Display U...

Страница 6: ...L Mechanical Height Extent 39 R2L Min Height Position 40 Exceeding R2L Mechanical Min Extent 41 Touch Plate Thickness 42 Applications 43 Touch Plate Height 43 Exe Touch Plate 43 About 49 Maintenance 5...

Страница 7: ...of residence of the authorized Ready2Lift machine distributor from whom the Ready2Lift machine was purchased Please contact Next Wave Innovation to take advantage of this warranty If Next Wave Innova...

Страница 8: ...while operating your Ready2Lift 6 Keep miscellaneous equipment off of the router table and the R2L This includes areas on top and underneath the R2L 7 Never leave the router table and R2L unattended...

Страница 9: ...2Lift electronic components A minimal battery backup will enable you to gracefully stop the job in progress at the time of the power loss thus minimizing the possibility of damage to the Ready2Lift el...

Страница 10: ...o the table Once the R2L is zeroed to the bit you can save up to eight positions in the R2L s memory in case you want to come back later and do another run of specific parts When combined with a Ready...

Страница 11: ...contact with the touch plate This same Ready2Rout touchplate Traveling Beyond the Mechanical Extents If you have set a Max Height Position and a Min Height Position that would allow the R2L unit to a...

Страница 12: ...a short that can damage the control board Your Ready 2 Lift will be delivered without the top plate installed and will look like the Lift in the picture below Using a 27 torx driver remove both the fr...

Страница 13: ...an adapter Please follow the additional instructions included with your adapter When installing the router be sure to line up slots with the pins on the router to allow clearance as seen below Slide...

Страница 14: ...R2Lv1 0 October 6 2014 2014 Ready2Lift 12 Re install clamping bolt and tighten to secure router motor Tighten all four screws of clamping base...

Страница 15: ...e router plate on top of Ready2Lift posts and secure with bolts supplied Place completed Ready2Lift into Router table and connect the serial cable into either the R2R or R2 Interface Connecting to an...

Страница 16: ...Jog Power is supplied to the R2L through the serial cable from either the R2R or R2 Interface Once you turn on power to either the R2R or R2 Interface press the Continue button at the start up screen...

Страница 17: ...ift buttons to raise or lower the lift R2L Control Panel Home If this is a new R2R or R2 Interface you will want to check the Next Wave Innovation downloads page for any updates to the R2 software Pre...

Страница 18: ...October 6 2014 2014 Ready2Lift 16 R2R About Panel Installing software updates is covered in a separate section of Ready2Rout or Interface manual or can be found online at www NextWaveAutomation com do...

Страница 19: ...nction with your router You use the control panel to zero the R2L set the cutter size run an application and update the R2L Control Panel Layout The R2L s Control Panel layout has 4 distinct areas R2L...

Страница 20: ...bles you to accurately jog the bit to a desired position The display unit of measurement is controlled by the top left hand button in the display and movement behavior area The speed of movement and d...

Страница 21: ...alculator Panel You can use the keypad to enter a value then press the Move key to move the R2L to that location The BS key is a backspace The C key clears the current entry The Location key provides...

Страница 22: ...ay and Movement Behavior Buttons Display Units Button The display units button controls the type of units displayed in the R2L location box The button text and resulting units are inch display is deci...

Страница 23: ...e from are based on the display units selected Display Units Jog Travel Distances Inch 1 2 1 4 1 8 1 10 1 16 1 32 1 100 mm 1 0 1 5 0 5 1 5 10 20 1 1 2 1 4 1 10 1 16 1 32 1 100 You toggle to the desire...

Страница 24: ...and applications buttons provide access to the R2L setup applications saving and retrieving favorite positions and the About panel You access the desired operation or application by pressing the appr...

Страница 25: ...ocation in the future by pressing the Save button to open the save panel Once the panel is open press the desired button to store the current location Simply touch a location and any current value in...

Страница 26: ...ero Home If you are setting the R2L zero you would press the Zero Home button blue one If you open the Save Operations Panel and do not want to make a new entry you can exit the panel by pressing on t...

Страница 27: ...October 6 2014 2014 Ready2Lift 25 Recall Button You can move the R2L to a favorite position by opening the Recall operations panel This also includes the Zero Home position Opening the Recall Operatio...

Страница 28: ...appropriate button Recall Panel You are always able to cancel movement by pressing the red Abort button Recall Abort Movement Button If you open the Recall Operations Panel and do not want to move the...

Страница 29: ...n and Max Position This will keep you from jogging the R2L beyond the mechanical extents and thus having to reset zero You access the Setup menu by pressing the Setup button from the home menu Selecti...

Страница 30: ...parameter keypad which you can use to change the value Enter the desired value using the keypad and press the OK button You can also press the XX button to close the parameter keypad The parameter key...

Страница 31: ...site numeric system from what is selected in the Display Units button on the home menu For example this enables you to enter a value that is metric when the Display Units is set to Inch or 1 X Type in...

Страница 32: ...the diameter of the bit in use It is not unheard of to have purchased a 1 4 for example that is actually 0 221 in diameter Display Units Minimum Maximum Inch 1 0 030 in 3 000 in mm 0 800 mm 76 2 mm B...

Страница 33: ...t Value Reference Bit Location 0 Center 1 Edge Referent Bit Parameters Reference Bit Parameter Settings The reference location you choose to use is up to you and in most cases is a personal preference...

Страница 34: ...ax 0 13 The Fence Speed Max parameter sets the maximum speed of travel of the R2L This parameter will override the Jog Speed Fast Medium and Slow parameter settings Minimum 1 Maximum 13 Fence Speed Mi...

Страница 35: ...fast movement behavior button is selected on the home panel This parameter is only associated when this button is invoked You can in fact enter a value that is less than a value entered for the Jog S...

Страница 36: ...the med movement behavior button is selected on the home panel This parameter is only associated when this button is invoked You can in fact enter a value that is more or less than a value entered for...

Страница 37: ...the slow movement behavior button is selected on the home panel This parameter is only associated when this button is invoked You can in fact enter a value that is less than a value entered for the J...

Страница 38: ...6 2014 2014 Ready2Lift 36 LCD Brightness 1 8 The LCD Brightness parameter setting controls the brightness of the R2L s LCD display Minimum 1 Maximum 8 LCD Brightness Min and Max Parameters LCD Bright...

Страница 39: ...parameter setting controls the volume of the beep sound made when a button is pressed on the R2L s control panel A setting of 0 will result in no sound emanating from the R2L Minimum 0 no sound Maxim...

Страница 40: ...nter in this parameter may in fact exceed the movement capability of the R2L unit Display Units Minimum Maximum Inch 1 0 000 in 10 in mm 0 000 mm 254 mm R2L Max Position Min and Max Parameters Fence M...

Страница 41: ...ntained on the R2L when the unit is off Exceeding R2L Mechanical Height Extent If you exceed the mechanical extent you hear a distinct noise coming from the lead screw nut slipping At this point you h...

Страница 42: ...e R2L unit Display Units Minimum Maximum Inch 1 0 000 in 10 00 in mm 0 000 mm 254 mm Fence Min Position Min and Max Parameters R2L Min Position Parameters While the current maximum value is 10 the ove...

Страница 43: ...ained on the R2L when the unit is off Exceeding R2L Mechanical Min Extent If you exceed the mechanical extent you hear a distinct noise coming from the lead screw nut slipping At this point you have l...

Страница 44: ...e Thickness parameter setting sets the thickness of the touchplate This parameter setting is used by the Touch Plate Fence application Display Units Minimum Maximum Inch 1 0 000 in 3 000 in mm 0 000 m...

Страница 45: ...u is entered correctly for the bit currently mounted in the router prior to running the Touch Plate application After selecting the Touch Plate application press the Press to Run button Touch Plate Ca...

Страница 46: ...plication Menu Once you ve completed these steps press the Press to Run button to start the application The first panel that appears reminds you of the steps that are required to be completed prior to...

Страница 47: ...4 Ready2Lift 45 Once the conditions are met press the OK button to proceed During the next step you will confirm that the R2L recognizes when the touch plate comes into contact with the bit Exe Touch...

Страница 48: ...2014 2014 Ready2Lift 46 Perform the test by moving the touch plate in contact with the bit which has the magnet attached to it If the test is successful you will see the panel below Exe Touch Plate Ap...

Страница 49: ...the touch plate is flush against the table surface press the OK button to start the application The panel that is open while the R2L is moving to make contact with the bit enables you to cancel the m...

Страница 50: ...h Plate Application Panel 6 Press the OK button to accept the new Zero Home position Press the Cancel button to discard the outcome of the application and maintain the current Zero Home position Press...

Страница 51: ...e installed on the R2L unit Selecting the About Menu from the Operations and Applications Menu The about panel opens the information can be compared with information on the latest version information...

Страница 52: ...er set screws to ensure they are tight If they get loose apply a dab of wood glue and reseat them Repair Parts and Upgrades Repair parts for the Ready2Lift are available online in the Next Wave Innova...

Страница 53: ...r fractions For example you can use a 1 4 bit to rout a 12mm dado without complicated calculations or measurements Firmware updates are made via USB port on the rear of the fence or controller box Tig...

Отзывы: