background image


2-4  Getting Started Guide


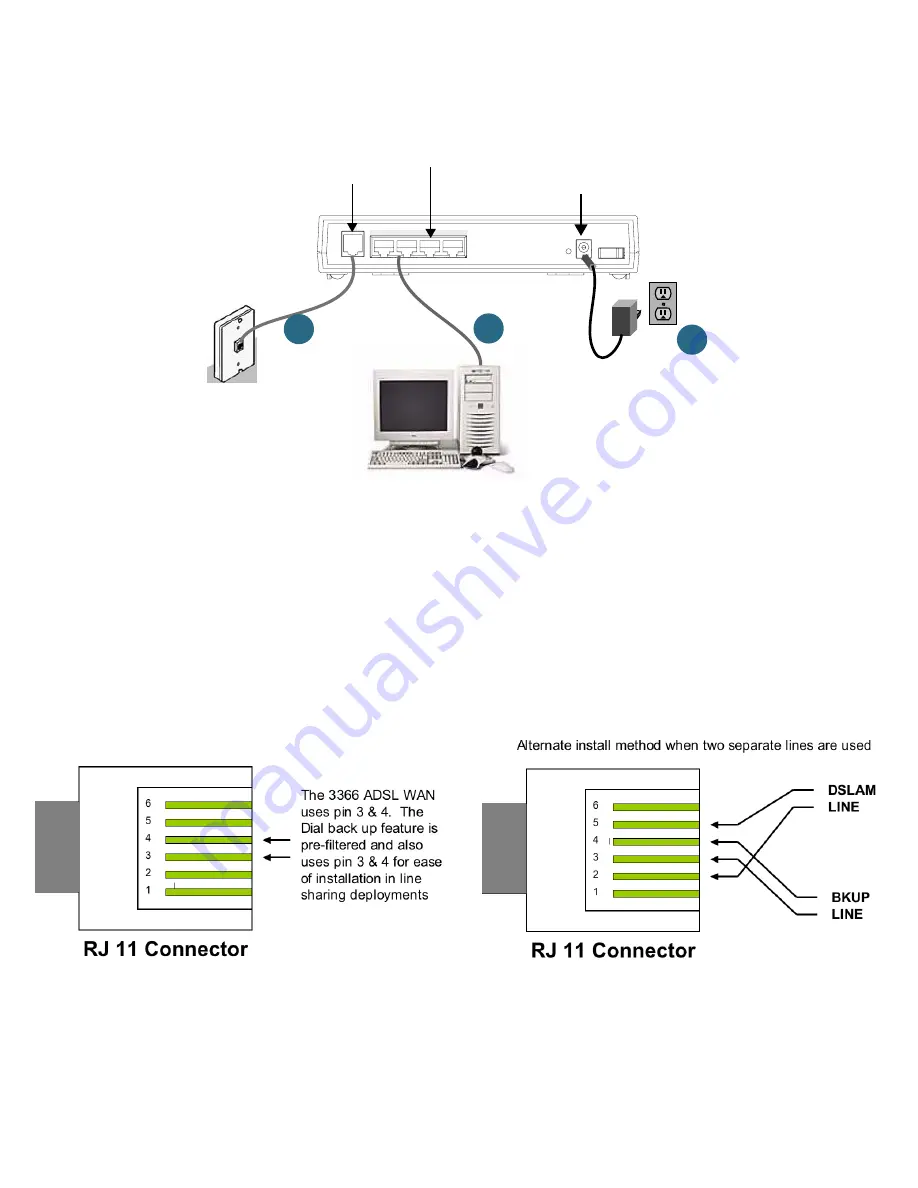
Connect your computer, DSL line, and power source as shown.

1.

For a direct computer to router Ethernet connection, use the standard Ethernet cable included with your 
router.

2.

Use the supplied RJ-11 telephone cable to connect the router to your DSL wall jack.

3.

Connect the supplied power brick to a power outlet and the connector end to the router.

You should now have: the power adapter plugged in; the Ethernet cable connected between the router and your 
computer; and the telephone cable connected to its appropriate wall jack.


Note:


The following diagrams show the pinouts for configuring when line sharing or when you are using 

separate physical lines (requires line1, line2, line splitter – not included). 

Power

Off / On

LAN

DSL

4

1

2

3

1

DSL

Ethernet

DC Power

3

2

RJ-11 Pinouts for Line Sharing

RJ-11 Pinouts for Separate Physical Lines

Содержание 3366-ENT

Страница 1: ...Netopia 3366 ENT ADSL Router with V 92 Backup Getting Started Guide...

Страница 2: ...t laws such materials may not be copied in whole or part without the prior written consent of Netopia Inc Under the law copying includes translation to another language or format Netopia Cayman and Br...

Страница 3: ...ork 3 1 Connecting to an Ethernet Network 3 2 Chapter 4 Configuring TCP IP 4 1 Configuring TCP IP on Windows based Computers 4 1 Microsoft Windows 4 1 Configuring TCP IP on Macintosh Computers 4 3 Mac...

Страница 4: ...10 Using Scheduled Connections with Backup 7 13 Backup Default Gateway 7 15 Chapter 8 Technical Specifications and Safety Information 8 1 Description 8 1 Power requirements 8 1 Environment 8 1 Softwar...

Страница 5: ...1 How to Use this Guide on page 1 2 Features and Capabilities The Netopia 3366 ENT ADSL Router with V 92 Backup provides the following features LAN interface four port 10 100BaseTX RJ 45 Ethernet swi...

Страница 6: ...et you up and running and connected to your local area network and the Internet It is intended to be viewed on line using the powerful features of the Adobe Acrobat Reader The information display has...

Страница 7: ...choosing a location for the Netopia ADSL Router with V 92 Backup consider Available space and ease of installation Physical layout of the building and how to best use the physical space available for...

Страница 8: ...ket outlet or appliance coupler be located so it is readily accessible CAUTION North America Only For use only with a CSA Certified or UL Listed Limited Power Source or Class 2 power supply rated 12Vd...

Страница 9: ...t ports Four RJ 45 10 100Base T Ethernet jacks You can use one of these to configure the Netopia 3366 ENT You can either connect your computer directly to an Ethernet port using the supplied Category...

Страница 10: ...outlet and the connector end to the router You should now have the power adapter plugged in the Ethernet cable connected between the router and your computer and the telephone cable connected to its...

Страница 11: ...lights D S L S y n c L A N 1 L A N 2 L A N 3 L A N 4 D i a l U p Power Solid green when the power is on Solid green when connected Solid green when connected Flashes green for traffic on the WAN to e...

Страница 12: ...2 6 Getting Started Guide...

Страница 13: ...installed before they can communicate through the Netopia 3366 ENT The following illustration shows the minimal requirements for a typical PC or Macintosh computer Application software This is the sof...

Страница 14: ...figured and connected to your LAN PC and Macintosh computers that have their required components in place will be able to connect to the Internet or other remote IP networks Connecting to an Ethernet...

Страница 15: ...ork Power Off On LAN DSL 4 1 2 3 To connect your 10 100Base T network to the Netopia 3366 ENT through an Ethernet port use standard Category 5 Ethernet cables with RJ 45 connectors You can attach addi...

Страница 16: ...3 4 Getting Started Guide...

Страница 17: ...s chapter explains the following topics Configuring TCP IP on Windows based Computers on page 4 1 Configuring TCP IP on Macintosh Computers on page 4 3 Con guring TCP IP on Windows based Computers Con...

Страница 18: ...Gateways if available Step 5 OK the settings Restart if prompted NOTE You can also use these instructions to configure other computers on your network to accept IP addresses served by the Netopia 3366...

Страница 19: ...er and optional in earlier system versions You must have built in Ethernet or a third party Ethernet card and its associated drivers installed in your Macintosh Macintosh MacOS 8 or higher or Mac OS X...

Страница 20: ...rted Guide Step 3 Select Configure Using DHCP Step 4 Close and Save if prompted NOTE You can use these instructions to configure other computers on your network to accept IP addresses served by the Ne...

Страница 21: ...atures The entry points are displayed in the Main Menu shown below The Easy Setup menus display and permit changing the values contained in the default connection profile You can use Easy Setup to ini...

Страница 22: ...sets of tables and device logs that show information about your router your network and their history The Quick Menus screen is a shortcut entry point to 22 of the most commonly used configuration me...

Страница 23: ...vigate the Netopia 3366 ENT s configuration screens enter and edit information and make choices The following table lists the keys to use to navigate through the Telnet screens To Use These Keys Move...

Страница 24: ...5 4 Getting Started Guide...

Страница 25: ...ote location Set up IP addresses and IP address serving Password protect configuration access to your Netopia 3366 ENT Accessing the Easy Setup Telnet screens To access the Telnet screens Telnet to th...

Страница 26: ...C SNAP for PPP DLEs only PPP Authentication None default PAP or CHAP for PAP or CHAP User Name or Host Name _______________________ for PAP or CHAP Password or Secret _______________________ Address T...

Страница 27: ...through a Telnet Session on page 5 2 Telnet is configured for the recommended values You have entered the correct password if necessary Your Netopia 3366 ENT s Telnet access may be password protected...

Страница 28: ...ost common type If you know that you have the reversed inner outer pair type of wiring choose A A1 Outer Pair from the pop up menu 4 Select Data Link Encapsulation and from the pop up menu choose eith...

Страница 29: ...Encapsulation RFC1483 Mode Bridged 1483 Routed 1483 Address Translation Enabled Yes IP Addressing Numbered Local WAN IP Address 0 0 0 0 Local WAN IP Mask 0 0 0 0 PREVIOUS SCREEN NEXT SCREEN Connectio...

Страница 30: ...his restriction See the Firmware User s Guide chapter on Multiple Network Address Translation MultiNAT for more information 2 Select Ethernet Subnet Mask and enter the subnet mask your ISP has given y...

Страница 31: ...addresses to your client workstations Normally you would accept the default On so that workstations on your LAN can have IP addresses assigned dynamically from the router 8 The IP address server will...

Страница 32: ...ng the Netopia Router s power brick The Router will restart and your configuration settings will be activated You can then Exit or Quit your Telnet application Easy Setup is now complete Easy Setup Se...

Страница 33: ...AN In the event of a loss of primary connectivity you have the option of switching back to the primary port automatically once it has recovered its connection Con guring Backup The following menus sup...

Страница 34: ...backup modem interface Profile Name Give the profile a descriptive name for example Modem Backup Profile Enabled Ordinarily this is toggled to Yes You can toggle it to No if you want to disable it la...

Страница 35: ...ackup Select Encapsulation Options Add Connection Profile Profile Name Profile 1 Profile Enabled Encapsulation Type PPP RFC1483 ATMP Encapsulation Options PPTP IPsec L2TP IP Profile Parameters COMMIT...

Страница 36: ...e and Secret Unless otherwise instructed you can leave the other defaults unchanged Press Escape Datalink PPP MP Options Data Compression rd LZS Send Authentication None PAP Send User Name CHAP Send P...

Страница 37: ...e Backup for the Interface Group Telco Options became visible Select Telco Options The Telco Options screen allows you to set the parameters for the modem connection IP Profile Parameters Address Tran...

Страница 38: ...of inactivity You can also toggle Callback to No or Yes In most cases since this is a backup connection you can leave this set to the default No In some cases your service provider or corporate offic...

Страница 39: ...see Backup Default Gateway on page 7 15 System Configuration Main Menu IP Setup IP Setup Ethernet IP Address 192 168 1 1 Ethernet Subnet Mask 255 255 255 0 Define Additional Subnets Default IP Gateway...

Страница 40: ...ion Main Menu Setup WAN Configuration WAN Wide Area Network Setup ATM Circuits Configuration Display Change Connection Profile Add Connection Profile Delete Connection Profile WAN Default Profile ATMP...

Страница 41: ...eaker On You can set how you want to hear dialing and connection tones generated by the modem or you can turn them off from the pull down menu Options are Never Until Carrier During Answer Always Spea...

Страница 42: ...esolutions of five seconds This is how often the router evaluates the state of the connections and makes decisions Select Ping Host Name or IP Address and enter an IP address or resolvable DNS name th...

Страница 43: ...he router should try to Auto Recover when the backup is invoked because of a Layer 2 loss for example a no valid Connection Profile Layer 1 is still available and this is what recovery checks Use this...

Страница 44: ...e up than others for example RFC1483 bridged vs PPP with PAP authentication The maximum allowed setting for the Layer 2 Failure Timer is 65535 Select Clear Backup Call only if idle The default Yes wil...

Страница 45: ...ckup modem The backup modem will be activated upon primary WAN link failure and remain active until primary WAN link recovery To configure a Scheduled Connection from the Main Menu select WAN Configur...

Страница 46: ...24X7 connection Press Escape to return to the Add Scheduled Connection screen Add Scheduled Connection Scheduled Connection Enable On How Often Weekly Schedule Type Forced Up Set Weekly Schedule Use...

Страница 47: ...to another router that has for example an ISDN or other broadband connection to the Internet and designating the second router as the backup gateway Should the primary WAN connection fail traffic wou...

Страница 48: ...Setup Ethernet IP Address 192 168 1 1 Ethernet Subnet Mask 255 255 255 0 Define Additional Subnets Default IP Gateway 0 0 0 0 Backup IP Gateway 0 0 0 0 Primary Domain Name Server 0 0 0 0 Secondary Dom...

Страница 49: ...etopia 3366 ENT ADSL Router with V 92 Backup has an RJ 11 jack for WAN line connections and a 4 port 10 100Base T Ethernet switch for your LAN connections Power requirements 12 VDC input 1 0 amps Envi...

Страница 50: ...e EMI Compatibility 89 336 EEC European directive EN55022 1994 CISPR22 Class B EN300 386 V1 2 1 Regulatory notices European Community This Netopia product conforms to the European Community CE Mark st...

Страница 51: ...function all repairs should be performed by our Company or an authorized agent Under FCC rules no customer is authorized to repair this equipment This restriction applies regardless of whether the equ...

Страница 52: ...ety information is provided in conformance with Australian safety requirements Caution DO NOT USE BEFORE READING THE INSTRUCTIONS Do not connect the Ethernet ports to a carrier or carriage service pro...

Страница 53: ...rk the telephone company will notify you in advance that temporary discontinuance of service may be required But if advance notice isn t practical the telephone company will notify the customer as soo...

Страница 54: ...typically lightning transients are very destructive to customer terminal equipment connected to AC power sources This has been identified as a major nationwide problem Therefore it is advised that th...

Отзывы: