background image

Getting Started

10

Powerline Music Extender XAU2511 

Set Up the Powerline Network

You can set up a new Powerline network that includes the Music Extender, or you can add the 
Music Extender to an existing Powerline network. 

Set Up a New Powerline Network

Different Powerline product models can share the network. All NETGEAR Powerline 
HomePlug AV products are compatible with the Powerline Music Extender XAU2511.

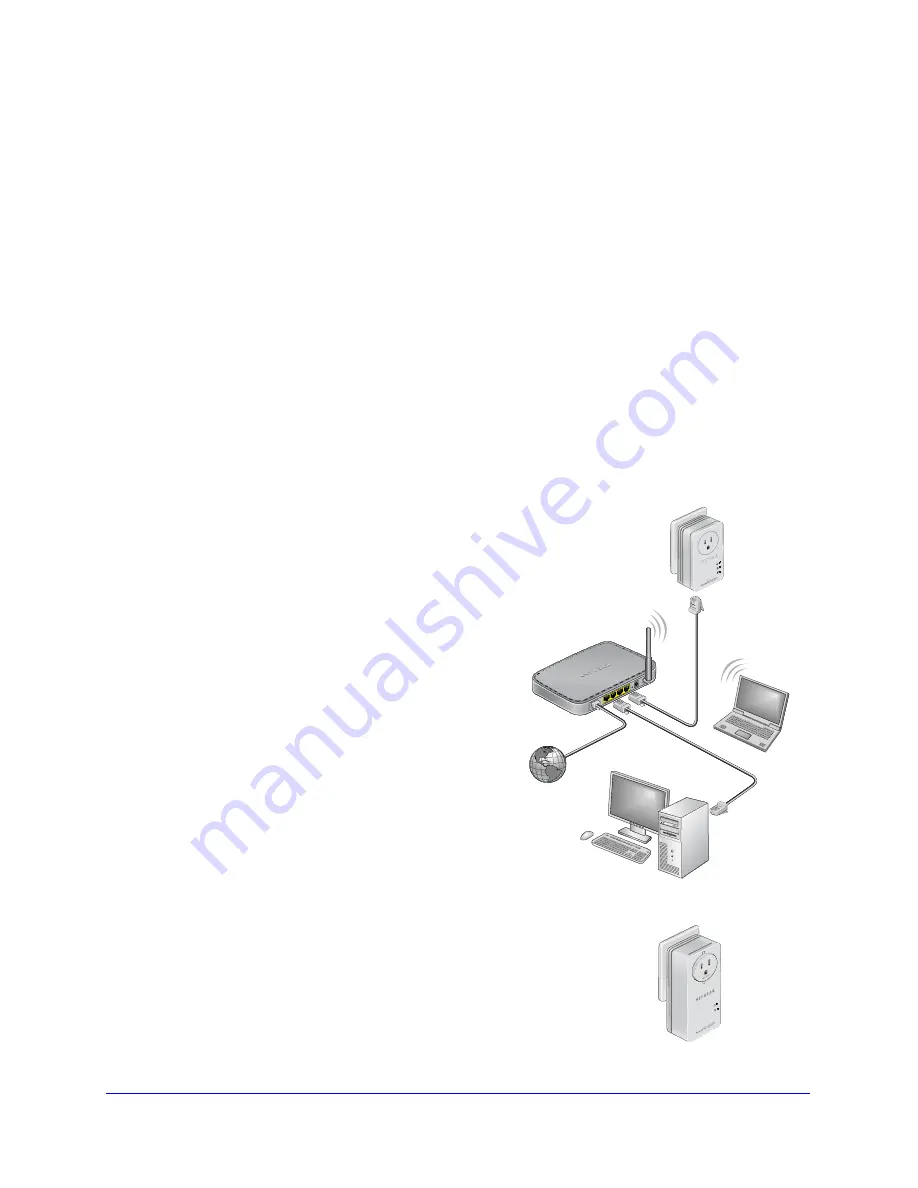
To set up a new Powerline network:

1. 

Make sure that your WiFi router or gateway is connected to the Internet and that your 

Ethernet wired connections are working. 

a.

On a computer that is connected to your router or gateway using an Ethernet cable, 

open a web browser and navigate to a web page.

b. 

On a computer or device that is connected to your wireless network, open a web 

browser and navigate to a web page.

2. 

First 
Powerline 

device

Music
Extender
XAU2511

Plug the first Powerline device (sold 

separately) into a wall outlet near your router 

or gateway. Then, connect the device to the 

LAN port on your router or gateway using an 

Ethernet cable.

For more detailed instructions, see the 
installation guide that came in the package.

3. 

Plug the Music Extender into a wall outlet 

near the USB devices that you want to 

connect to the Music Extender.

4. 

Wait for each Powerline adapter or extender 

to be recognized by the Powerline network. 

The Power and Powerline LEDs should 
turn on. This could take as little as 5 
seconds, or up to 80 seconds. If the 
Powerline LEDs are green or amber, the 
devices are successfully connected. A red 
LED indicates a poor link rate. In this case, 
move the device to another electrical outlet 
with a better connection.

5. 

Set up security as explained in 

Use the 

Security Button to Set the Encryption Key 

on 

page 12.

Содержание XAU2511

Страница 1: ...350 East Plumeria Drive San Jose CA 95134 USA October 2012 202 10955 01 v1 0 Powerline Music Extender XAU2511 User Manual...

Страница 2: ...tgear com Phone US Canada only 1 888 NETGEAR Phone Other Countries Check the list of phone numbers at http support netgear com general contact default aspx NETGEAR recommends that you use only the off...

Страница 3: ...SB to Audio Cable 17 ReadySHARE AirMusic for Smartphones and Tablets 18 Set Up ReadySHARE AirMusic 18 Use ReadySHARE AirMusic on iOS Devices 19 Use ReadySHARE AirMusic on Android Devices 20 Troublesho...

Страница 4: ...7 Chapter 4 Troubleshooting Basic Functioning 39 Troubleshooting Tips 39 LEDs 39 If You Do Not See All Your Devices with the NETGEAR genie 40 If You Do Not See the Powerline Icon on Your Network Map 4...

Страница 5: ...res and how to customize the encryption key for added security This chapter includes Hardware Features How the Music Extender Fits in Your Network Set Up the Powerline Network Powerline Network Securi...

Страница 6: ...regions might include a resource CD Ethernet cable Powerline Music Extender Resource CD USB to audio cable XAU2511 Figure 1 Package contents The following illustration shows the hardware features of t...

Страница 7: ...Good Amber Link rate 50 and 80 Mbps Fair Red Link rate 50 Mbps Poor Ethernet LED Solid green The device has an active Ethernet connection Off There is no Ethernet connection Buttons and Switches Fact...

Страница 8: ...printers and USB hard drives to your home network so they can be accessed through WiFi Filtered AC Socket The filtered AC socket can remove some electrical noise that might affect Powerline performan...

Страница 9: ...ne network you need at least two compatible Powerline devices including the Music Extender For best performance plan the location of your Powerline devices Use an electrical outlet that is not control...

Страница 10: ...ork open a web browser and navigate to a web page 2 First Powerline device Music Extender XAU2511 Plug the first Powerline device sold separately into a wall outlet near your router or gateway Then co...

Страница 11: ...y Button to Set the Encryption Key on page 12 Powerline Network Security A Powerline network consists of two or more compatible Powerline devices using the same network encryption key Securing your ne...

Страница 12: ...default encryption key and set a private encryption key instead The default encryption key is HomePlugAV To set the encryption key 1 Make sure that all of the Powerline devices that you want to confi...

Страница 13: ...device press the Security button on the second Powerline device for 2 seconds You need to press both Security buttons within 2 minutes The Power LED starts blinking after you release the button This p...

Страница 14: ...ic wirelessly from your smartphone or tablet Play music wirelessly from your computer Connect USB storage devices to your home network Connect USB printer and scanners to your home network This chapte...

Страница 15: ...ia Extender utility from the NETGEAR website Download the NETGEAR USB Media Extender Utility The NETGEAR USB Media Extender utility is a free download available from the NETGEAR website To download th...

Страница 16: ...computer that is connected to a Powerline device Note If you do not have a resource CD follow the instructions in Download the NETGEAR USB Media Extender Utility on page 15 Run the file that you down...

Страница 17: ...d USB to audio cable Connect to USB speakers directly Connect using USB to audio cable To connect your speakers to the Music Extender using the USB to audio cable Use the two RCA connectors to connect...

Страница 18: ...HARE AirMusic ReadySHARE AirMusic is for smartphones and tablets This setup procedure works only if you have a WiFi network at home that includes a WiFi router gateway or extender Router Gateway Step...

Страница 19: ...application 2 Click the arrow on the right side of the screen 3 Select XAU2511 XX in the devices list You should hear the Music Extender play music on the remote speaker Note Each Music Extender devi...

Страница 20: ...X Music plays on your remote speaker through the Music Extender Note Each Music Extender device is shown in the format XAU2511 xx where xx is a unique 2 digit number You can identify the Music Extende...

Страница 21: ...eo system Set Up ReadySHARE Music To set up ReadySHARE Music on your computer for the first time 1 Connect your speakers to the Music Extender see Use the USB to Audio Cable on page 17 2 Install the N...

Страница 22: ...t the Disconnect button as shown in the following figure Use ReadySHARE Music After the First Installation The NETGEAR USB Media Extender utility is always running in the background To display the uti...

Страница 23: ...SB Storage 1 Connect any storage device to the USB port of the Music Extender For example you could connect a USB hard drive or a USB stick 2 Install the NETGEAR USB Media Extender utility see Install...

Страница 24: ...have multiple USB printers or scanners working simultaneously if each one is connected to a Music Extender To set up ReadySHARE Printer 1 Connect the USB printer scanner or fax machine to the USB por...

Страница 25: ...er device listing and click the Connect for Scan Fax function button Your remote printer or scanner or fax machine is now connected as if it were connected locally through the USB cable To print or sc...

Страница 26: ...ork You can use NETGEAR genie to Change the name of a Powerline device Turn LEDs on or off Set encryption keys Restore a device to default configuration settings Add a device to the Powerline network...

Страница 27: ...he network but this procedure assumes that you are working from the computer that is connected to a Powerline device Note If you already have NETGEAR genie installed on your computer you must reinstal...

Страница 28: ...icon located on your desktop Select Start All Programs NETGEAR genie Powerline Utility Screen The Powerline Utility screen is where you view and manage your Powerline network To navigate to the Powerl...

Страница 29: ...of a device to view more information about it Powerline icon Security icon Device image Refresh icon Device information Security Icon You can click the Security icon on the Powerline Utility screen t...

Страница 30: ...Powerline Devices To view the link rate between your Powerline devices On the Powerline Utility screen click the device whose link rate you want to view A pop up screen displays Tx The rate at which...

Страница 31: ...name the Music Extender its AirMusic name appears below its model number on the Powerline Utility screen To name a Powerline device in your Powerline network 1 On the Powerline Utility screen right c...

Страница 32: ...t share the same Powerline network have to use the same encryption key The factory default encryption key is HomePlugAV In locations such as apartment buildings or office buildings others might share...

Страница 33: ...31 Model This identifies the model number of the Powerline adapter MAC Address The MAC address for the Powerline device This information is on the product label which might not be visible when the dev...

Страница 34: ...n key to its factory default of HomePlugAV Note If you customized your network encryption key the local Powerline device is disconnected from the network when you reset it to the factory defaults To a...

Страница 35: ...the computer 3 Start NETGEAR genie and navigate to the Powerline Utility screen 4 Click the Refresh icon and wait for the genie to detect the new device 5 Right click the device and select Security fr...

Страница 36: ...e and password for the password both in lowercase letters Note The web genie password is different from the device password printed on the product label The default web genie user name and password ar...

Страница 37: ...menu on the left select Administration Firmware Upgrade The following screen displays Click Check 3 Click the Check button If new firmware is available the Music Extender finds it 4 Click Yes to upda...

Страница 38: ...nter If you do not find the solution here check the NETGEAR support site at http support netgear com for product and contact information This chapter includes Basic Functioning Troubleshooting Tips If...

Страница 39: ...es not reset the device Pressing the Security button longer than 2 seconds does not activate security LEDs The LEDs indicate activity and can be used for troubleshooting LEDs Are Off When the Powerlin...

Страница 40: ...mputer connected directly to the router can access the Internet Press the Reset button on each Powerline device for 1 second to return the device to its factory default settings If You Do Not See All...

Страница 41: ...appearing on the Network Map To allow Powerline Utility network traffic to pass through the Symantec Endpoint Protection filter you must add a firewall rule to the filter Note Symantec Endpoint Protec...

Страница 42: ...isplays 3 Click Add to add a firewall rule The following screen displays 4 In the General tab do the following a Type a name for the firewall rule in the Rule name field b Select the Allow this traffi...

Страница 43: ...nu select Ethernet b In the Ethernet type field type 0x88E1 c Click OK to create the firewall rule for your Powerline devices The rule appears in the Firewall rules list 6 Make sure the check box next...

Страница 44: ...al Information This appendix provides technical specifications and safety information for the Powerline Music Extender XAU2511 This appendix includes the following sections Technical Specifications Sa...

Страница 45: ...relative humidity noncondensing Security encryption type 128 bit AES MAC addresses 64 number of nodes that can be added to a single network Bandwidth 200 Mbps Compatibility Not HomePlug v1 0 or HomeP...

Страница 46: ...components To help avoid damaging your system be sure that the voltage selection switch if provided on the power supply is set to match the power available at your location 110 volts V 60 hertz Hz in...

Страница 47: ...or damaged The product does not operate correctly when you follow the operating instructions Keep your system away from radiators and heat sources Also do not block cooling vents Do not spill food or...

Страница 48: ...interference and 2 this device must accept any interference received including interference that may cause undesired operation FCC Declaration Of Conformity We NETGEAR Inc 350 East Plumeria Drive San...

Страница 49: ...ctive 2004 108 EC and Low Voltage Directive 2006 95 EC as supported by applying the following test methods and standards EN 55022 2010 EN 55024 2010 EN 60950 1 2006 A11 2009 A1 2010 A12 2011 EN 61000...

Страница 50: ...imensions 45 E emissions electromagnetic 45 encryption keys setting 12 32 encryption type security 45 Ethernet LED described 7 troubleshooting 40 Ethernet port 8 F Factory Reset button described 7 tro...

Страница 51: ...ys 11 setting up 10 Powerline Utility 28 Printer ReadySHARE 24 private encryption key 12 protocols data and routing 45 R ReadySHARE features Air Music 18 Music 21 Printer 24 USB Storage 23 resetting t...

Отзывы: