background image

N600 Wireless Dual Band Router WNDR3400 User Manual 

Safeguarding Your Network

2-11

v1.0, August 2010

3.

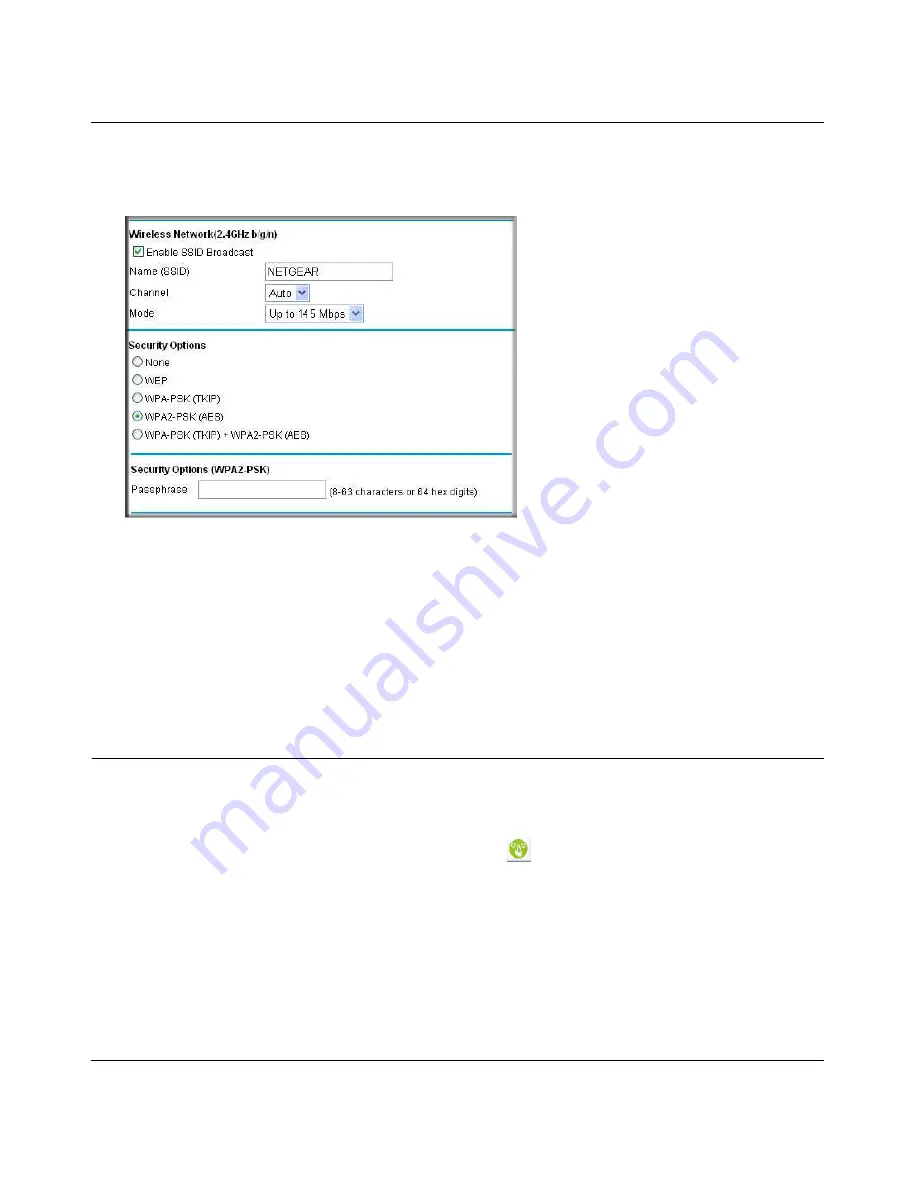
On the Wireless Setting screen, select the radio button for the WPA or WPA2 option of your 
choice.

4.

The settings displayed on the screen depend on which security option you select.

5.

For WPA-PSK or WPA2-PSK, enter the passphrase. 

6.

To save your settings, click 

Apply

.

Using Push 'N' Connect (WPS) to Configure Your Wireless 
Network

If your wireless clients support Wi-Fi Protected Setup (WPS), you can use this feature to configure 
the wireless router’s SSID and security settings and, at the same time, connect the wireless client 
securely and easily to the wireless router. Look for the 

 symbol on your client device 

Figure 2-4

Содержание WNDR3400 - N600 Wireless Dual Band Router

Страница 1: ...202 10581 02 August 2010 v1 0 NETGEAR Inc 350 E Plumeria Drive San Jose CA 95134 USA N600 Wireless Dual Band Router WNDR3400 User Manual...

Страница 2: ...porter It is hereby certified that the N600 Wireless Dual Band Router WNDR3400 has been suppressed in accordance with the conditions set out in the BMPT AmtsblVfg 243 1991 and Vfg 46 1992 The operatio...

Страница 3: ...mit den grundlegenden Anforderungen und den brigen einschl gigen Bestimmungen der Richtlinie 1999 5 EG befindet Eesti Estonian K esolevaga kinnitab NETGEAR Inc seadme Radiolan vastavust direktiivi 19...

Страница 4: ...ma mal htigijiet essenzjali u ma provvedimenti ohrajn relevanti li hemm fid Dirrettiva 1999 5 EC Magyar Hungarian Alul rott NETGEAR Inc nyilatkozom hogy a Radiolan megfelel a vonatkoz alapvet k vetelm...

Страница 5: ...likely to cause harmful interference in which case the user will be required to correct the interference at his own expense If this equipment does cause harmful interference to radio or television rec...

Страница 6: ...he Class B category information equipment to be used in a residential area or an adjacent area thereto and conforms to the standards set by the Voluntary Control Council for Interference by Data Proce...

Страница 7: ...lication Details Model Number WNDR3400 Publication Date August 2010 Product Family Wireless Router Product Name N600 Wireless Dual Band Router WNDR3400 Home or Business Product Home Language English P...

Страница 8: ...Your Network Planning Your Wireless Network 2 1 Wireless Placement and Range Guidelines 2 2 Wireless Security Options 2 3 Manually Configuring Your Wireless Settings 2 4 Configuring WEP Wireless Secu...

Страница 9: ...ing the Time 3 11 Chapter 4 Using Network Monitoring Tools Upgrading the Router Firmware 4 1 Upgrading Automatically to New Router Software 4 3 Upgrading Manually to New Router Software 4 3 Viewing Wi...

Страница 10: ...Deleting a Port Forwarding Entry 5 18 Configuring Port Triggering 5 18 Wireless Repeating Also Called WDS 5 22 Wireless Repeating Function 5 23 Setting Up the Base Station 5 24 Setting Up a Repeater U...

Страница 11: ...ubleshooting Basic Functions 8 3 Cannot Access the Router Main Menu 8 4 Cannot Access the Internet 8 5 Troubleshooting a Network Using the Ping Utility 8 6 Testing the LAN Path to Your Router 8 7 Test...

Страница 12: ...formats and scope of this manual are described in the following paragraphs Typographical conventions This manual uses the following typographical conventions Formats This manual uses the following for...

Страница 13: ...on the Adobe Web site at http www adobe com Revision History NETGEAR Inc is constantly searching for ways to improve its products and documentation The following table indicates any changes that migh...

Страница 14: ...on page 1 6 Viewing or Manually Configuring Your ISP Settings on page 1 6 Using the Setup Manual For first time installation of your wireless router refer to the NETGEAR Router Setup Manual The Setup...

Страница 15: ...rowser and then press Enter A login window displays 2 Enter admin for the router user name and your password or the default password For information about how to change the password see Changing the B...

Страница 16: ...n displays unless you previously cleared the Check for Updated Firmware Upon Log in check box If the router discovers a newer version of the software you are asked if you want to upgrade to the new so...

Страница 17: ...the Documentation link under Web Support to view support information or the documentation for the wireless router If you do not click Logout the wireless router waits for 5 minutes after no activity b...

Страница 18: ...me you select it that language is also stored in memory If you are connected to the Internet and select a language that is not already stored in flash memory the language is downloaded from the NETGEA...

Страница 19: ...ck Next to proceed 3 Enter your ISP settings as needed 4 At the end of the Setup Wizard click Test to verify your Internet connection If you have trouble connecting to the Internet see Chapter 8 Troub...

Страница 20: ...6 Click Test to test your Internet connection If the NETGEAR website does not appear within one minute see Chapter 8 Troubleshooting When your Internet connection is working you do not need to launch...

Страница 21: ...ided a Service Name enter it here Connection Mode Specify when the router will connect to and disconnect from the Internet Always On The router logs in to the Internet immediately after booting and ne...

Страница 22: ...ogin is required Router MAC Address The Ethernet MAC address that will be used by the wireless router on the Internet port Some ISPs register the Ethernet MAC address of the network interface card in...

Страница 23: ...tricting Access to Your Router on page 2 19 Adding Guest Networks on page 2 20 Planning Your Wireless Network For compliance and compatibility between similar products in your area the operating chann...

Страница 24: ...r the PIN of the wireless device Make sure that all wireless computers and wireless adapters on the network are Wi Fi certified and WPA or WPA 2 capable and that they support WPS configuration See Usi...

Страница 25: ...Unlike wired network data your wireless data transmissions can extend beyond your walls and can be received by anyone with a compatible adapter For this reason use the security features of your wirele...

Страница 26: ...to make changes make sure to note the current settings first To view or manually configure the wireless settings 1 Log in to the wireless router at its default LAN address of http www routerlogin net...

Страница 27: ...Settings from the main menu to display the Wireless Settings screen The settings for this screen are explained in Table 2 1 on page 2 6 3 Select the region in which the wireless router will operate 4...

Страница 28: ...of some products such as Windows XP Name SSID This is the wireless network name Enter a 32 character maximum name in this field This field is case sensitive In a setting where there is more than one...

Страница 29: ...to connect to the wireless router When you select this option this additional area appears on your screen Security Options WPA PSK Enter the WPA passphrase Network key The passphrase must be between...

Страница 30: ...less router 2 From the main menu select Wireless Settings to display the Wireless Settings screen 3 Set the Security Options for the 2 4 GHz network first by selecting the WEP radio button in the Secu...

Страница 31: ...values are not case sensitive You can manually enter the four data encryption keys These values must be identical on all computers and access points in your network Enter 10 hexadecimal digits any com...

Страница 32: ...s the strongest security WPA2 with AES is a hardware implementation see your device documentation before implementing it Consult the product documentation for your wireless adapter for instructions fo...

Страница 33: ...urity option you select 5 For WPA PSK or WPA2 PSK enter the passphrase 6 To save your settings click Apply Using Push N Connect WPS to Configure Your Wireless Network If your wireless clients support...

Страница 34: ...s router includes a dome The dome acts as a push button for the router to enable WPS security with other WPS enabled devices Pushing on the dome for over 5 seconds opens a 2 minute window for the rout...

Страница 35: ...WPA2 security The dome lights will stop blinking or turn off depending on how you have them configured 4 Be sure to note the new SSID and WPA WPA2 password for the wireless network To connect a devic...

Страница 36: ...ee the wireless router s Internet LED blink indicating communication to the ISP Using PIN Entry to Add a WPS Client Any wireless computer or wireless adapter that will connect to the wireless router w...

Страница 37: ...outer Add WPS Client screen enter the client PIN number and then click Next The wireless router tries to communicate with the client for 4 minutes The wireless router WPS screen displays a message con...

Страница 38: ...displays the wireless router PIN and allows you to Disable Router s PIN and the Keep Existing Wireless Settings for either wireless network 2 4GHz or 5GHz By default both Keep Existing Wireless Setti...

Страница 39: ...led 1 Follow the procedures in Using a WPS Button to Add a WPS Client on page 2 12 or Using PIN Entry to Add a WPS Client on page 2 14 2 To view a list of all devices connected to your wireless router...

Страница 40: ...anually Configuring Your Wireless Settings on page 2 4 and click Apply On the WPA PSK WPA2 PSK screen select a passphrase and click Apply Record this information to add additional clients 3 For the no...

Страница 41: ...arding Your Network 2 19 v1 0 August 2010 Restricting Access to Your Router You can use the advanced Wireless Settings screen to enable or disable the wireless router From the Advanced menu select Wir...

Страница 42: ...tings screen and then click Apply The Fragmentation Threshold CTS RTS Threshold and Preamble Mode options are reserved for wireless testing and advanced configuration only Do not change these settings...

Страница 43: ...le Guest Network When this check box is selected the guest network is enabled and guests can connect to your network using the SSID of this profile Enable SSID Broadcast If selected the Wireless Acces...

Страница 44: ...ss devices in your network NETGEAR recommends that you change the name to a different value 4 Select a Security option from the list For a description of each Security option see Security Options in t...

Страница 45: ...tting the Time on page 3 11 Protecting Access to Your Wireless Router For security reasons the wireless router has its own user name and password Also after a period of inactivity for a set length of...

Страница 46: ...irelessly connect to the WNDR3400 router MAC address filtering adds an obstacle against unwanted access to your network but the data broadcast over the wireless link is fully exposed To restrict acces...

Страница 47: ...eless device to the wireless access control list The Wireless Card Access Setup screen opens and displays a list of currently active wireless cards and their Ethernet MAC addresses 4 Adjust the list a...

Страница 48: ...0 router allows you to restrict access based on Web addresses and Web address keywords Up to 255 entries are supported in the Keyword list Keyword application examples If the keyword XXX is specified...

Страница 49: ...ng Specify a trusted user by entering that computer s IP address in the Trusted IP Address fields Since the trusted user is identified by IP address you should configure that computer with a fixed IP...

Страница 50: ...in menu The Block Services screen displays 2 Enable service blocking by selecting either Per Schedule or Always and then click Apply To block by schedule be sure to specify a time period in the Schedu...

Страница 51: ...d to enable your Block Services Setup selections Configuring a User Defined Service To define a service first you must determine which port number or range of numbers is used by the application The se...

Страница 52: ...Day to select the check boxes for all days Click Apply b Time of Day to Block Select a start and end time in 24 hour format Select All Day for 24 hour blocking Click Apply Be sure to select your time...

Страница 53: ...ring E mail Alert and Web Access Log Notifications To receive logs and alerts by e mail you must provide your e mail account information To configure e mail alert and web access log notifications Figu...

Страница 54: ...will not be sent by e mail b Enter the e mail address to which logs and alerts are sent in the Send To This E mail Address field This e mail address will also be used as the From address If you leave...

Страница 55: ...this case the router overwrites the log and discards its contents 5 Click Apply to save your settings So that the log entries are correctly time stamped and sent at the correct time be sure to set th...

Страница 56: ...Access on page 4 13 Scheduling Wireless Signal Down Time on page 4 14 Traffic Meter on page 4 16 Upgrading the Router Firmware The routing software also called firmware of the WNDR3400 router is stor...

Страница 57: ...s by clicking the Check button If a new version is found you can download and install it in one step To enable the Smart Wizard to automatically check for a new software version upon login select the...

Страница 58: ...R When the upload is complete your router automatically restarts The upgrade process typically takes about three minutes Read the new software release notes to determine whether you must reconfigure t...

Страница 59: ...o your PC the file ends in img or chk 7 Click Upload to send the firmware to the router When the upload is complete your router automatically restarts The upgrade process typically takes about three m...

Страница 60: ...sing Network Monitoring Tools 4 5 v1 0 August 2010 Viewing Wireless Router Status Information To view router status and usage information from the main menu under the Maintenance heading select Router...

Страница 61: ...ess The Media Access Control address This is the unique physical address being used by the Internet WAN port of the router IP Address The IP address being used by the Internet WAN port of the router I...

Страница 62: ...uter The default is NETGEAR 5G Region The geographic region where the router is being used It might be illegal to use the wireless features of the router in some parts of the world Channel Identifies...

Страница 63: ...ng used The default channel is Auto When Auto is selected the router will find the best operating channel available If you notice interference from nearby devices you can select a different channel Ch...

Страница 64: ...Statistics Table 4 2 Connection Status Settings Item Description IP Address The IP address that is assigned to the router Subnet Mask The subnet mask that is assigned to the router Default Gateway The...

Страница 65: ...ription System Up Time The time elapsed since the router was last restarted Port The statistics for the WAN Internet and LAN Ethernet ports For each port the screen displays Status The link status of...

Страница 66: ...outer are stored within the router in a configuration file You can back up save this file to your computer restore it or reset it to the factory default settings From the main menu under Maintenance s...

Страница 67: ...if you have forgotten the password you might want to erase the configuration and restore the factory default settings After an erase the router s user name is admin the password is password the LAN IP...

Страница 68: ...es will be allowed to access the router s remote management To allow access from any IP address on the Internet select Everyone To allow access from a range of IP addresses on the Internet select IP A...

Страница 69: ...vice port The default is 8080 which is a common alternate for HTTP 4 Click Apply to have your changes take effect Scheduling Wireless Signal Down Time For each wireless radio you can schedule times wh...

Страница 70: ...ff The times are shown in half hour intervals from midnight to 11 30 p m 4 Click the End drop down menus and select the time that you want the wireless signal to turn back on 5 Select one of the follo...

Страница 71: ...of Internet traffic passing through your router s Internet port With the Traffic Meter utility you can set limits for traffic volume set a monthly limit and get a live update of traffic usage To monit...

Страница 72: ...ng traffic 4 You can limit the amount of data traffic allowed per month By specifying how many Mbytes per month are allowed By specifying how many hours of traffic are allowed 5 Set the Traffic Counte...

Страница 73: ...page 5 16 Configuring Port Triggering on page 5 18 Wireless Repeating Also Called WDS on page 5 22 Using the LAN Setup Options The LAN Setup screen allows configuration of LAN IP services such as Dyna...

Страница 74: ...s to take effect The LAN Setup fields are explained in the following table Figure 5 1 Note If you change the LAN IP address of the router while connected through the browser you will be disconnected Y...

Страница 75: ...when receiving By default the RIP function is disabled RIP 1 is universally supported It is adequate for most networks unless you have an unusual network setup RIP 2 carries more information Both RIP...

Страница 76: ...eme you should define a range between 192 168 1 2 and 192 168 1 254 although you might wish to save part of the range for devices with fixed addresses The router delivers the following parameters to a...

Страница 77: ...our IP address will be and the address can change frequently In this case you can use a commercial Dynamic DNS service which allows you to register your domain to their IP address and forwards traffic...

Страница 78: ...der list For example for DynDNS org select www dyndns org 2 Select the Use a Dynamic DNS Service check box 3 Select the name of your Dynamic DNS service provider 4 Type the host name or domain name th...

Страница 79: ...packets The firewall should be disabled only in special circumstances such as when you are troubleshooting application issues Default DMZ Server This feature is sometimes helpful when you are using so...

Страница 80: ...DMZ server 1 Click the Default DMZ Server check box 2 Type the IP address NAT Filtering Network Address Translation NAT determines how the router processes inbound traffic Secured NAT provides a secu...

Страница 81: ...0 When you first configured your router two implicit static routes were created A default route was created with your ISP as the gateway and a second static route was created to your local network for...

Страница 82: ...ute This is for identification purposes only 3 Select the Private check box if you want to limit access to the LAN only If Private is selected the static route is not reported in RIP 4 Select the Acti...

Страница 83: ...followed by two examples explaining how port forwarding and port triggering operate and how they differ How Your Computer Accesses a Remote Computer through Your Router When a computer on your network...

Страница 84: ...two computers could independently be using the same session number Your router then sends this request message through the Internet to the Web server at www example com 4 The Web server at www example...

Страница 85: ...inating source port but also sends an identify message to your computer on port 113 Using port triggering you can tell the router When you initiate a session with destination port 6667 you must also a...

Страница 86: ...ation by contacting the publisher of the application or user groups or newsgroups How Port Forwarding Changes the Communication Process In both of the preceding examples your computer initiates an app...

Страница 87: ...ssage to your router 4 Your router performs Network Address Translation NAT on the source IP address and sends this request message through the Internet to the remote computer which displays the Web p...

Страница 88: ...rver to which all other incoming protocols are forwarded The DMZ server is configured in the WAN Setup screen as discussed in Setting Up a Default DMZ Server on page 5 8 Before starting you need to de...

Страница 89: ...ot appear in the Service Name list you must first determine which port number or range of numbers is used by the application You can usually determine this information by contacting the publisher of t...

Страница 90: ...namic IP address using DHCP address reservation as explained in Address Reservation on page 5 4 In this example your router will always give your Web server an IP address of 192 168 1 33 2 In the Port...

Страница 91: ...any computer that needs them and can close the ports when they are no longer needed To configure port triggering you need to know which inbound ports the application needs Also you need to know the n...

Страница 92: ...e up to 9999 minutes This value controls the inactivity timer for the designated inbound ports The inbound ports close when the inactivity time expires This is required because the router cannot be su...

Страница 93: ...ct Single address and enter the IP address of one computer to restrict the service to a particular computer 8 Select the service type either TCP or UDP or both TCP UDP If you are not sure select TCP U...

Страница 94: ...APs must use the same SSID wireless channel and encryption mode see Manually Configuring Your Wireless Settings on page 2 4 or Using Push N Connect WPS to Configure Your Wireless Network on page 2 11...

Страница 95: ...ating function and allows you to control wireless client association Wireless Repeater The wireless router sends all traffic from its local wireless or wired computers to a remote AP To configure this...

Страница 96: ...ess of the remote unit First set up the base station and then set up the repeater To set up the base station 1 Set up both units with exactly the same SSID mode channel and security Note that the wire...

Страница 97: ...g select Wireless Repeating Function to display the Wireless Repeating Function screen 3 In the Wireless Repeating Function screen depending on the frequency you want to use select the Enable Wireless...

Страница 98: ...the Enable Wireless Repeating Function check box and the Wireless Repeater radio button 3 Fill in the Repeater IP Address field This IP address must be in the same subnet as the base station but diffe...

Страница 99: ...data rate between your sites is limited by each side s upstream data rate A typical residential ADSL or cable modem connection provides a downstream throughput of about 1 to 3 megabits per second Mbp...

Страница 100: ...Ethernet can extend up to 100 meters with twisted pair wiring of CAT 5e or better A wired connection is not susceptible to interference and eavesdropping would require a physical connection to your ne...

Страница 101: ...network you should first consider which devices will have the heaviest traffic flow between them Examples are A media center in one room streaming high definition video from a server in another room...

Страница 102: ...PCs with Gigabit 1000 Mbps Ethernet adapters have a gigabit connection through the GS605 switch to the storage server This connection should allow for extremely fast backups or quick access to large f...

Страница 103: ...ent carefully For best results place your router Near the center of the area in which your computers will operate In an elevated location such as a high shelf where the wirelessly connected computers...

Страница 104: ...s the largest data packet a network device transmits When one network device communicates across the Internet with another the data packets travel through many devices along the way If any device in t...

Страница 105: ...me types of traffic ahead of others The WNDR3400 router can provide QoS prioritization over the wireless link and on the Internet connection To configure QoS use the QoS Setup screen Note An incorrect...

Страница 106: ...und For an application to receive the benefits of WMM QoS both it and the client running that application must be WMM enabled Legacy applications that do not support WMM and applications that do not r...

Страница 107: ...cations and Online Gaming To create a QoS policy for applications and online games 1 From the main menu under Advanced select QoS Setup The QoS Setup screen displays as shown in Figure 6 2 on page 6 8...

Страница 108: ...ed by the application or game 7 From the Priority drop down list select the priority that this traffic should receive relative to other applications and traffic when accessing the Internet The options...

Страница 109: ...other applications and traffic when accessing the Internet The options are Low Normal High and Highest 7 Click Apply to save this rule to the QoS Policy list and return to the QoS Setup screen 8 In th...

Страница 110: ...e s traffic should receive relative to other applications and traffic when accessing the Internet The options are Low Normal High and Highest 6 Click Apply to save this rule to the QoS Policy list and...

Страница 111: ...utomatic device configuration The default setting for UPnP is disabled If this check box is not selected the router does not allow any device to automatically control the resources such as port forwar...

Страница 112: ...from 1 to 255 The default value for the advertisement time to live is 4 hops which should be fine for most home networks If you notice that some devices are not being updated or reached correctly then...

Страница 113: ...7 Unmounting a USB Drive on page 7 10 Specifying Approved USB Devices on page 7 11 Connecting to the USB Drive from a Remote Computer on page 7 12 Connecting to the USB Drive with Microsoft Network S...

Страница 114: ...ing files in a central location so that you do not have to power up a computer to perform local sharing In addition you can share files between Macintosh Linux and PC computers by using the USB drive...

Страница 115: ...rt 1 The daughter accesses the USB drive by typing readyshare in the address field of her Web browser Then she copies the photos to the USB drive 2 The mother uses her Web browser or Microsoft Network...

Страница 116: ...storage device attached to your router On the router main menu below the USB heading select Basic Settings The following screen displays By default the USB storage device is available to all computer...

Страница 117: ...hare Name If only 1 device is connected the default share name is USB_Storage You can click the name shown or you can type it in the address field of your Web Browser If Not Shared is shown the defaul...

Страница 118: ...s from All no password to admin The user name account name for All no password is guest The password for admin is the same one that is used to log in to the router main menu By default it is password...

Страница 119: ...Settings The USB Storage Advanced Settings screen displays You can use this screen to specify access to the USB storage device The following table explains the fields and buttons in the USB Storage A...

Страница 120: ...via internet Disabled by default If you enable this setting remote users can access the USB drive via FTP over the Internet This setting supports both downloading and uploading of files Available Net...

Страница 121: ...Create a Network Folder screen You can use this screen to create a folder and to specify its Share Name Read Access and Write Access from All no password to admin The user name account name for All n...

Страница 122: ...are in the Address Bar On Mac OS X version 10 2 or later enter smb readyshare in the Address Bar In My Network Places enter readyshare in the Address Bar You can also use the ReadyShareConnect utility...

Страница 123: ...lick Approved Devices The USB Drive Approved Settings screen displays 2 Select the USB device from the Available USB Devices list 3 Click Add 4 Select the Allow only approved devices check box 5 Click...

Страница 124: ...ve using a Web browser 1 Connect to the router by typing ftp and the Internet port IP address in the address field of Internet Explorer or Netscape Navigator For example ftp 10 1 65 4 If you are using...

Страница 125: ...nd Windows XP Right click on the network connection for your local area network File and Printer Sharing for Microsoft Windows should be listed If not click Install and follow the installation prompts...

Страница 126: ...Troubleshooting a Network Using the Ping Utility on page 8 6 Problems with Date and Time on page 8 8 Wireless Connectivity on page 8 9 Restoring the Default Configuration and Password on page 8 14 Qu...

Страница 127: ...h wireless computer s MAC address to the router s access list Make sure that the network settings of the computer are correct Wired and wirelessly connected computers must have network IP addresses on...

Страница 128: ...connected to a functioning power outlet Check that you are using the 12V DC 1 5A power adapter that NETGEAR supplied for this product If the Power light alternately blinks green every second the route...

Страница 129: ...he modem or computer Make sure that power is turned on to the connected modem or computer Be sure that you are using the correct cable When connecting the router s Internet port to a cable or DSL mode...

Страница 130: ...t first determine whether the router can obtain an IP address from your Internet Service Provider ISP Unless your ISP provides a fixed IP address your router must request an IP address from the ISP Yo...

Страница 131: ...oot your computer and verify the DNS address as described in the online document you can access from Preparing Your Network in Appendix B You can also configure your computer manually with DNS address...

Страница 132: ...s not working you see this message Request timed out If the path is not functioning correctly you could have one of the following problems Wrong physical connections For a wired connection make sure t...

Страница 133: ...o see that the network address of your computer the portion of the IP address specified by the subnet mask is different from the network address of the remote device Check that your cable or DSL modem...

Страница 134: ...s card in your computer a Smart Wizard utility program is installed that can provide helpful information about your wireless network You can find this program in your Windows Program menu or as an ico...

Страница 135: ...lines on page 2 2 If your wireless network appears and has good signal strength configure your wireless card and router for the simplest possible connection as described in the next section Setting Up...

Страница 136: ...ooting 8 11 v1 0 August 2010 1 Select under Setup in the main menu of the WNDR3400 router 2 Make sure the Enable SSID Broadcast check box is selected Figure 8 1 Note Be sure to configure both Wireless...

Страница 137: ...s networks within several hundred feet of your router For more information about the wireless channel frequencies click the link to the online document Wireless Networking Basics in Appendix B 6 Set t...

Страница 138: ...and test your wireless computer for wireless connectivity Program the wireless adapter of your computer to have the same SSID and channel that you configured in the router and disable encryption Chec...

Страница 139: ...Use this method for cases when the administration password or IP address is not known To restore the factory default configuration settings when you do not know the administration password or IP addr...

Страница 140: ...When you log in after resetting the Smart Wizard configuration assistant prompts you to configure these settings To restore the factory default configuration settings 1 Use a sharp object such as a pe...

Страница 141: ...SSID Enabled Transmission speed Autoa Country region United States in the US otherwise varies by region RF channel 6 until region selected Operating mode Up to 300 Mbps for 5GHz and up to 145 Mbps fo...

Страница 142: ...DHCP PPPoE PPTP Dynamic DNS UPnP and SMB Power Adapter North America 120V 60 Hz input UK Australia 240V 50 Hz input Europe 230V 50 Hz input All regions output 12V DC 1 5A output Physical Dimensions 8...

Страница 143: ...z IEEE 802 11n IEEE 802 11a 5 0 GHz Maximum computers per wireless network Limited by the amount of wireless network traffic generated by each node typically 50 70 nodes Operating frequency ranges 2 4...

Страница 144: ...tions for your wireless router in the NETGEAR Wireless Router Setup Manual Document Link TCP IP Networking Basics http documentation netgear com reference enu tcpip index htm Wireless Networking Basic...

Страница 145: ...on setting up 5 24 Basic Settings screen 1 7 basic wireless connectivity 8 10 blocking access 3 4 inbound traffic 5 11 bold text xi broadband Internet 6 1 C cables checking 8 2 compatibility protocol...

Страница 146: ...rnet MAC address See MAC addresses F factory default settings listed A 1 restoring 4 12 8 14 A 1 firewalls default settings A 2 disabling 5 7 Firmware Upgrade Assistant 1 3 4 1 firmware version 4 6 fi...

Страница 147: ...l software upgrade 4 3 metric value 5 11 MTU size 6 6 multicasting 5 3 multiple input multiple output MIMO 6 1 N NAT Network Address Translation 5 8 5 12 network correct settings checking 8 2 restarti...

Страница 148: ...re 6 4 scheduling wireless down time 4 14 screen display language 1 4 selecting 1 4 service numbers 3 7 services blocking 3 5 setting time 3 11 settings default See default factory settings SMTP serve...

Страница 149: ...5 7 WDS 5 23 WDS see Wireless Repeating 5 22 Web Configuration Interface troubleshooting 8 4 WEP configuring 2 8 wireless manually configuring settings 2 4 range and interference 2 2 wireless card se...

Отзывы: