background image

  Chapter 2:  System Configuration


|


13

ProSafe Unmanaged Plus Switch Configuration Utility User Guide 

System Features

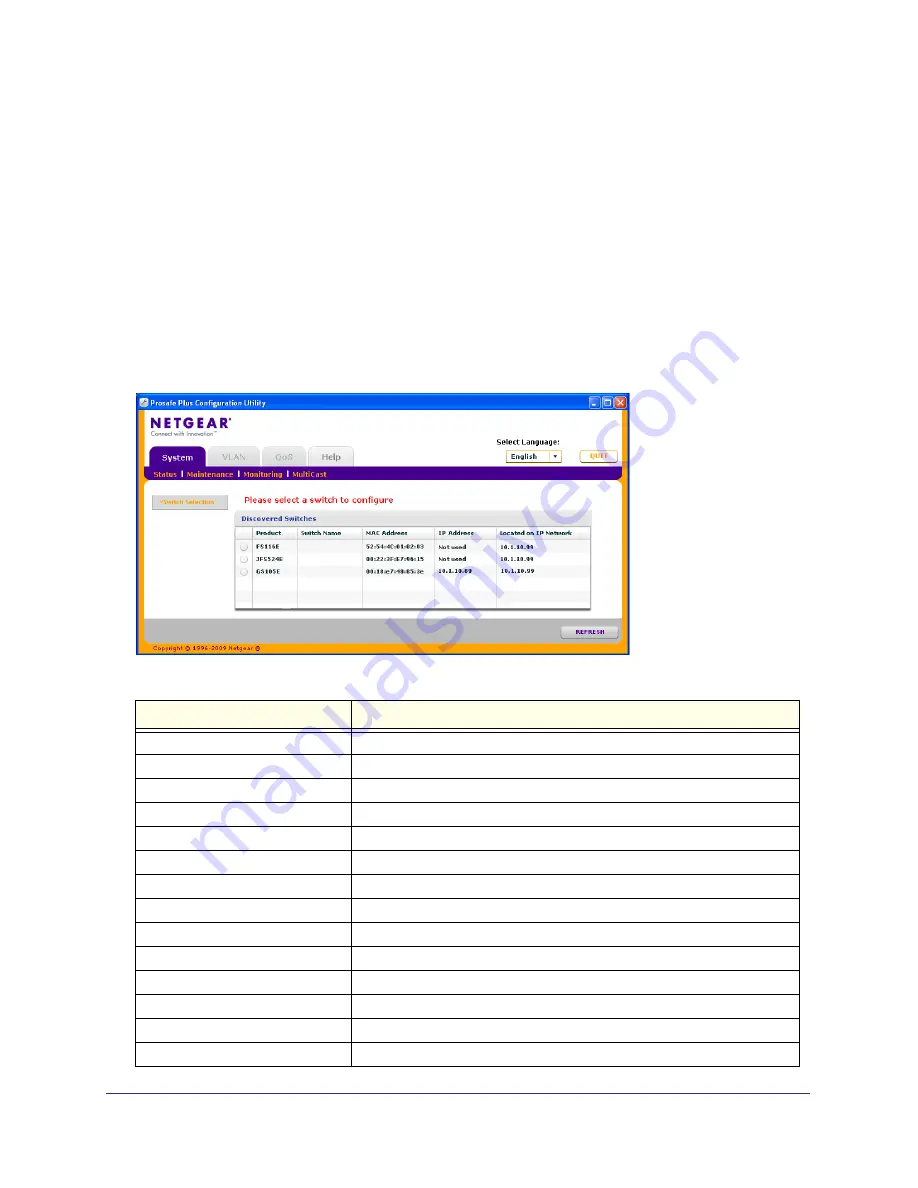
The System tab lets you select a switch to manage, display general information about the 
switch, perform basic switch maintenance, and monitor data flow through the switch. The 
switch selection remains in effect until you select a different switch, or quit the utility.

System features are:

Status

 - indicates which switches are present and if they are operational.

Maintenance

 - allows you to change administrator password, reboot the switch, reset to 

factory default settings and if the supported by the selected switch, upgrade switch firmware.

Monitoring

 - displays port statistics (packets sent or received), tests cable connections, and 

allows you to mirror ports.

MultiCast

 - allows you to change the IGMP snooping settings.

Table 2-1 Features available on the System tab.

Feature

Description

Status

      Switch Selection

Selects a switch to configure

      Switch Information

Displays general information for the selected switch

Maintenance

      Change Password

Changes password for the selected switch

      Device Reboot

Restarts the selected switch using configured settings

      Factory Default

Restarts the selected switch with factory default settings

      Firmware Upgrade

Updates the selected switch with a firmware update saved on the PC

Monitoring

      Port Statistics

Displays port network traffic for the selected switch

      Mirroring

Allows a port to receive data sent to another port

      Cable Tester

Checks cable connections for the ports of the selected switch

MultiCast

IGMP snooping Allows switch to selectively forward multicast traffic

Содержание GS105E-100NAS - Prosafe Plus 5PORT

Страница 1: ...September 2010 202 10524 03 v1 0 350 East Plumeria Drive San Jose CA 95134 USA ProSafe Plus Switch Utility User Guide...

Страница 2: ...RAID2 and NeoTV are trademarks or registered trademarks of NETGEAR Inc Microsoft Windows Windows NT and Vista are registered trademarks of Microsoft Corporation Other brand and product names are regis...

Страница 3: ...n System Features 13 Status 14 Switch Selection 14 Switch Information 14 DHCP Mode Selection 15 Manually Setting the IP Address Information 15 Maintenance 16 Change Password 16 Device Reboot 16 Reset...

Страница 4: ...24 VLAN Configuration 24 VLAN Membership 25 Port PVID 25 Port Tagging 25 Chapter 4 Quality of Service Configuration QoS Overview 28 QoS Global Configuration 29 Rate Limiting 31 Broadcast Filtering 32...

Страница 5: ...etting Started 3 1 Getting Started 1 This chapter contains the following topics Installing the ProSafe Plus Switch Utility Discovering Switches Utility Features Overview Default Settings Uninstalling...

Страница 6: ...present on the PC it will be replaced by the newer version Newer versions of the utility are backwards compatible and support all previously released ProSafe Plus switches If the version of the utili...

Страница 7: ...copies the utility program into the Program Files Netgear ProSafe Plus Utility directory and places a utility icon on the PC desktop The WinPcap and Adobe AIR programs may be used by other network app...

Страница 8: ...need to turn off the firewall function in order for discovery to work Within a few seconds the utility will discover and list all ProSafe Plus switches in your network or in the same broadcast domain...

Страница 9: ...supports it upgrade switch firmware Monitoring displays port statistics packets sent or received tests cable connections and allows you to mirror ports MultiCast allows you to change the IGMP snooping...

Страница 10: ...If you do this your previous settings will be lost The features on each tab are explained in the following chapters Chapter 2 System Configuration describes general management features Chapter 3 Virt...

Страница 11: ...tch Selection No switch selected Names All names blank Passwords password for all switches Switch Information DHCP Mode Enabled IP Address 192 168 0 239 Subnet Mask 255 255 255 0 Gateway Address 192 1...

Страница 12: ...sed Basic Disabled Advanced Disabled 802 1Q Basic Disabled Advanced Disabled QoS QoS Global Configuration QoS Mode 802 1P based Rate Limit Ingress No limit Egress No limit Broadcast Filtering Disabled...

Страница 13: ...utility 1 Use your PC s Add or Remove Programs command Start Control Panel Add or Remove Programs 2 Select ProSafe Plus Utility and click Change Remove 3 When you are asked if you want to completely r...

Страница 14: ...ry default settings and if the feature is available on the selected switch upgrade switch firmware Monitoring displays port statistics packets sent or received tests cable connections and allows you t...

Страница 15: ...ved tests cable connections and allows you to mirror ports MultiCast allows you to change the IGMP snooping settings Table 2 1 Features available on the System tab Feature Description Status Switch Se...

Страница 16: ...Monitoring for other switch features When you select a switch the Status menu displays the status up or down of the ports on the switch and the speed of the device connected to the port The switch au...

Страница 17: ...m Switch Information The Switch Information screen will display 2 Click the list arrow in the DHCP Mode list box 3 Select Enable then click Apply The IP Address Subnet Mask and Gateway Address fields...

Страница 18: ...password default is password and the new password 3 Click Apply Device Reboot WARNING Rebooting the switch will briefly disrupt network traffic through the switch To reboot the selected switch 1 Selec...

Страница 19: ...you must first download a firmware upgrade file for the selected switch from the NETGEAR support website to your PC To upgrade firmware on the selected switch 1 Select System Maintenance Firmware Upg...

Страница 20: ...Port Statistics for the selected switch will display in bytes received bytes sent and packet errors Port Mirroring Port mirroring allows a port to see the data on another port To have a switch port s...

Страница 21: ...a port the cable test will give an estimate of the distance of the fault from the switch To perform a cable test 1 Click System Monitoring Cable Tester The Cable Tester screen will display 2 Select th...

Страница 22: ...ecting network performance To enable or disable IGMP snooping Select Disable or Enable for IGMP Snooping Status and click Apply or You can also change the VLAN for which the IGMP Snooping to be enable...

Страница 23: ...Chapter 3 Virtual LAN Configuration 21 3 Virtual LAN Configuration 3 This chapter contains the following topics VLAN Overview Port Based Configuration 802 1Q Based Configuration...

Страница 24: ...ks Data from a port that is a member of a VLAN group will be restricted to other members of that VLAN group This is an easy way to partition a network into private sub networks 802 1Q allows you to cr...

Страница 25: ...evious VLAN settings 4 Click Yes The Basic Port Based VLAN Configuration screen will display 5 For each port to be added to the group select the port and then the VLAN Group 6 When you are finished ad...

Страница 26: ...2 1Q VLAN Configuration In Advanced 802 1Q VLAN configuration you configure ports to a VLAN Group ID 1 4093 or all The advanced configuration feature allows you to create and update VLAN groups with a...

Страница 27: ...tagged for a particular VLAN group If you have a PC on port 6 and you want it to be a part of VLAN group 2 you would configure port 6 to automatically add a PVID of 2 to all data received from the PC...

Страница 28: ...Advanced Port Tagging The Port Tagging screen displays 2 Select the ports whose data you want tagged select the Tag Tagging Control and click Apply To untag data from ports 1 Click on the VLAN tab and...

Страница 29: ...Chapter 4 Quality of Service Configuration 27 4 Quality of Service Configuration 4 This chapter contains the following topics QoS Overview Rate Limiting Broadcast Filtering...

Страница 30: ...sitive data delays would be undesirable Video sequences would be jerky and voice communication would have annoying gaps The QoS Quality of Service feature in the ProSafe Plus switches allows you to co...

Страница 31: ...rowsing and ordinary data transfers and high priority to video voice and other delay sensitive data Port Based Priority Port based priority works by assigning a priority to all data passing through a...

Страница 32: ...riority uses a header in the data packet that identifies the class of data in the packet for example voice or video When 802 1p based priority is used the switch reads information in the packet header...

Страница 33: ...can be set for a port in addition to other QoS settings If a port has a rate limit set the switch will restrict the acceptance or retransmission of data to the values configured To configure Rate Lim...

Страница 34: ...ach port others assign a predetermined Storm control rate for all ports on the switch To configure Broadcast Filtering 1 Select System and click the radio button for the switch you want to configure 2...

Страница 35: ...Chapter 5 Help 33 5 Help 5 This chapter contains the following topics Online Help...

Страница 36: ...ser Guide to your PC After installing a new ProSafe Plus Switch you should check this website for the latest version of this manual Support Information If the PC running the utility program has access...

Страница 37: ...wall applications 6 firmware upgrade 17 H Help 7 33 I IGMP snooping 20 installation 4 InstallShield Wizard 5 L LAN 21 M maintenance 7 13 16 monitoring 7 13 18 MultiCast 20 P password 16 port based 21...

Страница 38: ...lus Switch Configuration Utility User Guide T technical support 2 trademarks 2 U user guide 33 utility install 4 utility uninstall 11 V VLAN 7 VLAN membership 24 VLAN add groups 23 VLAN advanced 22 VL...

Отзывы: