background image

35

3. Convenient Features

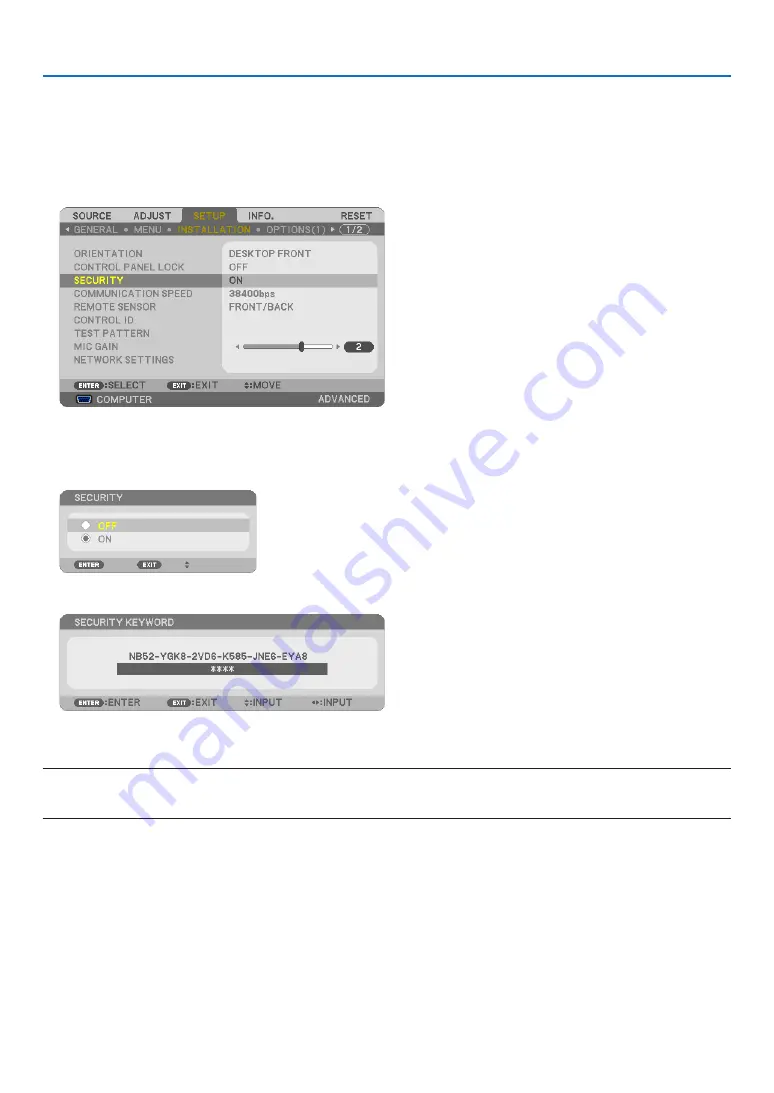
To disable the SECURITY function:

1.  Press the MENU button.
  The menu will be displayed.

2.  Select [SETUP] 

 [INSTALLATION] 

 [SECURITY] and press the ENTER button.

  The OFF/ON menu will be displayed.

3.  Select [OFF] and press the ENTER button.

  The SECURITY KEYWORD screen will be displayed.

4.  Type in your keyword and press the ENTER button.
  When the correct keyword is entered, the SECURITY function will be disabled.

NOTE: If you forget your keyword, contact your dealer. Your dealer will provide you with your keyword in exchange for your request 

code. Your request code is displayed in the Keyword Confirmation screen. In this example [NB52-YGK8-2VD6-K585-JNE6-EYA8] 

is a request code.

Содержание P501X

Страница 1: ...Projector P501X P451X P451W P401W PE501X User s Manual The PE501X is not distributed in North America Model No NP P501X NP P451X NP P451W NP P401W NP PE501X...

Страница 2: ...gistered trademarks of the Wi Fi Alliance Blu ray is a trademark of Blu ray Disc Association CRESTRON and ROOMVIEW are registered trademarks of Crestron Electronics Inc in the United States and other...

Страница 3: ...tice for Canada only This Class B digital apparatus complies with Canadian ICES 003 Machine Noise Information Regulation 3 GPSGV The highest sound pressure level is less than 70 dB A in accordance wit...

Страница 4: ...couraged to try to correct the interference by one or more of the following measures Reorient or relocate the receiving antenna Increase the separation between the equipment and receiver Connect the e...

Страница 5: ...le 10 created by extending the tilt foot Using the projector in any way other than the desktop and ceiling mount may result in failures of the projector If the projector is used over a tilt angle of 1...

Страница 6: ...e outcome such as fire or injury to the eyes Do not place any objects which are easily affected by heat in front of a projector exhaust vent Doing so could lead to the object melting or getting your h...

Страница 7: ...turn off the AC power for 60 seconds after the lamp is turned on and while the POWER indicator is blink ing blue Doing so could cause premature lamp failure Remote Control Precautions Handle the remo...

Страница 8: ...that no one is under the projector Glass fragments could fall if the lamp has been burned out About High Altitude mode Set FAN MODE to HIGH ALTITUDE when using the projector at altitudes approximately...

Страница 9: ...wing connectors and functions will not work PC CONTROL port MONITOR OUT connector AUDIO OUT connector USB PC port LAN functions Mail Alert function DDC CI Virtual Remote Tool PE501X does not have this...

Страница 10: ...er Connecting the Power Cord 14 Turning on the Projector 15 Note on Startup screen Menu Language Select screen 16 Selecting a Source 17 Selecting the computer or video source 17 Adjusting the Picture...

Страница 11: ...ored in a USB memory device 63 Starting the Viewer 63 Exiting the Viewer 68 Names and functions of Viewer screen 69 Viewer option settings 74 Projecting data from shared folder 77 Connecting the proje...

Страница 12: ...K PROJECTOR 119 REMOTE DESKTOP CONNECTION 119 NETWORK SETTINGS 120 TOOLS 136 6 Installation and Connections 141 Setting Up the Screen and the Projector 141 Selecting a Location 141 Throw Distance and...

Страница 13: ...0 182 Connecting the projector to a LAN 183 Basic Operation of Image Express Utility 2 0 184 Using the Projector to Operate Your Computer over a LAN Desktop Control Utility 1 0 not supported by PE501...

Страница 14: ...software 7N951902 Important Infomation For North America 7N8N3472 For Other countries than North America 7N8N3472 and 7N8N3482 Quick Setup Guide For North Amer ica 7N8N3492 For Other countries than No...

Страница 15: ...e Main Power Switch or disconnecting the AC power supply To turn off the AC power supply when the projector is powered on use a power strip equipped with a switch and a breaker 2 The quick start time...

Страница 16: ...aming video transfer capability for Windows only Image Express Utility Lite allows you to send streaming video from the computer to a single projector over wired or wireless LAN without the need of co...

Страница 17: ...page 6 Lens Remote Sensor page 9 Intake Vent Filter Cover page 158 163 Zoom Lever page 22 Lens Cover Focus Lever page 21 Adjustable Tilt Foot page 23 Adjustable Tilt Foot Lever page 23 Exhaust Vent He...

Страница 18: ...ong pressure in either the up or down direction Doing so can cause damage to the lens cover sliding mechanism AC Input Connect the supplied power cord s three pin plug here and plug the other end into...

Страница 19: ...2 POWER Indicator page 14 15 27 206 3 STATUS Indicator page 206 4 LAMP Indicator page 160 206 5 ECO Button page 30 6 SOURCE Button page 17 7 AUTO ADJ Button page 26 8 MENU Button page 87 9 Volume But...

Страница 20: ...T Mini Jack Stereo Mini page 147 8 S VIDEO IN Connector Mini DIN 4 Pin page 148 9 VIDEO IN Connector RCA page 148 10 VIDEO S VIDEO AUDIO IN L MONO R RCA page 148 11 MIC Input Jack Monaural Mini page 5...

Страница 21: ...Y Button page 17 14 ID SET Button page 106 15 Numeric Keypad Button CLEAR Button page 106 16 FREEZE Button page 29 17 AV MUTE Button page 29 18 MENU Button page 87 19 EXIT Button page 87 20 Button pag...

Страница 22: ...30 30 30 30 22 feet 7 m 22 feet 7 m Remote sensor on projector cabinet Remote control 22 feet 7 m 22 feet 7 m The infrared signal operates by line of sight up to a distance of about 22 feet 7 m and wi...

Страница 23: ...e projector from your computer Audio transmission USB Display and GCT functions are not supported by Mac Image Express Utility Lite for Mac OS is not supported by PE501X Image Express Utility 2 0 Wind...

Страница 24: ...M 1 2 GHz equivalent or higher required Dual core 1 5 GHz or higher recommended Windows XP Pentium M 1 0 GHz equivalent or higher required Dual core 1 0 GHz or higher recommended Memory Windows 8 Win...

Страница 25: ...vironment Wired or wireless LAN required that supports TCP IP The following LAN adapters are verified to work with Image Express Utility Lite Wired LAN adapter built into Mac Wireless LAN adapter buil...

Страница 26: ...projector page 15 Step 3 Selecting a source page 17 Step 4 Adjusting the picture size and position page 19 Correcting keystone distortion KEYSTONE page 24 Step 5 Adjusting a picture and sound Optimiz...

Страница 27: ...ed power cord s three pin plug to the AC IN of the projector and then connect the other plug of the supplied power cord in the wall outlet The projector s power indicator will flash for a few seconds...

Страница 28: ...TIP When the message Projector is locked Enter your password is displayed it means that the SECURITY feature is turned on page 33 When the ECO message is displayed it means that ON is selected for EC...

Страница 29: ...e of the projector is too high the projector detects abnormal high temperature In this condition the projector will not turn on to protect the internal system If this happens wait for the projector s...

Страница 30: ...will change as follows COMPUTER HDMI1 HDMI2 VIDEO S VIDEO VIEWER USB DISPLAY COMPUTER With the SOURCE screen displayed you can press the SOURCE button a few times to select the input source The Viewer...

Страница 31: ...ayed page 111 5 Select a source as the default source and press the ENTER button 6 Press the EXIT button a few times to close the menu 7 Restart the projector The source you selected in step 5 will be...

Страница 32: ...vertical position of a projected image Lens shift page 20 Adjusting the focus Focus lever page 21 Finely adjusting the size of an image Zoom lever page 22 Adjusting the throw angle the height of an im...

Страница 33: ...eyond the maximum upward or downward shift Forcibly rotating may cause damage to the projector TIP Lens shift can be adjusted with the range below If you wish to move up the image higher than this lim...

Страница 34: ...ion Ceiling front projection P501X P451X PE501X P451W P401W Focus Use the FOCUS lever to obtain the best focus Focus Lever Height of projected image Height of projected image Vertical shift range 0 to...

Страница 35: ...22 2 Projecting an Image Basic Operation Zoom Use the ZOOM lever to adjust the image size on the screen Zoom Lever...

Страница 36: ...oot can be extended up to 1 6 inch 40 mm There is approximately 10 degrees up of adjustment for the front of the projector Rotate the rear foot to the desired height in order to square the image on th...

Страница 37: ...ottom of sides of the projected image are parallel NOTE Before performing the horizontal keystone correction set the lens shift to the position of 0 5 V P501X P451X PE501X 0 6 V P451W P401W 1 Press th...

Страница 38: ...Keystone screen will disappear To perform Keystone correction again press the button to display the Keystone screen and repeat above steps 1 to 6 To return the keystone adjustments to default 1 Press...

Страница 39: ...mize the computer signal try to adjust HORIZONTAL VERTICAL CLOCK and PHASE manually page 96 97 Turning Up or Down Volume Sound level from the speaker can be adjusted TIP When no menus appear the and b...

Страница 40: ...L is selected for STANDBY MODE Power On Steady blue light Standby Steady orange light CAUTION Parts of the projector may become temporarily heated if the projector is turned off with the POWER button...

Страница 41: ...tion Make sure that the projector is turned off 1 Unplug the power cord 2 Disconnect any other cables Remove the USB memory if it is inserted into the projector 3 Retract adjustable tilt foot if exten...

Страница 42: ...button immediately after the start of the power saving function the lamp brightness may not be restored to its original level Freezing a Picture Press the FREEZE button to freeze a picture Press agai...

Страница 43: ...Steady Green light ECO Lamp power consumption approx 60 brightness on P501X P451W PE501X and approx 67 on P451X P401W The lamp life will extend longer than the one on NORMAL mode by controlling power...

Страница 44: ...r symbol indicates the ECO MODE is automatically set to NORMAL mode because the internal temperature is too high Immediately after ECO MODE is changed from ECO to one of OFF AUTO ECO or NORMAL the lam...

Страница 45: ...ission reduction will also increase Calculation for amount of CO2 emission reduction is based on an OECD publication CO2 Emissions from Fuel Combustion 2008 Edition The TOTAL CARBON SAVINGS is calcula...

Страница 46: ...menu To enable the Security function 1 Press the MENU button The menu will be displayed 2 Press the button twice to select SETUP and press the button or the ENTER button to select GEN ERAL 3 Press the...

Страница 47: ...enabled To turn on the projector when SECURITY is enabled 1 Press the POWER button The projector will be turned on and display a message to the effect that the projector is locked 2 Press the MENU bu...

Страница 48: ...button The SECURITY KEYWORD screen will be displayed 4 Type in your keyword and press the ENTER button When the correct keyword is entered the SECURITY function will be disabled NOTE If you forget you...

Страница 49: ...t CORNERSTONE and press the ENTER button The drawing shows the upper left icon is selected The CORNERSTONE screen will be displayed 3 Project an image so that the screen is smaller than the area of th...

Страница 50: ...ne adjustment screen select EXIT or press the EXIT button on the remote control The confirmation screen is displayed 10 Press the or button to highlight the OK and press the ENTER button This complete...

Страница 51: ...enter of the screen the adjustable range will be increased or decreased Image is projected in maximum wide with the zoom NOTE Even when the projector is turned on the last used correction values are a...

Страница 52: ...heck box underneath the mouse speed slider in the Mouse Properties dialog box Pointer Options tab Wait at least 5 seconds after disconnecting the USB cable before reconnecting it and vice versa The co...

Страница 53: ...mputer always start even if it is older version than the one installed to the projector If audio transfer capability and other features will not work try uninstalling Image Express Utility Lite from y...

Страница 54: ...he projector 2 Picture Turns on or off AV MUTE Picture mute and turns on or off FREEZE Freeze a picture 3 Sound Turns on or off AV MUTE Sound mute play the sound and turns up or down the volume 4 Othe...

Страница 55: ...y setting IP address is DHCP ON NOTE To use the projector in a network consult with your network administrator about network settings The display s or button s response can be slowed down or operation...

Страница 56: ...ng by specifying http pj nec co jp index html for the address or the entry column of the URL Example 2 When the IP address of the projector is 192 168 73 1 access is gained to the network setting by s...

Страница 57: ...page 95 SOURCE SELECT This switches the input connector of the projector COMPUTER Switches to the COMPUTER IN connector HDMI1 Switches to the HDMI 1 IN connector HDMI2 Switches to the HDMI 2 IN conne...

Страница 58: ...server connected to the projector AUTO DNS OFF Set your IP address of DNS server connected to the projector Setting for WIRED LAN PROFILE 1 PROFILE 2 Two settings can be set for wired LAN connection...

Страница 59: ...K AES WPA2 PSK TKIP WPA2 PSK AES WPA EAP TKIP EAP TLS WPA EAP AES EAP TLS WPA EAP TKIP PEAP MSCHAP v2 WPA EAP AES PEAP MSCHAP v2 WPA2 EAP TKIP EAP TLS WPA2 EAP AES EAP TLS WPA2 EAP TKIP PEAP MSCHAP v2...

Страница 60: ...messages via e mail when using wireless or wired LAN Placing a checkmark will turn on the Alert Mail feature Clearing a checkmark will turn off the Alert Mail feature Sample of a message to be sent f...

Страница 61: ...ss Machine and Information System Industries Association JBMIA in 2005 The projector supports all the commands of PJLink Class 1 Setting of PJLink will not be affected even when RESET is done from the...

Страница 62: ...iness Windows Vista Ultimate Windows Vista Enterprise Hardware specifications The specifications recommended by Microsoft as the operation environment for Windows 8 Windows 7 Windows Vista should be s...

Страница 63: ...LECT or button to select NETWORK and press the ENTER button In the screen the APPLICATION MENU menu is displayed 3 From the APPLICATION MENU menu select NETWORK PROJECTOR The PROJECTOR NAME DISPLAY RE...

Страница 64: ...a Network Projector When the Permission Connect to a Network Projector window appears click Yes The Connect to a Network Projector window appears 5 Click Search for a projector recommended In the Avai...

Страница 65: ...tion works the background color of the desktop changes to solid color When the network projector function is stopped the original background color is restored Reference If the projector cannot be foun...

Страница 66: ...e Windows Vista Enterprise Windows XP Professional with Service Pack 3 Note In this user s manual this feature is described using Windows 7 as an example A keyboard is required to use the Remote Deskt...

Страница 67: ...to the Confirm new password box 9 Click Create a password The Administrator is changed to Password Protection Setting the Remote Access 1 Click Start from the desktop of Windows 7 2 Click Control Pane...

Страница 68: ...IP Address xxx xxx xxx xxx displayed 6 Click Close 7 Click X at the upper right of the window The system goes back to the desktop Starting the Remote Desktop 1 With the projector turned on press the S...

Страница 69: ...ress of Windows 7 and click CONNECTION The log on screen of Windows 7 is displayed in the screen projected by the projector 5 Operate the wireless keyboard to input the user s password and press Enter...

Страница 70: ...e PERFORMANCE screen Making settings to OPTIONS will allow you to display the desktop background or to enable the window animation function during the Remote Desktop operation However doing this will...

Страница 71: ...nd from COMPUTER VIDEO S VIDEO and HDMI audio inputs or sound of VIEWER NETWORK input will be heard from the speaker with your microphone voice Microphone sensitivity can be adjusted From the menu sel...

Страница 72: ...haring of Windows Media Player 11 turned on can be used as a media server Supported graphic formats Format File name extension JPEG jpg jpe jpeg CMYK is not supported BMP bmp bit field not supported P...

Страница 73: ...l not work or display Functions added are bookmarks boxes in form tool and notes will not be displayed Auto flip or Auto transition will not work Some PDF files may not be displayed Supported PowerPoi...

Страница 74: ...ack correctly depending on your network environment or the bit rate of your file NOTE Do not disconnect between the projector and your computer by removing the LAN cable or turning off the projector w...

Страница 75: ...Print Command See the help of Adobe Acrobat for more information 1 Select Print from the File menu 2 Select Adobe PDF from Printer name and click the Properties but ton 3 Click the Edit button in the...

Страница 76: ...not remove the USB memory from the projector while it s LED flashes Doing so may corrupt the data TIP You can a USB memory insert the projector when the drive list screen is displayed 3 Press the SOU...

Страница 77: ...are more pages pressing the PAGE page down button will show the next page pressing the PAGE page up will show the previous page 6 Press the ENTER button Operation varies depending on the selected fil...

Страница 78: ...he next slide press to select the previ ous slide You can also use the or button to select a page To return to the thumbnail screen press the EXIT button Excel The first sheet will be displayed Pressi...

Страница 79: ...ndow is displayed it means that the PDF file is password protected Pressing the ENTER button will show the software key board Use the software keyboard to enter your password Select OK and press the E...

Страница 80: ...E The play mode MANUAL AUTO for slides of index file works in the following way In case of MANUAL for PLAY MODE When you select OPTIONS SLIDE SETTING PLAY MODE MANUAL index files will be set for manua...

Страница 81: ...E button to select a source other than VIEWER A press of the SOURCE button will display the source select screen A few more presses of the SOURCE button will display another source To exit the Viewer...

Страница 82: ...button to move the cursor to the drive list Use the or button to switch between the menu and the drive list Press the or button to select a type of drive press the or button to select the drive conne...

Страница 83: ...a LAN set for con necting a shared folder See page 77 for setting up for connecting a shared foler of the projector MEDIA SERVER Displays up to four drives of a computer connected to a LAN set for con...

Страница 84: ...TEM SET TING Opens the system setting menu Scroll bar Thumbnail screen will display 12 files with 4 by 3 If the thumbnail screen has twelve or more files or folders the scroll bar will be displayed at...

Страница 85: ...button The selected function will be executed Functions of still image control bar Name Description PREV Goes back to the previous image PLAY Plays the image This button also is used to stop or start...

Страница 86: ...SE Stops playing a movie file FF Fast forwards a movie file for about 7 seconds NEXT Goes to the beginning of a next movie file TIME Displays an elapsed time for playback or pause SIZE BEST FIT Displa...

Страница 87: ...ratio in the projector s display able maximum resolution ACTUAL SIZE Displays the image in its actual size PLAY MODE MANUAL Selects manual play AUTO Selects auto play INTERVAL 5 300 seconds Specifies...

Страница 88: ...E Name Options Description AUTO PLAY OFF PICTURE Plays a first found still image in a drive MOVIE Plays a first found movie file in a drive PowerPoint Plays a first found PowerPoint file in a drive TI...

Страница 89: ...ally by name in descending order EXT ABC Displays the files alphabetically by extension in ascending order EXT ZYX Displays the files alphabetically by extension in descending order DATE NEW Displays...

Страница 90: ...our user guide or help file accompanied with your Windows computer Use a keyboard to give a name to the shared folder in alphanumeric characters To connect the shared folder beyond the subnet set WINS...

Страница 91: ...utton to a shared folder number and press the button to select ENABLE and then press the ENTER button 5 Enter the path user name and password for the shared folder Press the button to select the SHARE...

Страница 92: ...4 Using the Viewer 6 Exit the setting Press the button to select OK and press the ENTER button This will close the SHARED FOLDER screen If an error message appear your settings are not correct Try aga...

Страница 93: ...ed do not disconnect your LAN cable If doing so the Viewer will not work TIP Connecting settings for Shared folder Settings of up to four folders can be saved Restarting the projector will display set...

Страница 94: ...p Media Sharing in Windows Media Player 11 or Windows Media Player 12 NOTE Both the projector and the media server must be on the same subnet Connecting to the media server beyond the subnet is not po...

Страница 95: ...t of accessible devices will be displayed 4 Select P501 Series and then Allow A check mark will be added to the P501 Series icon The P501 Series is a projector name specified in NETWORK SETTINGS 5 Sel...

Страница 96: ...Windows Media Player 12 2 Select Stream and then select Automatically allow devices to play my media The Allow All Media Devices windows will be displayed 3 Select Automatically allow all computers an...

Страница 97: ...cabinet page 17 This will start searching for a computer with media sharing enabled in the network and add it to the Media server of the thumbnail screen Another way to do this is to point the cursor...

Страница 98: ...and select the ENTER button 2 Display the MEDIA SERVER setting screen Press the button to select the MEDIA SERVER icon and press the ENTER button 3 Disable the connection Press the ENTER button to cl...

Страница 99: ...97 2007 format files may not be displayed Some restrictions on Excel files Fonts will be automatically converted to the fonts installed in the projector Fonts can vary in size or width causing layout...

Страница 100: ...rojector cabinet to select the item you want to adjust or set You can use the buttons on the remote control or the projector cabinet to select the tab you want 5 Press the ENTER button on the remote c...

Страница 101: ...n option in a dialog box Source Indicates the currently selected source Off Timer remaining time Indicates the remaining countdown time when the OFF TIMER is preset Slide bar Indicates settings or the...

Страница 102: ...ATIVE P451W P401W AUTO 4 3 16 9 15 9 16 10 LETTERBOX NATIVE POSITION Not available on P451W P401W 0 AUDIO VOLUME 11 SETUP GENERAL KEYSTONE 0 KEYSTONE HORIZONTAL KEYSTONE VERTICAL PINCUSHION LEFT RIGHT...

Страница 103: ...ENT RGB COMPONENT RGB COMPONENT VIDEO AUTO AUTO NTSC3 58 NTSC4 43 PAL PAL M PAL N PAL60 SECAM S VIDEO AUTO AUTO NTSC3 58 NTSC4 43 PAL PAL M PAL N PAL60 SECAM WXGA MODE P501X P451X PE501X OFF P451W P40...

Страница 104: ...LEVEL WIRED LAN not supported by PE501X IP ADDRESS SUBNET MASK GATEWAY MAC ADDRESS WIRELESS LAN not supported by PE501X IP ADDRESS SUBNET MASK GATEWAY MAC ADDRESS SSID NETWORK TYPE WEP WPA CHANNEL SI...

Страница 105: ...amera S VIDEO Selects what is connected to your S VIDEO input VCR or DVD player NOTE A frame may freeze for a brief period of time when a video is played back in fast forward or fast rewind with a Vid...

Страница 106: ...ightly lit room PRESENTATION Recommended for making a presentation using a PowerPoint file VIDEO Recommended for typical TV program viewing MOVIE Recommended for movies GRAPHIC Recommended for graphic...

Страница 107: ...ot available when DICOM SIM is selected for DETAIL SETTINGS Selecting Screen Size for DICOM SIM SCREEN SIZE This function will perform gamma correction appropriate for the screen size LARGE For screen...

Страница 108: ...brightness level or the back raster intensity SHARPNESS Controls the detail of the image COLOR Increases or decreases the color saturation level HUE Varies the color level from green to blue The red...

Страница 109: ...ion adjusts the clock frequencies that eliminate the horizontal banding in the image This adjustment may be necessary when you connect your computer for the first time PHASE Use this item to adjust th...

Страница 110: ...solution horizontal and vertical frequency its adjustments will be called up and applied To delete adjustments stored in memory from the menu you select RESET CURRENT SIGNAL or ALL DATA and reset the...

Страница 111: ...15 9 The image is displayed in 15 9 aspect ratio 16 10 The image is displayed in 16 10 aspect ratio WIDE ZOOM P501X P451X PE501X The image is stretched left and right Parts of the displayed image are...

Страница 112: ...tically determined NOTE To display a letterbox signal prop erly select LETTERBOX NOTE To display a squeezed signal prop erly select 16 9 TIP Image position can be adjusted vertically using POSITION wh...

Страница 113: ...ing Up or Down Sound Adjusts the volume of the projector speaker and AUDIO OUT Stereo Mini Jack TIP When no menus appear the and buttons on the projector cabinet and the VOL buttons on the remote cont...

Страница 114: ...tion page 24 KEYSTONE VERTICAL Corrects vertical keystone distortion page 24 PINCUSHION LEFT RIGHT Corrects pincushion distortion at the left or right side PINCUSHION TOP BOTTOM Corrects pincushion di...

Страница 115: ...n in applications where the screen material is not white NOTE Selecting WHITEBOARD reduces lamp brightness Setting Eco Mode ECO MODE The ECO MODE increases lamp life while lowering power consumption a...

Страница 116: ...ff after the countdown is complete NOTE To cancel the preset time set OFF for the preset time or turn off the power When the remaining time reaches 3 minutes before the projector is turned off the THE...

Страница 117: ...fter the last touch of a button to turn off the menu The preset choices are MANUAL AUTO 5 SEC AUTO 15 SEC and AUTO 45 SEC The AUTO 45 SEC is the fac tory preset Selecting a Color or Logo for Backgroun...

Страница 118: ...ROL PANEL LOCK function NOTE This CONTROL PANEL LOCK does not affect the remote control functions When the control panel is locked pressing and holding the EXIT button on the projector cabinet for abo...

Страница 119: ...ect a number from 1 to 254 you wish to assign to your projector CONTROL ID Select OFF to turn off the CONTROL ID setting and select ON to turn on the CONTROL ID setting NOTE When ON is selected for CO...

Страница 120: ...N MENU on page 120 OPTIONS 1 Setting Auto Adjust AUTO ADJUST This feature sets the Auto Adjust mode so that the computer signal can be automatically or manually adjusted for noise and stability You ca...

Страница 121: ...RGB COMPONENT and the projector automatically detects a component signal However there may be some component signals that the projector is unable to detect If this is the case select COMPONENT VIDEO S...

Страница 122: ...LECT Make the settings for each audio level when connecting HDMI equipment your network and USB PC port Select between each equipment and computer HDMI Select HDMI1 or HDMI2 to switch the HDMI 1 or HD...

Страница 123: ...y mode the POWER indicator will light orange and the STATUS indicator will not light This shows that the projector s power can be turned on by wired LAN When in the standby mode the following connecto...

Страница 124: ...ojector We recommend using this function in com bination of the AUTO POWER OFF function This function will not be available under the following conditions when a component signal is applied to the COM...

Страница 125: ...plays back movie files from the USB memory device every time the projector is turned on not supported by PE501X NETWORK Displays a signal from LAN port RJ 45 or the USB Wireless LAN Unit not supported...

Страница 126: ...bar indicator changes from 0 to 100 Hours and starts counting down If the remaining lamp time reaches 0 hours the projector will not turn on The message to the effect that the lamp or the filters sho...

Страница 127: ...1 SOURCE NAME SOURCE INDEX HORIZONTAL FREQUENCY VERTICAL FREQUENCY SYNC TYPE SYNC POLARITY SCAN TYPE SOURCE 2 SIGNAL TYPE VIDEO TYPE BIT DEPTH VIDEO LEVEL WIRED LAN not supported by PE501X IP ADDRESS...

Страница 128: ...enu WIRELESS LAN not supported by PE501X IP ADDRESS SUBNET MASK GATEWAY MAC ADDRESS SSID NETWORK TYPE WEP WPA CHANNEL SIGNAL LEVEL VERSION 1 FIRMWARE Version DATA Version VERSION 2 not supported by PE...

Страница 129: ...116 5 Using On Screen Menu OTHERS PROJECTOR NAME MODEL NO SERIAL NUMBER LAN UNIT TYPE CONTROL ID when CONTROL ID is set...

Страница 130: ...To reset the lamp usage time see Clearing Lamp Hour Meter CLEAR LAMP HOURS below Clearing Lamp Hour Meter CLEAR LAMP HOURS Resets the lamp clock back to zero Selecting this option displays submenu fo...

Страница 131: ...or CD ROM In ADMINISTRATOR MODE either ADVANCED menu or BASIC menu can be selected page 136 The BASIC menu contains minimum essentials of menus and commands IMAGE EXPRESS UTILITY This shows informatio...

Страница 132: ...and network wired wireless which are required to use Network Projector Use this information to set up for your computer REMOTE DESKTOP CONNECTION This allows you to set up for computer name entry and...

Страница 133: ...ff DHCP page 122 To set only for wireless LAN NETWORK TYPE and WEP WPA Select PROFILE 1 or PROFILE 2 for wireless LAN and then select ADVANCED and OK and press the ENTER button The Advanced menu will...

Страница 134: ...nit select DISABLE from the PROFILES list Selecting SIMPLE ACCESS POINT will allow the projector to create an infrastructure network The IP address of the projector will be set automatically Select Ob...

Страница 135: ...off Up to 12 numeric characters WNS CONFIGURA TION Set the IP address of your WINS server of the network connected to the projector when DHCP is turned off Up to 12 numeric characters AUTO DNS Place...

Страница 136: ...type WEP key and encryption key settings must be the same as communication devices such as PC or access point in your wireless network When you use SECURITY your image transmission speed will slow dow...

Страница 137: ...keys below KEY1 KEY2 KEY3 KEY4 Enter a WEP key Maximum number of characters Option Alphanumeric ASCII Hexadecimal HEX WEP 64bit 5 10 WEP 128bit 13 26 When WPA PSK WPA EAP WPA2 PSK or WPA2 EAP is sele...

Страница 138: ...le to the root folder of the USB memory The file formats of digital certificate that are supported by the projector are DER and PKCS 12 only The projector cannot handle any digital certificate whose f...

Страница 139: ...PSK WPA EAP or WPA2 EAP is not available when AD HOC is selected 6 Select the SECURITY tab The SECURITY page will be displayed 7 Select the SECURITY TYPE field and press the ENTER button The pull dow...

Страница 140: ...le PEAP MSCHAPv2 User Name 1 character or more and 32 characters or less Password 1 character or more and 32 characters or less CA Certificate Certificate authority s certificate DER format file Selec...

Страница 141: ...ital certificate has been installed its information cannot be deleted even if you stop setting WPA EAP or WPA2 EAP 14 On the FILES screen select a digital certificate PKCS 12 format file saved in your...

Страница 142: ...the steps below By doing the following procedure all the digital certificates for the currently displayed profile will be cleared 1 Select CLEAR CERTIFICATES in the bottom left of the AD VANCED setti...

Страница 143: ...talling a digital certificate You can install each digital certificate client certificate and CA certificate for PROFILE 1 or 2 on a file by file basis Install a root CA certificate for a CA certifica...

Страница 144: ...YES and press the ENTER button The digital certificates will be cleared TIP Entering WEP keys Switching between Alphanumeric characters and hexadecimal To enter from KEY1 to KEY4 do the following 1 S...

Страница 145: ...is connected to a network wired LAN or wireless LAN PROJECTOR NAME HOST NAME DOMAIN NETWORK INFOR MATION WIRED LAN WIRELESS LAN CONNECTION STATUS IP ADDRESS SUBNET MASK GATEWAY WINS DNS MAC ADDRESS SS...

Страница 146: ...rojector name Up to 16 alphanu meric characters and symbols DOMAIN ADVANCED menu only Set a host name and domain name of the projector HOST NAME Set a host name of the projector Up to 15 alphanumeric...

Страница 147: ...network connected to the projector Up to 60 alphanumeric characters SENDER S AD DRESS Specify the sender s address Up to 60 alphanu meric characters and symbols SMTP SERVER NAME Type in the SMTP serve...

Страница 148: ...ation System Industries Associa tion JBMIA in 2005 The projector supports all the commands of PJLink Class 1 Setting of PJLink will not be affected even when RESET is done from the menu Up to 32 alpha...

Страница 149: ...ave your projector settings Clear this check box to save your projector settings NEW PASSWORD CONFIRM PASS WORD Assign a password for the administrator mode Up to 10 alphanumeric characters TIP To ret...

Страница 150: ...more the built in clock stops working The POWER SAVING or NORMAL2 of STANDBY MODE will be invalidated when PROGRAM TIMER is enabled Setting a new program timer 1 On the PROGRAMTIMER screen use the SE...

Страница 151: ...TOOLS screen NOTE Up to 30 different timer settings can be programmed Once the program not marked with a check in REPEAT has been executed the check mark in the ACTIVE check box will be cleared automa...

Страница 152: ...ton 2 Change the settings on the EDIT screen 3 Select OK and press the ENTER button The programmed settings will be changed You will be returned to the PROGRAM LIST screen Changing the order of progra...

Страница 153: ...ate MM DD YYYY and time HH MM INTERNET TIME SERVER If you place a check mark the projector s built in clock will be synchronized with an Internet time server in every 24 hours and at the time of proje...

Страница 154: ...e can be is ap proximately 25 0 64 m measured diagonally when the projector is roughly 35 inches 0 9 m from the wall or screen The largest the image can be is 300 7 6 m when the projector is about 435...

Страница 155: ...en Size Screen Size Unit cm inch 200 180 150 120 100 80 1 1 7 4 5 9 9 3 3 6 7 7 0 2 7 5 5 8 2 2 9 4 6 1 8 3 3 9 1 5 2 3 1 1 2 1 2 3 9 0 1 5 6 0 40 7 8 3 0 6 60 30 25 1 1 4 5 0 9 3 7 646 2 W 403 9 H 25...

Страница 156: ...7 380 9641 63 0 1600 0 0 0 15 5 0 0 9 4 240 6096 192 4877 144 3658 0 72 0 1829 261 6621 434 11026 72 0 1829 0 0 0 15 4 0 0 9 4 270 6858 216 5486 162 4115 0 81 0 2057 294 7456 489 12411 81 0 2057 0 0 0...

Страница 157: ...d 104 F 40 C Eco mode selected automatically at 95 F to 104 F 35 C to 40 C Do not expose the projector to moisture dust or smoke This will harm the screen image Ensure that you have adequate ventilati...

Страница 158: ...PC is not turned on unless connected to the projector before being powered up If the screen goes blank while using your remote control it may be the result of the computer s screen saver or power man...

Страница 159: ...long Turn off the projector and the PC before connecting the DVI to HDMI cable To project a DVI digital signal Connect the cables turn the projector on then select the HDMI input Finally turn on your...

Страница 160: ...o your projector to simultaneously view on a monitor the computer analog image you re projecting NOTE Daisy chain connection is not possible When audio equipment is connected the projector speaker is...

Страница 161: ...IN VIDEO VIDEO S VIDEO IN S VIDEO S VIDEO NOTE The AUDIO IN L and R jacks RCA are shared between the Video and S Video inputs NOTE Refer to your VCR owner s manual for more information about your equi...

Страница 162: ...riate input connector after turning on the projector Input connector SOURCE button on the projector cabinet Button on the remote control COMPUTER IN COMPUTER COMPUTER 1 NOTE Refer to your DVD player s...

Страница 163: ...of audio video equipment with an HDMI connector Select Enhanced rather than Normal if HDMI output is switchable between Enhanced and Normal This will provide improved image contrast and more detailed...

Страница 164: ...h a LAN port RJ 45 which provides a LAN connection using a LAN cable To use a LAN connection you are required to set the LAN on the projector menu Select SETUP WIRED LAN page 120 Example of LAN connec...

Страница 165: ...connect the projector to a network and then use the HTTP server to set the wireless LAN After setting the wireless LAN by using the HTTP server set NETWORK SETTINGS SETTINGS WIRED DISABLE When switchi...

Страница 166: ...icator facing outward Keep the cap for later use NOTE Do not force to insert the USB Wireless LAN Unit 4 Put the USB LAN port cover back into place Insert the catch of the USB LAN port cover into the...

Страница 167: ...ireless LAN Unit To enable direct communication i e peer to peer between personal computers and projectors you need to select the Ad Hoc mode Use the HTTP server function to make the settings page 42...

Страница 168: ...he cable cover after installing the projector on the ceiling and connecting cables Tool needed for attaching Phillips screwdriver plus head 1 Align two tabs on the outside of the cable cover with groo...

Страница 169: ...t use a spray containing flammable gas to remove dust attached to the filters etc Doing so may result in fires NOTE The message for filter cleaning will be displayed for one minute after the projector...

Страница 170: ...wash the filter with water Doing so can result in filter clog ging 5 Remove dust from the filter unit and the filter cover Clean both outside and inside 6 Attach the four filters to the filter unit 1...

Страница 171: ...nto the groove of the cabinet and push the buttons on the left and right to close the filter cover Push the filter cover until it clicks into place 9 Clear the filter usage hours Plug the power cord i...

Страница 172: ...inet If heavily soiled use a mild detergent Never use strong detergents or solvents such as alcohol or thinner When cleaning the ventilation slits or the speaker using a vacuum cleaner do not force th...

Страница 173: ...glass surface on the lamp housing Leaving finger prints on the glass surface might cause an unwanted shadow and poor picture quality The projector will turn off and go into standby mode when you conti...

Страница 174: ...There is an interlock on this case to prevent the risk of electrical shock Do not attempt to circumvent this interlock 2 Remove the lamp housing by holding it CAUTION Make sure that the lamp housing i...

Страница 175: ...trol for 10 seconds to reset the lamp clock back to zero When the lamp time clock is reset to zero the LAMP indicator goes out 4 Reattach the lamp cover 1 Slide the lamp cover back until it snaps into...

Страница 176: ...or is precision equipment Keep out dust and dirt during filter replacement Do not wash the filters with soap and water Soap and water will damage the filter membrane Put filters into place Incorrect a...

Страница 177: ...rusion of the filter unit 6 Put the filter unit back to the projector cabinet Make sure that the filter unit is placed in the correct orientation 7 Put the filter cover back to the projector cabinet I...

Страница 178: ...P Home Edition and Windows XP Professional Microsoft NET Framework Version 2 0 is required The Microsoft NET Framework Version 2 0 3 0 or 3 5 is available from Microsoft s web page Download and instal...

Страница 179: ...ck Start and then Control Panel The Control Panel window will be displayed 2 Click Uninstall a program under Programs The Programs and Features window will be displayed 3 Select the software program a...

Страница 180: ...ENSE AGREEMENT and click Next The confirmation window will be displayed 7 Click I accept the terms in the license agreement Follow the instructions on the installer screens to complete the installatio...

Страница 181: ...rmation on Virtual Remote Tool visit our website http www nec display com dl en index html NOTE When COMPUTER is selected from your source selection the Virtual Remote screen or the toolbar will be di...

Страница 182: ...nsert the accompanying NEC Projector CD ROM into your CD ROM drive The menu window will be displayed TIP If the menu window will not be displayed try the following procedure For Windows 7 1 Click star...

Страница 183: ...on the screens to complete the uninstallation For Windows XP 1 Click Start and then Control Panel The Control Panel window will be displayed 2 Double click Add Remove Programs The Add Remove Programs...

Страница 184: ...reens When Easy Setup is completed the Virtual Remote Tool screen will be displayed NOTE When POWER SAVING is selected for STANDBY MODE from the menu the projector cannot be turned on via the computer...

Страница 185: ...ol Displaying the help file using the taskbar 1 Click the Virtual Remote Tool icon on the taskbar when Virtual Remote Tool is running The pop up menu will be displayed 2 Click Help The Help screen wil...

Страница 186: ...ASY CONNECTION function the complicated network settings can be simplified and the computer will automatically connect to the projector The screen of your computer can be sent to up to four projectors...

Страница 187: ...ocedure For Windows 7 1 Click start on Windows 2 Click All Programs Accessories Run 3 Type your CD ROM drive name example Q and LAUNCHER EXE in Name example Q LAUNCH ER EXE 4 Click OK The menu window...

Страница 188: ...ly to the projector by one to one Easy Connection is recommended When one or more networks for EASY CONNECTION are found the Easy Connection Selection Screen window will be displayed To check for the...

Страница 189: ...e of the projector 3 Picture Turns on or off AV MUTE Picture mute and turns on or off FREEZE Freeze a picture 4 Sound Turns on or off AV MUTE Sound mute play the sound and turns up or down the volume...

Страница 190: ...e control window The Help screen will be displayed Displaying the Help file of GCT while it is running Click Help Help on the edit window The Help screen will be displayed Displaying the help file usi...

Страница 191: ...ox 6MB from the IEU_Lite removable media folder in the supplied NEC Projector CD ROM to the root directory of your removable media 2 Insert your removable media into your computer The AutoPlay screen...

Страница 192: ...a Wireless LAN page 152 and Controlling the Projector by Using an HTTP Browser page 42 Step 3 Start Image Express Utility Lite for Mac OS 1 Open your Applications folder in Mac OS 2 Double click the I...

Страница 193: ...nformation about Multi point Correction and Parameters Correction see the help file of Image Express Utility Lite page 177 179 Your correction data can be stored in the projector or your computer whic...

Страница 194: ...After completing right click the mouse The green frame and the mouse pointer will disappear from the projected image area This will complete the cor rection 7 Click the X close button on the 4 point C...

Страница 195: ...omputers High speed high quality image transmissions based on NEC s original compression algorithm NEC s original compression algorithm allows high quality images to be sent over the network at high s...

Страница 196: ...h computer Attendant projects Possible operation includes switching projecting computers to project from as well as temporarily termi nating communication with the projector Attendant D presenter Mana...

Страница 197: ...jector User Supportware Image Express Utility 2 0 Image Express Utility 2 0 in that order The Selection Of Network Connections window will be displayed A list of the network equipment connected to you...

Страница 198: ...e screen of your computer will be projected from the projector At this time the input signal of the projector will automatically change to NETWORK Transferring images When your computer is connected t...

Страница 199: ...image projected from the projector does not change To manipulate the screen that should not be disclosed projected from the projector stop transmission 3 Click the projector icon on the Windows taskba...

Страница 200: ...E To disclose a file to the participants selection can be made only in folder units Therefore a folder only having files that can be disclosed to the participants must be created in advance 1 Click th...

Страница 201: ...he conference by clicking at the upper right of the presenter window Participating in Conference Participating in conferences 1 Click Windows Start All Programs NEC Projector User Supportware Image Ex...

Страница 202: ...pate and click Connect 3 Click The computer will be connected to the selected conference and the attendant window will be displayed If the presenter selects Send to PC And Projector the image projecte...

Страница 203: ...ated file is saved to My Documents ImageExpress under the default settings In case of Windows 7 Windows Vista Document ImageExpress is the default folder to save a created file A folder is created bel...

Страница 204: ...After Downloading is checked the file is opened by specified Windows application software after downloading is com plete In case of Windows XP a created file is saved to My Documents ImageExpress unde...

Страница 205: ...presenter In the following example Not Approved is selected Click Become A Presenter in the attendant window You will change from a participant to a presenter 1 Click Leaving conference Leave the con...

Страница 206: ...oom IMPORTANT You can use the Desktop Control Utility 1 0 to operate a computer located in a separate room from the projector over a network Therefore care must be exercised to prevent any third party...

Страница 207: ...ng on with the administrator account follow the procedure below to change the setting Change Procedure For Windows 8 Windows 7 1 Click Control Panel 2 Click User Accounts and Family Safety Windows 8 o...

Страница 208: ...ws 7 Windows Vista the User Account Control Window is displayed Click OK or input the administrator password Screen when Desktop Control Utility 1 0 is started first time already Screen if starting pa...

Страница 209: ...played in the password field varies each time Desktop Control Utility 1 0 is started 4 Write down the character string displayed in the password field Write down PMHN in the screen example of step 3 5...

Страница 210: ...in advance 3 Press the SOURCE button on the projector unit The Source list will be displayed In case of the remote control press the NETWORK button The network menu screen will be displayed proceed t...

Страница 211: ...ld to delete the character to the left of the character insertion point 8 After inputting the password click the button on the right side of the PASSWORD field You are returned to the DESKTOP CONTROL...

Страница 212: ...anipulating desktop screen The displayed desktop screen can be manipulated by using the USB mouse connected to the projector If the EXIT button of the projector or remote control is pressed while the...

Страница 213: ...peration as when the ESC key of the computer is pressed is performed This icon is used for example to stop a slideshow of PowerPoint Operating the projector disconnecting communications 1 Press the EX...

Страница 214: ...creen is displayed 2 Click Exit Desktop Control Utility 1 0 will be terminated 3 Press the EXIT button on the projector unit or on the remote control The network menu screen will be displayed 4 Press...

Страница 215: ...Install PC Control Utility Pro 4 Pro 5 on the computer Step 2 Connect the projector to a LAN Step 3 Start PC Control Utility Pro 4 Pro 5 To run PC Control Utility Pro 4 on Windows 8 Windows XP Home Ed...

Страница 216: ...ion is complete the Welcome window will be displayed 3 Click Next END USER LICENSE AGREEMENT screen will be displayed Read END USER LICENSE AGREEMENT carefully 4 If you agree click I accept the terms...

Страница 217: ...ning the scheduler Example For Windows 7 Select Control Panel System and Security Power Options Change when the computer sleeps Put the computer to sleep Never NOTE When POWER SAVING is selected for S...

Страница 218: ...2 Step 3 Start PC Control Utility Pro 5 1 Open your Applications folder in Mac OS 2 Click the PC Control Utility Pro 5 folder 3 Click the PC Control Utility Pro 5 icon PC Control Utility Pro 5 will st...

Страница 219: ...n Orange 1 cycle 0 5 sec On 2 5 sec Off Network conflict Both the built in wired LAN and the wireless LAN cannot be connected to the same network at the same time To use both built in wired LAN and wi...

Страница 220: ...rom the notebook PC is not turned on unless connected to the projector before being powered up If the screen goes blank while using your remote control it may be the result of the computer s screen sa...

Страница 221: ...the projected image may not be displayed correctly Should this happen deactivate the notebook PC s LCD screen when the projector display is in use Each notebook PC has a different way of deactivate re...

Страница 222: ...ts 1 RGB D Sub 15P 1 Stereo Mini Audio PC Control 1 PC Control Port D Sub 9P Wired LAN Port 1 RJ 45 10BASE T 100BASE TX not supported by PE501X Wireless LAN Port Optional IEE 802 11 b g n optional USB...

Страница 223: ...ome scan rates are not supported depending on the resolution of its input signal Mechanical Model Number NP P501X NP PE501X NP P451X NP P451W NP P401W Installation Orientation Desktop Front Desktop Re...

Страница 224: ...2 8 76 5 3 398 15 7 115 4 5 282 11 1 11 5 0 5 175 6 9 24 0 9 33 8 1 3 130 5 1 150 5 9 200 7 9 134 5 3 Cabinet Dimensions NP P501X NP P451X NP P451W NP P401W Unit mm inch Lens center Lens center Holes...

Страница 225: ...212 9 Appendix NP PE501X 71 8 2 8 76 5 3 398 15 7 115 4 5 282 11 1 11 5 0 5 175 6 9 24 0 9 33 8 1 3 130 5 1 150 5 9 200 7 9 134 5 3 Lens center Lens center Holes for ceiling mount Unit mm inch...

Страница 226: ...7 8 Pin No RGB Signal Analog YCbCr Signal 1 Red Cr 2 Green or Sync on Green Y 3 Blue Cb 4 Ground 5 Ground 6 Red Ground Cr Ground 7 Green Ground Y Ground 8 Blue Ground Cb Ground 9 No Connection 10 Syn...

Страница 227: ...lution on WXGA model P451W P401W 3 The projector may fail to display these signals correctly when AUTO is selected for ASPECT RATIO in the on screen menu The factory default is AUTO for ASPECT RATIO T...

Страница 228: ...ICTURE MUTE OFF 02H 11H 00H 00H 00H 13H SOUND MUTE ON 02H 12H 00H 00H 00H 14H SOUND MUTE OFF 02H 13H 00H 00H 00H 15H NOTE Contact your local dealer for a full list of the PC Control Codes if needed Ca...

Страница 229: ...orrectly AUTO POWER OFF is turned off only models with the AUTO POWER OFF function OFF TIMER is turned off only models with the OFF TIMER function Video and Audio Image is too dark Remains unchanged e...

Страница 230: ...r s cable Model number Length inch m Distribution amplifier Model number Switcher Model number Adapter Model number Installation environment Screen size inch Screen type White matte Beads Polarization...

Страница 231: ...and labor warranty and InstaCare service program Visit our web site at www necdisplay com click on support center register product and submit your completed form online Upon receipt we will send a con...

Страница 232: ...NEC Display Solutions Ltd 2013 2014 7N951902...

Отзывы: