Necta StarFood Скачать руководство пользователя страница 13

9

© by NECTA VENDING SOLUTIONS SpA

0110 171-01

INSTALLATION

The machine installation and the following maintenance
operations should be carried out with the machine ener-
gised
 and therefore by qualified personnel, who are trained
in the correct use of the machine and are aware of the
specific risks of such condition.

The machine is not suitable for outdoor installation, it
must be installed in a dry room where the temperature
remains between 2° C and 32° C.

It cannot be positioned where water jets are used for
cleaning (e.g. in large kitchens, etc.).

The machine should be positioned with a maximum
inclination of 2°.

UNPACKING THE VENDING MACHINE

After removing the packing, ensure that the machine is
intact.
If the vending machine is found to be damaged, immedi-
ately inform the carrier and do not use the machine.

No packing elements (i.e. plastic bags, polystyrene
foam, nails, etc.) should be left within the reach of
children, as they are potentially dangerous.

Packing materials must be disposed of in authorised
containers and the recyclable ones must be recovered by
qualified companies.

CONNECTING TO THE POWER SUPPLY

The machine is designed to operate under single-phase
230 V~ voltage and is protected by 15 A fuses.
Before making the connection, ensure that the rating
corresponds to that of the power grid, and more specifi-
cally:

- the supply voltage rating must be within the range

recommended for the connection points;

- the main switch should be capable of withstanding the

peak load required, and at the same time ensure
proper omnipolar disconnection from the power grid
with an opening gap of the contacts of at least 3 mm.

The switch, the power outlet and the plug must be
located in an easily accessible position.

The electrical safety of the machine is ensured only when
it is correctly earthed according to the safety standards in
force.

This fundamental safety requirement must be duly
verified, and if in doubt the system must be carefully
tested by qualified technicians.

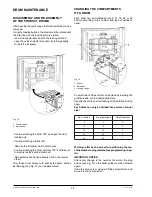
The power supply cable is of the type with a fixed plug. Any
replacement (see figure) should be done by qualified
personnel only, using exclusively cables of the type HO5
RN - F or HO5 V V-F or H07 RN-F with a section of 3x1-1.5
mm

2

.

Fig. 7

1 - Cable from the mains
2 - Cable clamp
3 - Lift cover

Do not use adapters, multiple sockets and/or exten-
sions.

THE MANUFACTURER DECLINES ALL RESPONSI-
BILITY FOR ANY DAMAGE CAUSED BY NON-COM-
PLIANCE WITH THE ABOVE MENTIONED PRECAU-
TIONS.

INSTALLING THE PAYMENT SYSTEM

The machine is sold without payment system, there-
fore the installer of such a system is responsible for
any damage to the machine or to things and persons
caused by faulty installation.

- Install the desired coin mechanism according to the

appropriate instructions and make sure that the rel-
evant parameters are programmed correctly.

- adjust the selector opening lever bracket to allow

complete opening of the selector;

- adjust the coin chute according to the type of coin

mechanism installed.

Содержание StarFood

Страница 1: ...INSTALLATION OPERATING AND MAINTENANCE MANUAL UK English StarFood DOC NO H 171U 01 EDITION 2 2001 10...

Страница 2: ......

Страница 3: ...icht Declaraquelam quinadescriptaenlaplacadeidentificaci n resultaconformealasdisposicioneslegislativas de las directivas 89 392 89 336 73 23 CEE y modificaciones y integraciones sucesivas Declara que...

Страница 4: ......

Страница 5: ...NFIGURATION PAGE 11 FILLER MENU PAGE 12 STATISTICS PAGE 12 SELECTION PRICES PAGE 12 CHANGE TUBES CONTROL PAGE 12 ADJUSTING THE AIRFLOW PAGE 12 ANTI TAMPERING CHECK PAGE 13 TEST PAGE 13 TECHNICIAN MENU...

Страница 6: ...s optimising the machine capacity INTRODUCTION This technical documentation is part and parcel of the vendingmachineandmustalwaysfollowthemachine in case it is moved or transfer of ownership so as to...

Страница 7: ...ulations in force for its relevant systems must be checked by qualified per sonnel at least once a year PRECAUTIONS IN USING THE MACHINE The following precautions will assist in protecting the environ...

Страница 8: ...emperature 20 C Refrigerated box temperature 3 C temperature of loaded products machine completely empty 5 C the following power consumption levels resulted to reach operating temperature 12 460 Wh Ho...

Страница 9: ...d and the desired product is brought to dispensing position on the right hand side of the slider window The drums which are programmed for First in First out mode or that are empty do not rotate Each...

Страница 10: ...e message Loading is indicated on the display and the selection buttons are assigned programming functions This allows programming and or loading operations to be carried out with the refrigerated box...

Страница 11: ...t loading buttons are enabled Pressingoneofloadingbuttonswillcausethecorrespond ing drum to rotate bringing each sector into loading position The drum will be considered completely full and the counti...

Страница 12: ...aining abrasive or corrosive agents do not use common steel wool wire brushes or steel scrapers Clean varnished parts with silicone wax Switch off the machine in the event of failure or malfunction An...

Страница 13: ...ended for the connection points the main switch should be capable of withstanding the peak load required and at the same time ensure proper omnipolar disconnection from the power grid with an opening...

Страница 14: ...level menu NORMAL OPERATING MODE The machine is preset to Normal operation mode when connected to the power supply with the door closed see programming switch The lighting lamps are switched on and th...

Страница 15: ...r the number of empty sectors is indi cated on the price display of each drum When pressing the selection button the first empty ex pired sector is presented and the slider opens so that the product c...

Страница 16: ...r before confirming press the confirm button again to start printing DISPLAY When pressing the confirm button the data described in the paragraph Printing the statistics is sequentially displayed RESE...

Страница 17: ...these functions pressing the loading buttons does not change the status of a drum and or of a sector full empty expired SLIDER TEST With this function the correct functioning of the sliders can betest...

Страница 18: ...failures are currently present after pressing the confirm button the message End failures will be displayed The monitored failures are Compressor The machine is locked if the compressor runs non stop...

Страница 19: ...DV MDB By selecting one of the systems it is possible to control its functions EXECUTIVE The following payments systems are available for the Executive system Standard Price Holding Coges U Key Sida V...

Страница 20: ...o zero Immediate change Normally the amount of credit inserted for a selection is cashed after the machine sends the message Selection successful When this function is enabled disabled by default the...

Страница 21: ...front of the operator It is also possible to unlock a single drum to be rotated manually until the hole is aligned with the adjustment screw COLD UNIT ENABLE The cooling unit operation can be disabled...

Страница 22: ...tersandrelativecounters whichcanberesetwithout losing total data PRINT Connect an RS232 serial printer having a Baud rate of 9600 8 data bit no parity 1 stop bit the CITIZEN I DP 3110 24RF230Ap n92102...

Страница 23: ...is changed full empty expired MISCELLANEOUS This menu contains some sub menus used less fre quently which permit control of the functions described below MACHINE INFORMATION The machine can memorize...

Страница 24: ...ode Now by inserting the programmer into its holder the connection will take place automatically and the setup menu will be shown on the programmer display press key E to access the displayed function...

Страница 25: ...Validator connector MAINTENANCE PRINTED BOARD FUNCTIONS AND INDICATOR LIGHTS CPU BOARD The C P U card Central Processing Unit is located inside the payment system compartment it communi cates with th...

Страница 26: ...nd suitable system PersonalComputerorsimilar themachinemanagement software can be updated without replacing the EPROMs RELAY AND TRIAC FUNCTION see Wiring diagram K01 slider motor 1 K02 slider motor 2...

Страница 27: ...an be skipped by pressing Rear door microswitch By operating the switch on the rear door if fitted the status of Closed micro or Open micro changes to advance to the next check Large door microswitch...

Страница 28: ...drum halves with exactly the same section partitioning see Fig 15 can be assembled CHANGING THE COMPARTMENTS OF A DRUM Each drum can be subdivided into 6 12 18 24 or 36 sectors according to the number...

Страница 29: ...evaporator 9 Temperature sensor AUTOMATIC DEFROSTING DEVICE Automatic defrosting is enabled through programming Thedefrostingsystemoperation indicatedinFig 19 isas follows The bypass solenoid valve s...

Страница 30: ...lenoid valve open the evaporator fans are stopped to avoid a temperature increase inside the refrigerated box MAINTENANCE AND CLEANING The machine must be kept clean at all times both inside and outsi...

Страница 31: ...counter Confirm Printing CAR 1 1 2 Total printout CAR 1 1 2 Total printout Confirm Printing Heading Current date Machine model Software edition Operator code Machine code Installation date Filler men...

Страница 32: ...3 1 2 Display total counter CAR 1 3 1 1 Display single counter Selection 1 Band CAR 1 3 1 1 Display single counter Selection 1 CAR 1 3 1 2 Display total counter Selection 1 Tot TOTAL STATISTICS CAR 1...

Страница 33: ...ction for each time band and total Display total sales by single selection CAR 1 4 Display relative statistics CAR 1 4 1 Display sel counter CAR 1 4 1 1 Display single counter CAR 1 4 1 2 Display tota...

Страница 34: ...M DATA according to protocol used Validators and Executive Cashed and sold BDV Audit MDB Audit CAR 1 4 4 1 Display coin mech counter CAR 1 4 4 2 Display cash counter Filler menu Summary R ELATIVE STAT...

Страница 35: ...1 Fill BDV tubes CAR 3 1 Fill BDV tubes Credit BDV only Manual change tube refill CAR 3 BDV tube control CAR 3 2 Release BDV tubes Credit Manual tube releasing CAR 3 2 Tube A X Release one coin from t...

Страница 36: ...u Summary CAR 6 1 Drum test CAR 6 2 Slider test CAR 6 1 Select drum CAR 6 2 Select slider Press a selection button Press a selection button CAR 1 Failures CAR 5 Anti tampering CAR 6 3 Complete selecti...

Страница 37: ...ailures TECN 1 3 Eseguito TECN 1 1 End of failures TECN 1 Failures TECN 1 2 Read Failures Drums Sliders TECN 1 2 Read Failures Drums 1 12 TECN 1 2 Drum N Name of failure 1 to 12 Slider failure Slider...

Страница 38: ...TECN 2 Programming parameters TECN 2 1 1 2 1 Band Week Day 1 7 TECN 2 1 Cash TECN 2 1 1 3 2 Time band 1 Start band End band C LOCK When confirming the blinking values day month year and week day are...

Страница 39: ...Executive BDV T YPE OF V ENDING C HANGE WITHOUT VEND TECN 2 1 2 Coin mechanisms TECN 2 1 2 1 Set coin mechanisms Coin mech type TECN 2 1 2 1 BDV data TECN 2 1 2 1 Type of Vending TECN 2 1 2 1 Single...

Страница 40: ...F XXXX 1 XXXX 1 TECN 2 1 2 1 Maximum change TECN 2 1 2 1 Value TECN 2 1 2 1 Accepted coins TECN 2 1 2 1 Coin A TECN 2 1 2 1 Coin A Yes Coins A to F TECN 2 1 2 1 Non accepted coins TECN 2 1 2 1 Coin A...

Страница 41: ...1 2 1 Value TECN 2 1 2 1 C P C device TECN 2 1 2 1 C P C device TECN 2 1 2 1 Empty state level TECN 2 1 2 2 Immediate change Enable Disable A D XXXX 1 XXXX 1 A TECN 2 1 2 2 Immediate change Enable Di...

Страница 42: ...1 Fill BDV tubes Credit BDV only Manual change tube refill TECN 2 1 2 3 2 Release BDV tubes Credit Manual tube releasing TECN 2 1 2 3 2 Tube A X Release one coin from the active tube TECN 2 1 2 3 BDV...

Страница 43: ...Enabled Disabled TECN 2 2 1 4 Drum expiry date TECN 2 2 1 3 1 Band Day Drum A Enabled Disabled TECN 2 2 1 4 Drum expiry date Drum 1 12 X 1 X 1 TECN 2 2 1 3 Drum status Band TECN 2 2 1 3 1 Band 1 4 TE...

Страница 44: ...2 3 Cold parameters TECN 2 2 2 Slider parameters Operating temperature 3 to 15 C 3 C by default TECN 2 3 1 1 Cold parameters Internal temperature TECN 2 3 1 1 Cold parameters Int temperature X 1 X 1...

Страница 45: ...2 1 Cold parameters Defrosting interval TECN 2 3 2 1 Cold parameters Defrosting int TECN 2 3 2 1 Cold parameters Defrosting cycle adj TECN 2 3 2 1 Defrosting cycles Date xx xx xx time xx xx duration X...

Страница 46: ...4 2 1 User messages TECN 2 4 2 1 User messages Message Status A Enabled Disabled No messagge Internal temperature Time and time P OSSIBLE MESSAGES TECN 2 4 3 Promotional message TECN 2 4 3 1 Promotion...

Страница 47: ...ess programming If set to Zero default the password is not required TECN 2 5 1 1 Password TECN 2 5 1 2 Password TECN 2 5 1 1 Enter password Password Enabled disabled When confirming the blinking value...

Страница 48: ...Filler menu TECN 3 Statistics TECN 2 5 3 Mascheramento Filler menu Menu name TECN 2 5 3 Filler menu Enabled disabled Enabled Disabled TECN 2 5 3 Menu name Filler menu Enabled disabled Statistics Pric...

Страница 49: ...CN 3 1 1 1 Print sel counter Confirm Printing TECN 3 1 2 Total printout TECN 3 1 2 Total printout Confirm Printing Heading Current date Machine model Software edition Operator code Machine code Instal...

Страница 50: ...3 1 2 Display total counter TECN 3 3 1 1 Display single counter Selection 1 Band TECN 3 3 1 1 Display single counter Selection 1 TECN 3 3 1 2 Display total counter Selection 1 Tot T OTAL STATISTICS TE...

Страница 51: ...n for each time band and total Display total sales by single selection TECN 3 4 Display relative statistics TECN 3 4 1 Display sel counter TECN 3 4 1 1 Display single counter TECN 3 4 1 2 Display tota...

Страница 52: ...Display coin mech data COIN MECH DATA according to protocol used Validators and Executive Cashed and sold BDV Audit MDB Audit TECN 3 4 4 1 Display coin mech counter TECN 3 4 4 2 Display cash counter...

Страница 53: ...6 1 1 Partial canc TECN 3 6 1 1 Partial canc Confirm Printing TECN 3 6 2 Delete total TECN 3 6 2 1 Delete total TECN 3 6 2 1 Delete total Confirm Printing TECN 3 7 Dis count at start up Status Enable...

Страница 54: ...e current date will be set as installation date TECN 5 1 Machine info 8 digit number identifying the machine TECN 5 1 2 Machine code TECN 5 1 2 Machine code Code TECN 5 1 3 Operator code TECN 5 1 3 Op...

Страница 55: ...TOR COUNTER MICROSWITCH MP1 OPEN DOOR MICROSWITCH MP2 OPEN PAYMENT COMPT MICROSWITCH MRD DRUM MOTOR MS1 SLIDER MICROSWITCH MUR COMPRESSOR MVT FAN NTC1 REFRIG BOX TEMPERATURE PROBE NTC1 TEMPERATURE PRO...

Страница 56: ...NECTA VENDING SOLUTIONS SpA...

Страница 57: ...Star ood...

Страница 58: ...NECTA VENDING SOLUTIONS SpA...

Страница 59: ...Star ood...

Страница 60: ...by NECTA VENDING SOLUTIONS SpA NOTE...

Страница 61: ...by NECTA VENDING SOLUTIONS SpA NOTE...

Страница 62: ...by NECTA VENDING SOLUTIONS SpA NOTE...

Страница 63: ...any responsibility for any inaccuracies contained in this publication which can be ascribed to printing and or transcription errors All instructions drawings tables and information contained in this...

Страница 64: ......

Отзывы: