background image

58

4. Using On-Screen Menu

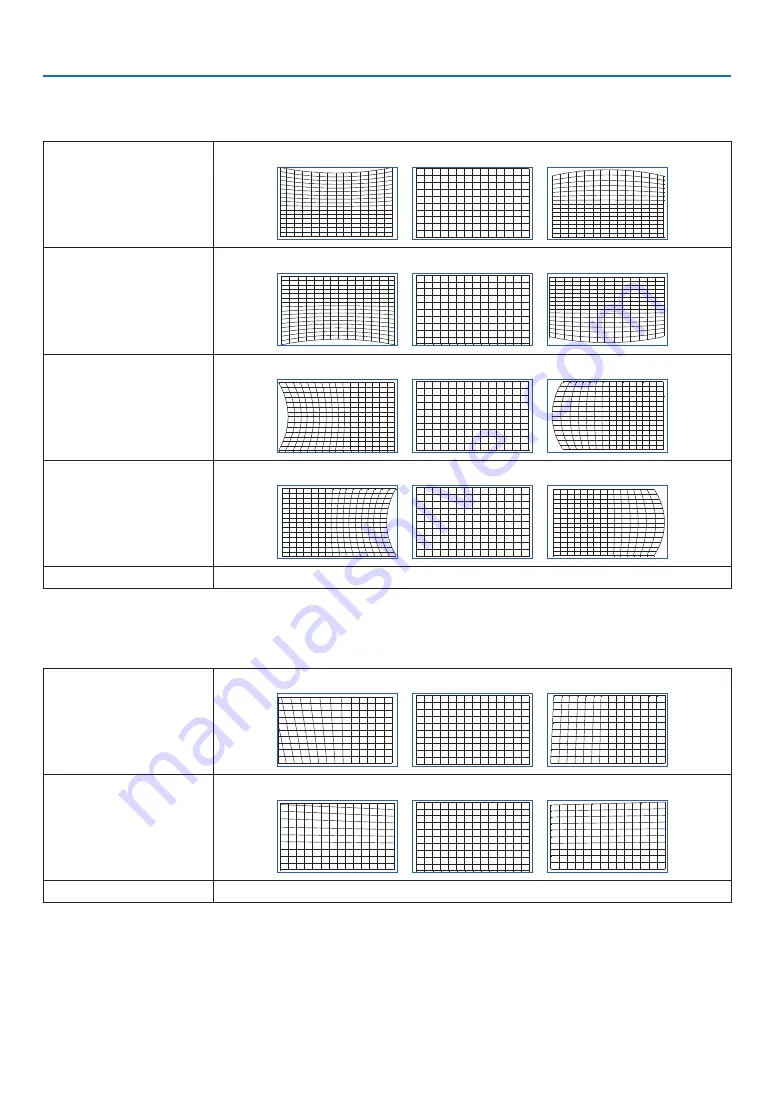
ARC

Adjusts the barrel-shaped distortion for each of the 4 sides.

TOP

-150 (-30%)

0

150 (30%)

BOTTOM

-150 (-30%)

0

150 (30%)

LEFT

-150 (-30%)

0

150 (30%)

RIGHT

-150 (-30%)

0

150 (30%)

RESET

Resets the [ARC] adjustment value to the factory setting.

TOP LEFT CORNER

Adjusts the top left corner distortion.

HORIZONTAL

-192 (Pixels)

0

192 (Pixels)

VERTICAL

-120 (Pixels)

0

120 (Pixels)

RESET

Returns the adjustment value to the factory setting.

Содержание PX2000UL

Страница 1: ...Projector PX2000UL User s Manual Please visit our web site for User s Manual in the latest version https www nec display com dl en pj_manual lineup html Model No NP PX2000UL ...

Страница 2: ... Tilt Foot 25 2 6 Turning off the Projector 26 3 Convenient Features 27 3 1 Turn off the light of the projector LENS SHUTTER 27 3 2 Turning off the Image AV MUTE 27 3 3 Turning Off the On Screen Menu On Screen Mute 27 3 4 Shift the On Screen Menu displaying position 28 3 5 Freezing a Picture 29 3 6 Magnifying a Picture 30 3 7 Adjustment of luminance brightness and energy saving effect LIGHT MODE 3...

Страница 3: ...AMIC CONTRAST 54 4 4 10 LIGHT OFF TIMER 54 4 5 DISPLAY 55 4 5 1 LENS LOCK 55 4 5 2 LENS CONTROL 55 4 5 3 LENS MEMORY 55 4 5 4 CENTER LENS 55 4 5 5 DIGITAL ZOOM 56 4 5 6 GEOMETRIC CORRECTION 56 4 5 7 BLANKING 60 4 5 8 EDGE BLENDING 60 4 5 9 SCREEN TYPE 60 4 6 SETUP 61 4 6 1 LANGUAGE 61 4 6 2 ORIENTATION 61 4 6 3 FAN MODE 62 4 6 4 AUTO POWER OFF 62 4 6 5 DIRECT POWER ON 62 4 6 6 NETWORK SETTINGS 63 ...

Страница 4: ...ng the Cabinet 71 7 Appendix 72 7 1 Throw distance and screen size 72 7 2 Compatible Input Signal List 76 7 3 Specifications 78 7 4 Cabinet Dimensions 81 7 5 Pin assignments and signal names of main terminals 82 7 6 Troubleshooting 85 7 7 Feature of each indicator 87 7 8 PC Control Codes and Cable Connection 89 7 9 Troubleshooting Check List 90 ...

Страница 5: ...the United States and other countries PJLink trademark and logo are trademarks applied for registration or are already registered in Japan the United States of America and other countries and areas Blu ray is a trademark of Blu ray Disc Association CRESTRON and CRESTRON ROOMVIEW are trademarks or registered trademarks of Crestron Electronics Inc in the United States and other countries Ethernet is...

Страница 6: ...RE HIGH VOLTAGE COMPONENTS INSIDE REFER SERVICING TO QUALIFIED SERVICE PERSONNEL This symbol warns the user that uninsulated voltage within the unit may be sufficient to cause electrical shock Therefore it is dangerous to make any kind of contact with any part inside of the unit This symbol alerts the user that important information concerning the operation and maintenance of this unit has been pr...

Страница 7: ...roduct After collecting the used products they are reused and recycled in a proper way This effort will help us reduce the wastes as well as the negative impact to the human health and the environment at the minimum level The mark on the electrical and electronic products only applies to the current European Union Member States Outside the European Union If you wish to dispose of used electrical a...

Страница 8: ...the projector lens Doing so could lead to the object melting from the heat that is emitted from the light output The below pictogram indicated on the cabinet means the precaution for avoiding to place objects in front of the projector lens This projector can be installed any angle within vertical and horizontal 360 range however life of optical parts will be shorten in the following installation s...

Страница 9: ...melting or getting your hands burned from the heat that is emitted from the exhaust vent Handle the power cord carefully A damaged or frayed power cord can cause electric shock or fire Do not use any power cord other than the one supplied with the projector Do not bend or tug the power cord excessively Do not place the power cord under the projector or any heavy object Do not cover the power cord ...

Страница 10: ...d to malfunction Caution on Handling the Optional Lens Contact your dealer to install and replace the lens unit When shipping the projector with the lens remove the lens before shipping the projector Always attach the dust cap to the lens whenever it is not mounted on the projector The lens and the lens shift mechanism may encounter damage caused by improper handling during transportation Do not h...

Страница 11: ...ies according to your local regulations Light Module 1 A light module containing multiple laser diodes is equipped in the product as the light source 2 These laser diodes are sealed in the light module No maintenance or service is required for the performance of the light module 3 End user is not allowed to replace the light module 4 Contact qualified distributor for light module replacement and f...

Страница 12: ...LASER PRODUCT in CLASS 3R conforming to IEC 60825 1 Second edition For other regions The LASER PRODUCT in CLASS 1 conforming to IEC 60825 1 Third edition and RG3 of IEC EN 62471 5 First edition 2015 Label A Label B Label A Laser Explanatory Label Includes LASER APERTURE label Label B Risk Group Lamp Safety Label ...

Страница 13: ...xii Important Information Label D Label C Label C Manufacturer s ID Label Label D Barcode label P N ...

Страница 14: ...radiation range of the laser light unit degree Horizontal angle H Lens Zoom Tele Wide NP45ZL 22 0 28 3 NP46ZL 17 4 22 1 NP47ZL 13 9 18 2 NP48ZL 7 0 13 8 NP49ZL 4 0 7 0 Vertical angle V Lens Zoom Tele Wide NP45ZL 14 1 18 5 NP46ZL 11 1 14 2 NP47ZL 8 8 11 6 NP48ZL 4 4 8 7 NP49ZL 2 5 4 4 H H V V ...

Страница 15: ...in the RG3 zone The equipment administrator operator must control the entry of viewers into the RG3 zone Lens RG3 HD m Screen size m H V NP45ZL Wide 2 0 2 22 1 39 Tele 2 5 2 06 1 29 NP46ZL Wide 3 0 2 48 1 55 Tele 3 5 2 22 1 39 NP47ZL Wide 3 5 2 34 1 46 Tele 4 5 2 25 1 41 NP48ZL Wide 5 5 2 77 1 73 Tele 6 5 1 65 1 03 NP49ZL Wide 8 0 2 00 1 25 Tele 9 5 1 35 0 85 The drawings below are example of typi...

Страница 16: ...xv Important Information When projecting from above to a floor Horizontal security zone over 1 m RG3 zone H V HD Horizontal security zone over 1 m ...

Страница 17: ...ojector whenever the projector is powered on for an emergency Instruct the administrator of the projector operators to keep the installation manual user s manual and inspec tion records to a place where they can take these documents out easily Instruct them to clarify if the projector is conformed to standards of each country and region About Copyright of original projected pictures Please note th...

Страница 18: ...e instruction manual may cause harmful interference to radio communications Operation of this equipment in a residential area is likely to cause harmful interference in which case the user will be required to correct the interference at his own expense Supplier s declaration of conformity This device complies with Part 15 of FCC Rules Operation is subject to the following two conditions 1 This dev...

Страница 19: ... the projector 50 cm 19 7 or greater 50 cm 19 7 or greater Intake vent NOTE The drawing shows the proper clearance required for the left and right of the projector assuming sufficient clearance has been kept for the front back and top of the projector Example 2 If there is a wall behind the projector 50 cm 19 7 or greater 50 cm 19 7 or greater Intake vent Lens Exhaust vent NOTE The drawing shows t...

Страница 20: ... Brightness can be adjusted within a wide range Unlike with ordinary light sources the brightness can be adjusted from 30 to 100 in 1 increments CONSTANT BRIGHTNESS mode Brightness normally decreases with use but by selecting CONSTANT BRIGHTNESS mode sensors inside the projector detect and automatically adjust the output thereby maintaining constant brightness throughout the life of the light modu...

Страница 21: ...hat support XPAND 3D and active shutter type 3D eyewear The projector is also compatible with 3D images in the DLP Link format Network Supports wired LAN Equips the HDBaseT LAN RJ 45 port Utilizing a wired LAN connected with this port it enables to control the projector by a computer Convenient utility software User Supportware This projector supports our utility software NaViSet Administrator 2 P...

Страница 22: ...started is to take your time and do everything right the first time Take a few minutes now to review the user s manual This may save you time later on At the beginning of each section of the manual you ll find an overview If the section doesn t apply you can skip it ...

Страница 23: ...s shipped without a lens For the types of lens and throw distances see page 72 Remote control 7N901041 AA alkaline batteries x2 Power cord 2 79TM1021 79TQ1011 For Europe Asia South America For North America For North America only Limited warranty For customers in Europe You will find our current valid Guarantee Policy on our Web Site https www nec display solutions com Important Infomation 7N8R025...

Страница 24: ... Lens Request the dealer to attach or detach the lens unit Indicator Panel page 7 Intake vent Takes in air to cool the projector page xviii 71 Intake vent Takes in air to cool the projector page xviii 71 Remote Sensor located on the front and the rear page 11 Tilt Foot page 25 Lens Release PUSH Button Lens Cap The lens cap is attached to the lens ...

Страница 25: ...e wall outlet page 13 Power Cord Stopper page 14 Handle located on 4 positions For transportation NOTE For moving the projector make sure you have at least four people At the same time do not grip and hold the projector other than by these handles Attempting to move the pro jector with less than four people could result in back pain or other injuries Terminals page 8 Exhaust vent Heated aiir is ex...

Страница 26: ...ndicator page 87 4 LIGHT Indicator page 87 5 TEMP Indicator page 87 6 INPUT Button page 19 7 AUTO ADJUST Button page 51 8 ASPECT Button page 48 9 HOME Button page 16 22 10 SHUTTER Button page 27 11 MENU Button page 42 12 Buttons page 42 13 ENTER Button page 42 14 EXIT Button page 42 15 SHIFT Button page 21 16 FOCUS Button page 23 17 ZOOM Button page 24 ...

Страница 27: ...EMOTE terminal infrared remote control operations cannot be performed Power cannot be supplied from the REMOTE terminal to the remote control When HDBaseT is selected in the REMOTE SENSOR and the projector is connected to a commercially available transmission device that supports HDBaseT remote control operations in infra red cannot be carried out if transmission of remote control signals has been...

Страница 28: ...9 25 28 33 23 22 36 24 30 26 29 35 27 32 31 37 34 26 S VIDEO Button not available on this series of projectors 27 HDMI Button page 18 28 DisplayPort Button page 18 29 VIEWER Button not available on this series of projectors 30 NETWORK Button page 18 31 SLOT Button not available on this series of projectors 32 AUX Button page 18 33 ID SET Button page 66 34 Numeric 0 to 9 CLEAR Buttons page 66 35 CT...

Страница 29: ...pe it dry immediately Avoid excessive heat and humidity Do not short heat or take apart batteries Do not throw batteries into fire If you will not be using the remote control for a long time remove the batteries Ensure that you have the batteries polarity aligned correctly Do not use new and old batteries together or use different types of batteries together Dispose of used batteries according to ...

Страница 30: ...he sensor Weak batteries will also prevent the remote control from properly operating the projector Using the Remote Control in Wired Operation Connect one end of the remote cable to the REMOTE terminal and the other end to the remote jack on the remote control REMOTE Remote Jack NOTE When a remote cable is inserted into the REMOTE terminal the remote control does not work for infrared wireless co...

Страница 31: ...mputer Connecting the power cord page 13 Step 2 Turning on the projector page 15 Step 3 Selecting a source page 18 Step 4 Adjusting the picture size and position page 20 Correcting keystone distortion KEYSTONE page 32 56 Step 5 Adjusting a picture Step 6 Making a presentation Step 7 Turning off the projector page 26 2 Projecting an Image Basic Operation ...

Страница 32: ...NSERTED CAUTION This equipment is designed to be used in the condition of the power cord connected to earth If the power cord is not connected to the earth it may cause electric shock Please make sure the power cord is earthed properly Important Information When plugging in or unplugging the supplied power cord make sure that the main power switch is pushed to the off O position Failure to do so m...

Страница 33: ...Stopper To prevent the power cord from accidently removing from the AC IN of the projector attach the power cord stopper to clamp the power cord CAUTION To prevent the power cord from coming loose make sure that all the prongs of the power cord are fully inserted into the AC IN terminal of the projector before using the power cord stopper to fix the power cord A loose contact of the power cord may...

Страница 34: ...to use Turning off the projector 1 Press the POWER button The confirmation message will be displayed 2 Press the POWER button again The projector will go into standby mode 3 Press the main power switch to the OFF position O The projector will be turned off 1 Remove the lens cap from the lens unit NOTE Do not leave the lens cap on the lens while the projector is operating The lens cap could get hot...

Страница 35: ...ensure that the computer or video source is turned on NOTE The blue screen BLUE background is displayed when no signal is being input by factory default menu settings Standby Blinking Power On Steady green light Blinking blue light Steady blue light Performing Lens Calibration After installation or replacement of the lens be sure to perform CENTER LENS by pressing and holding the HOME button on th...

Страница 36: ... will not turn on If the internal temperature of the projector is too high the projector detects abnormal high temperature In this condition the projector will not turn on to protect the internal system If this happens wait for the projector s internal components to cool down If the STATUS indicator lights orange with the POWER button pressed it means that the CONTROL PANEL LOCK is turned on Cance...

Страница 37: ... control Press the Direct button on the remote control Select the input according to the connection terminal Input connector Button on the remote control Note HDMI 1 IN HDMI 2 IN HDMI Switches between HDMI 1 and HDMI 2 each time it is pressed DisplayPort DVI D IN DisplayPort Switches between DisplayPort and DVI D each time it is pressed 3G HD SD SDI IN AUX HDBaseT LAN NETWORK COMPUTER 1 IN COMPUTE...

Страница 38: ...input source will change as follows HDMI 1 HDMI 2 COMPUTER BNC DVI D DisplayPort SDI HDBaseT Select by displaying the On Screen Menu 1 Press the MENU button The On Screen Menu will be displayed on 2 Move the cursor by the or button to the INPUT 3 Move the cursor by the or button to the INPUT SELECTION and then press the ENTER or button 4 Press the or button select the input source and press the EN...

Страница 39: ...Zoom page 24 Adjusting the projected image s height and horizontal tilt Tilt foot page 25 NOTE 1 Adjust the projected image s height using the tilt foot when you want to project the image at a position higher than the lens shift adjustment range TIP Built in test patterns can be conveniently used for adjusting the picture size and position page 49 A press of the TEST button will display the test p...

Страница 40: ...d be exposed to strong light and get injured Keep hands away from the lens mounting portion while performing a lens shift Failure to do so could result in fingers being pinched by the moving lens NOTE Shifting the lens to the maximum in oblique angle will cause the edges of the image to become dark or will cause dark shadows Adjusting with buttons on the cabinet 1 Press the SHIFT or button Use the...

Страница 41: ... kind of trouble occurrence In this case perform CENTER LENS Operating procedure 1 Power on the projector 2 Press the HOME button on the control panel or keep pressing the CTL button and press the INFO L CALIB button on the remote control CENTER LENS is executed TIP The diagram below shows the lens shift adjustment range projection mode DESKTOP FRONT To raise the projection position higher than th...

Страница 42: ...s perform the following for permanent installation Preparation Warm up the projector for one hour 1 Use the FOCUS or buttons to make sure you obtain the best focus If you do not move the projector back and forth 2 Select the TEST PATTERN from the menu and display the test pattern page 49 You can also use the TEST button on the remote control to display the test pattern 3 Press the FOCUS button unt...

Страница 43: ...24 2 Projecting an Image Basic Operation Zoom 1 Press the ZOOM or buttons to adjust zoom On the remote control while pressing on the CTL button press the D ZOOM ZOOM or button The zoom is adjusted ...

Страница 44: ...EOMETRIC CORRECTION page 56 The tilt foot can be lengthened by a maximum of 10 mm 0 4 The tilt foot can be used to tilt the projector by a maximum of 1 NOTE Do not lengthen the tilt foot any more than 10 mm 0 4 Doing so will make the tilt feet s mount section unstable and could cause the tilt feet to come off the projector Pay attention to lengthen or shorten two tilt foot at front at the same tim...

Страница 45: ... blue in short cycles the power cannot be turned off Power On Steady blue light Standby Steady green light CAUTION Parts of the projector may temporarily overheat if the projector is turned off with the main power switch or the AC power supply is disconnected while the projector is in operation or the cooling fan is running Handle with care NOTE Do not unplug the power cord from the projector or f...

Страница 46: ...e menu display 3 3 Turning Off the On Screen Menu On Screen Mute A press of the ON SCREEN button on the remote control will hide the on screen menu the source display and other messages Press again to restore them TIP To confirm that the on screen mute is turned on press the MENU button If the on screen menu is not displayed even though you press the MENU button it means the on screen mute is turn...

Страница 47: ... ENTER or button 4 Move the cursor to MENU POSITION and press the ENTER or button 5 Press the button select the menu position and press the ENTER or button For finishing the setting on the On Screen Menu press the MENU button on the remote control TIP The display position of the menu is saved even when the power supply of the projector is turned off This function does not influence to the display ...

Страница 48: ...enient Features 3 5 Freezing a Picture Hold the CTL button and press the PIP FREEZE button to freeze a picture Press again to resume motion NOTE The image is frozen but the original video is still playing ahead ...

Страница 49: ... or the function may be restricted To do so 1 Press the D ZOOM button to magnify the picture 2 Press the button The area of the magnified image will be moved 3 Press the D ZOOM button Each time the D ZOOM button is pressed the image is demagni fied NOTE The image will be magnified or demagnified at the center of the screen Displaying the menu will cancel the current magnification ...

Страница 50: ...mption will increase The life of the optical components may also be shortened depending on the operating environment NORMAL Brightness changes to 100 and the screen becomes bright ECO The brightness becomes about 80 of the brightness in the NORMAL mode The operating noise and power consumption will also decrease due to control of the cooling fan according to the brightness LIGHT ADJUST When the mo...

Страница 51: ...ECTION screen of the on screen menu 2 Press the button to select KEYSTONE and press the ENTER or button The KEYSTONE menu screen will displayed on 3 Move the cursor to HORIZONTAL or VERTICAL then press the button to adjust the projection screen TIP For details on the GEOMETRIC CORRECTION menu functions see page 56 NOTE Use horizontal keystone correction when the vertical lens shift position is nea...

Страница 52: ... s response can be slowed down or operation may not be accepted depending the settings of your network Should this happen consult your network administrator The projector may not respond if its buttons are repeatedly pressed in rapid intervals Should this happen wait a moment and repeat If you still can t get any response turn off and back on the projec tor If the PROJECTOR NETWORK SETTINGS screen...

Страница 53: ...e server by a network administrator or the host name cor responding to the IP address of the projector has been set in the HOSTS file of the computer being used Example 1 When the host name of the projector has been set to pj nec co jp access is gained to the network setting by specifying http pj nec co jp index html for the address or the entry column of the URL Example 2 When the IP address of t...

Страница 54: ...s from LENS MEMORY 1 Press the MENU button The menu will be displayed 2 Press the button to select DISPLAY 3 Press the button to select LENS MEMORY and press the ENTER or button The LENS MEMORY screen will be displayed 4 Press the button to move the cursor to any of the items displayed as LOAD on the right side in MEMORY 1 to MEMORY 10 then press the ENTER button The lens shift adjustment value wi...

Страница 55: ...n the correct position so that the image becomes square in the appropriate size and then make optical adjustments lens shift focus and zoom Adjust the brightness of each projector using LIGHT ADJUST under SETUP In addition adjust the picture quality with the various adjustment functions such as PICTURE PRESET or GAMMA CORRECTION etc The following procedure shows an example of four projectors in a ...

Страница 56: ... displayed 2 Select DISPLAY EDGE BLENDING The EDGE BLENDING screen will be displayed Align the cursor with MODE and then press the ENTER but ton The mode screen will be displayed 3 Select MODE ON and press the ENTER button This enables the EDGE BLENDING function The following menu items are available MARKER RANGE and BLACK LEVEL ...

Страница 57: ...Features Select TOP BOTTOM LEFT RIGHT after selecting RANGE or BLACK LEVEL TOP OFF BOTTOM ON LEFT OFF RIGHT ON TOP ON BOTTOM OFF LEFT OFF RIGHT ON TOP OFF BOTTOM ON LEFT ON RIGHT OFF TOP ON BOTTOM OFF LEFT ON RIGHT OFF ...

Страница 58: ...green marker on the left screen onto the red marker on the right screen and the green marker on the right screen onto the red marker on the left screen Adjustment is completed when the markers are stacked Turn off MARKER to turn off the marker TIP When displaying a signal with a different resolution perform the Edge Blending function from the start Setting of MARKER will not be saved and return to...

Страница 59: ...depending on what combination of TOP BOTTOM LEFT and RIGHT in the RANGE or BLACK LEVEL are turned on The black level of the lower left projector is adjusted as shown in the figure TOP RIGHT RANGE The adjustment range of the black lebel BLACK LEVEL 1 Select DISPLAY EDGE BLENDING BLACK LEVEL and press the ENTER button The screen will switch to the black level adjustment screen 2 Use the or to adjust...

Страница 60: ...rtions for Black Level adjustment The black level of the center projector is adjusted as shown in the figure BOTTOM LEFT TOP RIGHT TIP The edge blending width is the width set in the range The BLACK LEVEL can be adjusted to make it brighter only ...

Страница 61: ... menu tab Sub menu Key Guide Adjustment bar Cursor Mark Set value 2 Press the button The cursor will move to the main menu tab INPUT PICTURE DISPLAY SETUP INFO When the main menu tab changes the sub menu also changes 3 With the cursor on the main menu tab press the button The cursor will move to the sub menu To return to the main menu tab from the sub menu press the MENU button Press the EXIT butt...

Страница 62: ...o move the cursor to OK or CANCEL then press the ENTER button 4 1 4 Changing the number This section explains how to change the factory default IP address and subnet mask etc in the network settings of the menu 1 Press the MENU button and select SETUP NETWORK SETTINGS The NETWORK SETTINGS screen is displayed 2 Press the button to move the cursor to the IP ADDRESS then press the ENTER button 3 Pres...

Страница 63: ...R 3D FRAME SEQUENTIAL AUTO ADJUST PICTURE PRESET HIGH BRIGHT HIGH BRIGHT PRESENTATION VIDEO CONTRAST 100 0 200 BRIGHTNESS 100 0 200 SHARPNESS 0 0 15 COLOR 100 0 200 HUE 100 0 200 COLOR TEMPERATURE NATIVE 5400K 6500K 7500K 9300K NATIVE COLOR GAMUT NATIVE REC709 EBU SMPTE NATIVE GAMMA GAMMA CORECTION 2 2 1 0 1 8 2 0 2 2 2 35 2 5 S CURVE DICOM SIM WHITE BALANCE CONTRAST R 100 0 200 CONTRAST G 100 0 2...

Страница 64: ...0 150 PINCUSHION H V 300 BARREL V PINCUSHION BARREL 0 150 PINCUSHION H V 300 BARREL H KEYSTONE 0 HORIZONTAL 60 60 V KEYSTONE 0 VERTICAL 40 40 ROTATION 0 10 10 RESET ARC TOP 0 150 150 BOTTOM 0 150 150 LEFT 0 150 150 RIGHT 0 150 150 RESET TOP LEFT CORNER HORIZONTAL 0 192 H 192 VERTICAL 0 120 V 120 RESET TOP RIGHT CORNER HORIZONTAL 0 192 H 192 VERTICAL 0 120 V 120 RESET BOTTOM LEFT CORNER HORIZONTAL ...

Страница 65: ...T MODE NORMAL BOOST NORMAL ECO LIGHT ADJUST 100 30 100 CONSTANT BRIGHTNESS OFF OFF ON BACKGROUND BLUE BLUE BLACK LOGO STARTUP LOGO ON OFF ON REMOTE CONTROL REMOTE SENSOR ALL ALL FRONT BACK FRONT BACK HDBaseT ID CONTROL ENABLE OFF OFF ON CONTROL ID CONTROL ID NUMBER 1 1 99 TRIGGER OFF OFF SCREEN 5 4 4 3 16 10 16 9 1 88 2 35 LETTERBOX AUTO NATIVE MENU MENU POSITION CENTER TOP LEFT TOP RIGHT BOTTOM L...

Страница 66: ...ed to the DisplayPort input terminal SDI Projects the image of the device connected to the SDI input terminal HDBaseT Projects a HDBaseT signal 4 3 2 AUTO SOURCE Checks the video input signal automatically and projects the image of the first detected signal 4 3 3 COLOR SPACE Set the color space according to the video input signal AUTO Switches to the corresponding color space automatically accordi...

Страница 67: ...tio is identified select an appropriate aspect ratio from the following items NATIVE Projects directly with the resolution of the computer input signal when the resolution of the computer input signal is smaller than the resolution of the projector 1920 1200 If the resolution is higher than the projector s resolution the center of the screen is projected at the resolution of the computer input sig...

Страница 68: ...n the horizontal direction HORIZONTAL H PHASE Adjusts the phase so that the screen color shift and flicker are minimized Phase V START Moves the screen in the vertical direction VERTICAL NOTE The screen may be distorted while adjusting the clock frequency and phase but this is not a malfunction 4 3 7 TEST PATTERN Project a test pattern Press the button to change the pattern of the test pattern Pre...

Страница 69: ... a long period of time After viewing for 1 hour take a rest for 15 minutes or more Consult your doctor before viewing if you or your family members have had light sensitive seizures before If you experience any abnormalities in your body such as nausea dizziness irritation headache eye pain blurred vision cramping of limbs numbness etc while watching stop watching immediately and take a rest If th...

Страница 70: ...n is automatically adjusted Automatic adjustment can also be performed by pressing the AUTO ADJUST button on the projector and the AUTO ADJ button on the remote control NOTE If the screen is distorted even after performing automatic adjustment adjust the image with IMAGE OPTIONS ...

Страница 71: ...lors R G B to optimize the color reproducibility A color temperature with a high numerical value becomes bluish white while one with a low numerical value becomes reddish white The setting can be selected from 5400K 6500K 7500K 9300K and NATIVE 4 4 4 COLOR GAMUT You can change the projector s color gamut according to the projected image 4 4 5 GAMMA CORRECTION Select the gradation of the picture Wi...

Страница 72: ...irection to make the color appear more yellow SATURATION Adjusts the intensity of the green color Move in the direction to make the color more vivid and move in the direction to make the color less vivid white GAIN Adjusts the brightness of the green color Move in the direction to make the color look brighter and move in the direction to make it look darker black BLUE HUE Adjusts the color near th...

Страница 73: ...n to make it look darker black WHITE RED GAIN Adjusts the white color Move in the direction to shift the color closer to red and move in the direction to shift the color closer to cyan GREEN GAIN Adjusts the white color Move in the direction to shift the color closer to green and move in the direction to shift the color closer to magenta BLUE GAIN Adjusts the white color Move in the direction to s...

Страница 74: ...st the zoom press the button 4 When you have finished adjusting the focus and zoom press the ENTER button The lens shift adjustment screen will be displayed 5 Press the button The lens shifts in the direction of the pressed button 6 When the lens shift is complete press the ENTER button The selected image will be projected and the ZOOM FOCUS adjustment screen will be displayed Repeat Step 2 to 6 a...

Страница 75: ...he button to move the screen in the vertical direction RESET Returns the screen to its original state 4 5 6 GEOMETRIC CORRECTION Corrects the distortion of the projection screen when projecting from an oblique direction to the screen to fit the image to the screen frame KEYSTONE Adjusts the keystone distortion by combining the horizontal adjustment and vertical adjustment of the projection screen ...

Страница 76: ...0 300 60 V PINCUSHION BARREL 150 30 0 300 60 H KEYSTONE Example of keystone adjustment in the horizontal direction V KEYSTONE Example keystone adjustment in the vertical direction ROTATION Rotation example RESET Returns the adjustment value of PINCUSHION BARREL to the factory setting NOTE H KEYSTONE or V KEYSTONE can be used when adjusting H PINCUSHION BARREL or V PINCUSHION BARREL ROTATION can be...

Страница 77: ...30 BOTTOM 150 30 0 150 30 LEFT 150 30 0 150 30 RIGHT 150 30 0 150 30 RESET Resets the ARC adjustment value to the factory setting TOP LEFT CORNER Adjusts the top left corner distortion HORIZONTAL 192 Pixels 0 192 Pixels VERTICAL 120 Pixels 0 120 Pixels RESET Returns the adjustment value to the factory setting ...

Страница 78: ...e factory setting BOTTOM LEFT CORNER Adjusts the bottom left corner distortion HORIZONTAL 192 Pixels 0 192 Pixels VERTICAL 120 Pixels 0 120 Pixels RESET Returns the adjustment value to the factory setting BOTTOM RIGHT CORNER Adjusts the bottom right corner distortion HORIZONTAL 192 Pixels 0 192 Pixels VERTICAL 120 Pixels 0 120 Pixels RESET Returns the adjustment value to the factory setting ...

Страница 79: ...is is turned on when the white level is increased from 0 a green marker is displayed for range adjustment and a red marker is displayed for display position adjustment RANGE Adjusts the edge blending range width BLACK LEVEL Adjusts the black level of non overlapping images on the multiple screens RESET Returns the edge blending adjustment value to the factory setting Example of a screen that is pr...

Страница 80: ...ion Never install the projector on your own The projector may drop and cause injury Install in such a way that viewers do not enter the Restriction Zone HD DESKTOP FRONT Install on a table and project from the front of the screen CEILING REAR Install on the ceiling and project from the back of the screen DESKTOP REAR Install on a table and project from the back of the screen CEILING FRONT Install ...

Страница 81: ...UDE the temperature protector may be activated and the power may be turned off automatically Furthermore since the internal temperature rises after the light source turns off the temperature protector may be activated and the power may not turn on In this case wait for a while before turning on the power When used at a high altitude replacement of optical components such as the light source etc ma...

Страница 82: ...utton to confirm SUBNET MASK When DHCP is set to OFF this sets the subnet mask of the projector in the network which it is connected to GATEWAY When DHCP is set to OFF this sets the default gateway of the network the projector is con nected to Refer to the IP ADDRESS item for details on how to change the gateway DNS Set the IP address of the DNS server of the network the projector is connected to ...

Страница 83: ... screen becomes slightly darker and the LIGHT indicator and TEMP indicator lights up in orange In addition in the Forced ECO MODE the LIGHT MODE BOOST function will be disabled even when set The Forced ECO MODE conditions and output are as follows Altitude Temperature 5 C 25 C 26 C 30 C 31 C 35 C 36 C 40 C 2 438 m 4 200 m 100 90 80 70 1 219 m 2 438 m 100 100 90 80 0 m 1 219 m 100 100 100 80 4 6 8 ...

Страница 84: ...control sensor BACK Enables only the rear remote control sensor HDBaseT Select this to set the transmission of the remote control signal on the transmission device side to operate the remote control when con nected to a commercially available HDBaseT compatible transmitter CONTROL ID Select whether to enable or disable the CONTROL ID function CONTROL ID NUMBER Select a number from 1 to 99 to assig...

Страница 85: ...or in Step 3 3 Press the numeric buttons while holding down the ID SET button on the remote control to set the remote control ID For example to change the number to 3 press the number 3 Enter 000 or press the CLEAR button if no ID is going to be set operate all projectors at once TIP Remote control IDs can be registered from 1 to 99 4 Release the ID SET button The CONTROL ID screen will be display...

Страница 86: ...cy DISPLAY TIME Select the time until the menu is automatically closed when the menu is displayed and no but ton is pressed next MESSAGE DISPLAY Select whether or not to display the projector s message at the bottom of the projection screen CONTROL PANEL LOCK Disables the operation buttons on the projector OFF The buttons on the projector are enabled ON The buttons on the projector are disabled lo...

Страница 87: ... the signal being projected H V REFRESH RATE Displays the horizontal and vertical frequency of the signal being projected PIXEL CLOCK Displays the pixel clock of the signal being projected LIGHT HOURS USED Displays the light hours used THERMAL STATUS Displays the temperature of the air inlet the temperature inside the projector the rpm of the cooling fan and the rpm of the water cooling pump 4 7 2...

Страница 88: ... to an external device In doing so do not enter the radiation zone HD If projected light enters your eyes it may cause visual impairment For HDMI DisplayPort BNC SDI and LAN please use a shielded cable Use of other cables may cause inter ference with radio and television reception 1 2 3 3 4 5 6 Computer etc Blu ray player etc HDBaseT transmission device etc Professional video equip ment etc Profes...

Страница 89: ...94A or higher In addition use cables with a cable length 100m or less The length of cables that can be used may differ depending on the signal LAN cable not supplied Please use a shielded twisted pair STP cable of Category 5e or higher for the LAN cable sold commercially The HDBaseT LAN port of the projector supports HDMI signals HDCP from transmission devices control signals from external devices...

Страница 90: ...thinner When cleaning the ventilation slits using a vacuum cleaner do not force the brush of the vacuum cleaner into the slits of the cabinet Vacuum the dust off the ventilation slits Poor ventilation caused by dust accumulation in ventilation openings can result in overheating and malfunction These areas should be cleaned regularly Do not scratch or hit the cabinet with your fingers or any hard o...

Страница 91: ... 9 3 9 5 0 4 8 6 5 6 5 12 9 12 9 22 6 180 4 57 3 5 4 7 4 7 6 0 5 8 7 8 7 8 15 5 15 5 27 1 200 5 08 3 9 5 2 5 2 6 7 6 5 8 6 8 6 17 2 17 2 30 2 250 6 35 4 8 6 5 6 5 8 4 8 1 10 8 10 8 21 5 21 5 37 7 300 7 62 5 8 7 8 7 8 10 1 9 7 12 9 12 9 25 8 25 8 45 2 1 For USA and China NP49ZL will be available on market in April 2020 in the United States and China Please contact your dealer about their detailed i...

Страница 92: ...endix Projection range for the different lenses 50 300 50 300 50 300 50 300 50 300 NP46ZL 51 398 1 3 10 1 m NP47ZL 63 508 1 6 12 9 m NP48ZL 87 1016 2 2 25 8 m NP49ZL 169 1780 4 3 45 2 m NP45ZL 39 307 1 0 7 8 m ...

Страница 93: ...54 0 84 8 215 4 53 0 134 6 120 304 8 101 8 258 5 63 6 161 5 150 381 0 127 2 323 1 79 5 201 9 180 457 2 152 6 387 7 95 4 242 3 200 508 0 169 6 430 8 106 0 269 2 220 558 8 186 6 473 9 116 6 296 2 250 635 0 212 0 538 5 132 5 336 5 280 711 2 237 4 603 1 148 4 376 9 300 762 0 254 4 646 2 159 0 403 9 350 889 0 296 8 753 9 185 5 471 2 400 1016 0 339 2 861 6 212 0 538 5 450 1143 0 381 6 969 3 238 5 605 8 ...

Страница 94: ...H 15 H 100 H 50 V 1 100 V 50 V 1 1 NP45ZL only 45 V 2 The lens shift range is the same for ceiling installation Example When using to project on a 150 screen According to the Table of screen sizes and dimensions page 74 H 130 7 331 9 cm V 73 6 187 0 cm Adjustment range in the vertical direction the projected image can be moved upwards 0 5 73 6 187 0 cm 36 8 93 5 cm 3 downwards approximately 0 5 73...

Страница 95: ...ad VGA 1280 960 4 3 60 SXGA 1280 1024 5 4 60 SXGA 1400 1050 4 3 60 WXGA 1440 900 16 10 60 WXGA 1600 900 16 9 60 WSXGA 1680 1050 16 10 60 UXGA 1600 1200 4 3 60 Full HD 1920 1080 16 9 60 WUXGA 1920 1200 1 16 10 60 Reduced Blanking HDTV 1080p 1920 1080 16 9 24 25 30 50 60 HDTV 1080i 1920 1080 16 9 50 60 HDTV 720p 1280 720 16 9 50 60 SDTV 480i p 720 1440 480 4 3 16 9 60 SDTV 576i p 720 1440 576 4 3 16...

Страница 96: ...A 1600 1200 4 3 60 Full HD 1920 1080 16 9 60 WUXGA 1920 1200 1 16 10 60 Reduced Blanking HDMI 3D Signal Resolution dots Aspect Ratio Refresh Rate Hz 3D Format 1920 1080p 16 9 23 98 24 Frame Packing 50 Side by Side Half Top and Bottom Frame Sequencial 59 94 60 Side by Side Half Top and Bottom Frame Sequencial 1920 1080i 16 9 50 Side by Side Half 59 94 60 Side by Side Half 1280 720p 16 9 50 Frame Pa...

Страница 97: ... Sync Input output terminals HDMI Video input HDMI Connector type A 2 Deep Color color depth 8 10 12 bit compatible Colorimetry RGB YCbCr444 YCbCr422 YCbCr420 REC2020 REC709 REC601 Supports HDCP 4 DisplayPort Video input DisplayPort 2 Data rate 5 4 Gbps 2 7 Gbps 1 62 Gbps No lanes 1 lane 2 lanes 4 lanes Deep Color color depth 8 10 12 bit compatible Colorimetry RGB YCbCr444 YCbCr422 REC709 REC601 S...

Страница 98: ... 3 Compliance with ISO21118 2012 4 If you are unable to view material via the HDMI input DisplayPort input and HDBaseT input this does not necessarily mean the projector is not functioning properly With the implementation of HDCP technology there may be cases in which certain content is protected with HDCP and might not be displayed due to the decision intention of the HDCP community Digital Conte...

Страница 99: ...er zoom and focus throw ratio 1 5 2 0 1 F2 17 2 65 f 31 90 42 20 mm NP48ZL Power zoom and focus throw ratio 2 0 4 0 1 F2 17 2 64 f 42 60 84 80 mm NP49ZL 1 Power zoom and focus throw ratio 4 0 7 0 1 F2 2 2 57 f 83 93 146 85 mm 1 For USA and China NP49ZL will be available on market in April 2020 in the United States and China Please contact your dealer about their detailed information or refer to ou...

Страница 100: ...mension on the projector M6 with the maximum depth 16 mm 0 63 CAUTION Do not attempt to mount the projector on a ceiling yourself The projector must be installed by qualified technicians in order to ensure proper operation and reduce the risk of bodily injury In addition the ceiling must be strong enough to support the projector and the installation must be in accordance with any local building co...

Страница 101: ...CEC grounding 8 TMDS Data 0 Shield 18 5 V power supply 9 TMDS Data 0 19 Hot plug detection 10 TMDS Clock DisplayPort IN Terminal 1 3 5 7 9 11 13 15 17 19 2 4 6 8 10 12 14 16 18 20 Pin No Signal Pin No Signal 1 Main link lane 3 11 Grounding 0 2 Grounding 3 12 Main link lane 0 3 Main link lane 3 13 Configuration 1 4 Main link lane 2 14 Configuration 2 5 Grounding 2 15 Supplementary channel 6 Main li...

Страница 102: ... Disconnection HDBT2 5 Disconnection HDBT2 6 RxD HDBT1 7 Disconnection HDBT3 8 Disconnection HDBT3 PC CONTROL Port D Sub 9 Pin 1 2 3 4 5 6 7 8 9 Pin No Signal 1 Unused 2 TxD transmission data 3 RxD reception data 4 Unused 5 Grounding 6 Unused 7 RTS transmission request 8 CTS transmission allowed 9 Unused ...

Страница 103: ...the screen controller and the screen will go up NOTE To use this feature you must turn on the TRIGGER 1 2 function See TRIGGER 1 2 on page 67 for more information Stereo mini cable not supplied Tip 12 V Ring 0 V Sleave ground 0 V NOTE Screen controllers are supplied and supported by screen manufacturers NOTE Do not use these terminals for anything other than intended use Connecting the wired remot...

Страница 104: ...puter manufacturer Install the updated driver or OS on your own responsibility We are not liable for any trouble and failure caused by this installation Signals may not be supported depending on the HDBaseT transmission device IR and RS232C cannot be used in certain cases as well Be sure to connect the projector and notebook PC while the projector is in standby mode and before turning on the power...

Страница 105: ...mage may not be displayed correctly Should this happen deactivate the notebook PC s LCD screen when the projector display is in use Each notebook PC has a different way of deactivate reactivate the local LCD screens as described in the previous step Refer to your computer s documentation for detailed information Image displayed is incorrect when using a Mac When using a Mac with the projector set ...

Страница 106: ...h low Indicator Message Status message POWER STATUS LIGHT TEMP Projector status Power is off Off Off Off Off In the state of Standby STANDBY POWER is OFF and the network is ready Orange Blink 1 Off Off Off In the state of Sleep Green Light Off Off Off Powered state LIGHT MODE is NORMAL Blue Light Off Green Light Off Powered state LIGHT MODE is ECO Blue Light Off Green Blink 2 Off Powered state LIG...

Страница 107: ...edure Temperature problem Ambient temperature is out of the operation temperature Check if any obstruction stays near the exhaust vent Red Blink 4 Off Off Off Lens mounting error Lens problem Lens is not mounted properly Mout it If the indicator message is remain un changed even if the lens is mounted properly contact your dealer Red Blink 4 Red Light Red Light Off Error requiring service support ...

Страница 108: ... SELECT SDI 02H 03H 00H 00H 02H 01H C4H CCH INPUT SELECT HDBaseT 02H 03H 00H 00H 02H 01H BFH C7H NOTE Contact your local dealer for a full list of the PC Control Codes if needed Cable Connection Communication Protocol Baud rate 9600 bps Data length 8 bits Parity No parity Stop bit One bit X on off None Communications procedure Full duplex NOTE Depending on the equipment a lower baud rate may be re...

Страница 109: ..._____________________________________ The source connected to the projector is active and available Still no image even though you adjust the brightness and or the contrast Input source s resolution and frequency are supported by the projector Image is too dark Remains unchanged even though you adjust the brightness and or the contrast Image is distorted Image appears to be trapezoidal unchanged e...

Страница 110: ...olarization Wide angle High contrast Throw distance feet inch m Orientation Ceiling mount Desktop Power outlet connection Connected directly to wall outlet Connected to power cord extender or other the number of connected equipment ______________ Connected to a power cord reel or other the number of connected equipment ______________ Computer Manufacturer Model number Notebook PC Desktop Native re...

Страница 111: ... NEC Display Solutions Ltd 2020 7N952971 ...

Отзывы: