background image

11

BASIC OPERATION

You can easily access your desired screen by selecting menus.
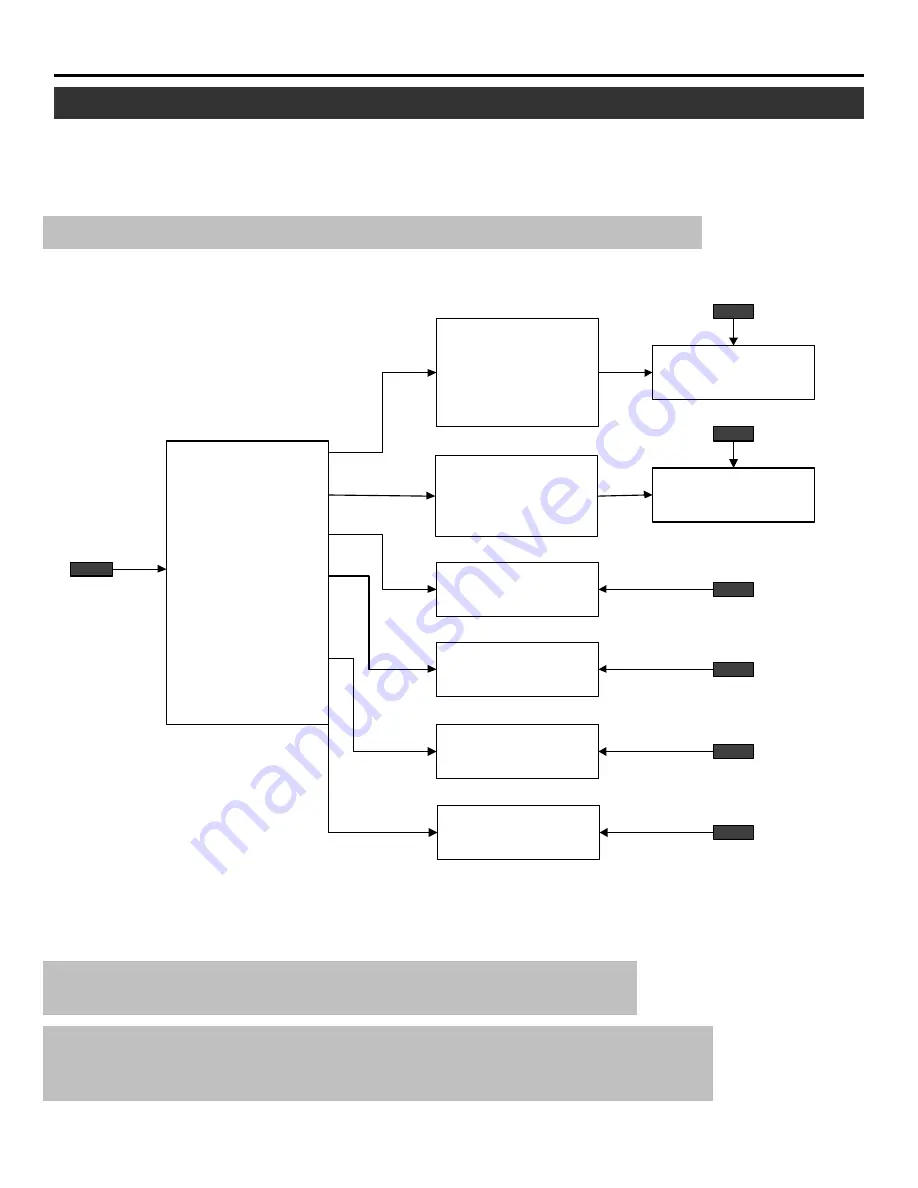
Depending upon button selection, your desired screen will be displayed as shown below:

n


OPERATE menu

NOTE:


Examples of the screen display are only when used with the ISS-6010/M-601OG.


The PIC FUNC, POSITION, SOUND FUNC, INPUT LIST, INFO and STATIC buttons are on the full
function remote control only.

CAUTION: 

Do not display a bright and still picture for longer than 20 minutes.

This could damage the CRTs.

NOTE: 

The explanation of the operation on the following pages is for use with the remote

control. You can also operate the projector using the buttons on the control panel of
the projector.
.

Displaying the Menu and Adjustment Screen


The SOUND item is
not included in the
“OPERATE” menu
on the stand alone
mode.

Adjustment screen


 - OPERATE -

   1 / PICTURE

   2 / POSITION

   3 / SOUND

   4 / INPUT SELECT

   5 / SOURCE INFO

   6 / STATIC


- PICTURE -

      1 / BRIGHT
      2 / CONTRAST
      3 / COLOR
      4 / SHARPNESS
      5 / TINT

        - POSITION -
        1 / SHIFT
        2 / BLANKING

INPUT SELECT

screen

SOURCE

INFORMATION

screen

Adjustment screen

Adjustment screen

Adjustment screen

OPERATE menu

OPERATE

PICTURE menu

POSITION menu

PIC FUNC

POSITION

SOUND FUNC

INPUT LIST

INFO

STATIC

Содержание PG-6000

Страница 1: ...sible 800 lumens of light output ECP lens produces an image with true color reproduction AKB circuit provides a stable white balance The wide band video circuit provides of 70MHz of Video Bandwidth Display size can be altered to accommodate any picture size from 60 to 300 diagonal In addition to ceiling mounting floor desk top and rear installations are possible Digital point convergence provides ...

Страница 2: ...hese requirements before operation Handle the power cord carefully and avoid excessive bending A damaged cord may cause electric shock or fire If the projector is not to be used for an extended period remove the plug from the power outlet Cleaning Unplug the projector from the power outlet before cleaning Clean the cabinet and front panel periodically with a soft cloth If heavily stained use a mil...

Страница 3: ...emote cable is inserted here 4 RGB H V and V Input Terminals Connect R G B H Horizontal sync and V Vertical sync outputs of the external equipment such as the Switcher If using a component with a combined sync SYNC output connect it to the H V terminal 5 Remote Sensor Receives the signal from the supplied remote control when used in the wireless condition 6 REMOTE 1 Terminal This terminal allows e...

Страница 4: ...d When used with the CONTROL button the DOWN button works as the CURSOR button on the remote control unit 17 UP Button Used to increase the selected adjustment level or move the cursor upward When used with the CONTROL button the UP button works as the CURSOR button on the remote control unit 18 NORMAL LOAD Button Returns the adjustment data to the standard level NORMAL function Pressing this butt...

Страница 5: ...D FUNCTIONS Remote control unit User Remote Control RC 6010 Full Function Remote Control RC 6011 NOTE The full function remote control is designed for setup adjustment Use the user remote control for normal operation ...

Страница 6: ...ss to enter the FOCUS mode 12 STATIC Button Press to enter the STATIC mode You can adjust the static convergence 13 POINT Button when the point convergence board installed Press to enter the POINT mode You can adjust the point convergence 14 TILT SKEW ALIGN Button Press to enter the TILTSKEW ALIGNMENT mode You can adjust the tilt and the skew of the projected image 15 TILT SKEW CONV Button Press t...

Страница 7: ...ss to display the various parameters and settings of the currently displayed image 30 KELVIN Button Press to enter the WHITE BALANCE mode You can adjust the white and the black level 31 POSITION Button Press to enter the position mode You can adjust the horizontal and vertical position and horizontal and vertical blanking 32 R G and B Buttons Turn each CRT beam on and off separately When using wit...

Страница 8: ...remove the batteries Do not use new and old batteries together or use different types together Do not take apart the batteries heat them or throw them into a fire Avoid using the full function remote control as wireless with the backlight switch ON for an extended period of time This can cause short battery life 2 Install the two new batteries making sure that their polarity matches the diagrams i...

Страница 9: ...f the ten INPUT buttons on the remote control You can also select a signal from the INPUT SELECT list See page 20 INPUT SELECTION for more details 5 Adjust the picture and sound See pages 14 through 18 for more details NOTE The volume function works only with the ISS 6010 ISS 6010G 6 To turn off the power press the POWER OFF button on the remote control or the POWER button on the rear panel 7 Pres...

Страница 10: ...NOTE The explanation of the operation on the following pages is for use with the remote control You can also operate the projector using the buttons on the control panel of the projector Displaying the Menu and Adjustment Screen The SOUND item is not included in the OPERATE menu on the stand alone mode Adjustment screen OPERATE 1 PICTURE 2 POSITION 3 SOUND 4 INPUT SELECT 5 SOURCE INFO 6 STATIC PIC...

Страница 11: ...en directly using the PIC FUNC button on the full function remote control Each time you press the PIC FUNC button the picture functions will rotate as follows CONTRAST COLOR SHARPNESS TINT BRIGHT 4 Use the CURSOR buttons to adjust a picture to your preference The CURSOR u or pbutton increases the level The CURSOR t or q button decreases the level 5 To end this adjustment press the END button to di...

Страница 12: ...R button Will be returned to the source screen To exit this mode without storing the current status select NO If the current status is not stored due to other button operation the STORE menu will be displayed Items to select YES The data will be stored NO The data will not be stored STORE YES NO ...

Страница 13: ...an enter the position adjustment screen di rectly using the POSITION button on the full function re mote control The POSITION button will toggle between the SHIFT and BLANKING 4 Adjust the position or screen area When selecting SHIFT Use the CURSOR buttons to move the position of the picture Pressing t or u moves the picture left or right Pressing p or q moves the picture up or down NOTE Adjust to...

Страница 14: ...n to display the STORE menu Whenever the END button is pressed the screen will be changed in this order POSITION menu OPERATE menu STORE menu 6 Use the CURSOR t or u to select either YES or NO and press ENTER If the position adjustments have not been changed the STORE menu will not be displayed Will be returned to the source screen To exit this mode without storing the current status select NO If ...

Страница 15: ...on is pressed the screen will be changed in this order OPERATE menu STORE menu 5 Use the CURSOR t or u button to select either YES or NO and press the ENTER button If the VOLUME data has not been changed the STORE menu will not be displayed To exit this mode without storing the current status select No If the current status is not stored due to other button operation the STORE menu will be display...

Страница 16: ...er OPERATE men Source screen Continued on the next page Input Selection NOTE You can display the INPUT SELECT list directly using the INPUT LIST button on the full function remote control NOTE To advance to the next page or to the previous page hold down the CTL button then press the CURSOR p or q button To directly access a page hold down the CTL button then any one of the INPUT buttons OPERATE 1...

Страница 17: ...her which is connected to the no 2 slot of the master Switcher first press the INPUT 2 button then the INPUT 3 button and finally press the ENTER button When pressing any one of the INPUT buttons to directly access one signal among two or more of the same signals the projector will output the signal listed in the upper line automatically To select the one listed in the lower line use the CURSOR p ...

Страница 18: ...OR TEMP AKB COUNTER and TIMER in this screen OPERATE 1 PICTURE 2 POSITION 3 SOUND 4 INPUT SELECT 5 SOURCE INFO 6 STATIC SOURCE INFORMATION M 01 S 01 NAME LOCK àààààààà àààààààà ON FREQUENCY OFF SYNC DETECT fh ààà ààà àà ààKHz AUTO COMP Fv àà àà àà àà Hz MANUAL SEPA G SYNC SYNC COLOR TEMP AKB HD VD 3200 K 6500 K ON VIDEO MODE 9300 K OFF COUNTER TIMER NTSC 3 58 ààààà ààààà ààà ààà àà àà SOURCE INFOR...

Страница 19: ...unction remote con trol 3 Press the R or B button to display the pattern to be aligned with the Green pattern as used a reference color You can turn on or off each CRT beam R and B separately 4 Hold down the CTL button then select the CRT you wish to adjust with the R and B buttons 5 Align the center of the Red or the Blue pattern with the center of the Green pattern using the CURSOR buttons The C...

Страница 20: ...TIC convergence data has not been changed the STORE menu will not be displayed Items to select YES The data will be stored NO The data will not be stored To exit this mode without storing the current status select NO If the current status is not stored due to other button operation the STORE menu will be displayed ...

Страница 21: ... CURSOR t or u button to select YES 3 Press the ENTER button The NORMAL function will be executed NOTE If you select NO you will exit this mode suspending current status To return to the last stored level LOAD 1 Press the NORMAL button while holding down the CTL but ton A confirmation message will be displayed 2 Use the CURSOR t or u button to select YES 3 Press the ENTER button The LOAD function ...

Страница 22: ...tive or positive BNC COMP sync 0 7 to 4 0Vp p 75ohm negative o r positive BNC Sync on G 0 3 to 0 6Vp p 75ohm negative BNC Video 1 0Vp p 75ohm positive BNC or switchable S video Y I 0Vp p 75ohm positive C 0 28Vp p 75ohm burst level Video system NTSC PAL SECAM and NTSC4 43 Digital convergence Pre set 100 positions Quick copy convergence Static and wave convergence Point convergence PG6000 PG 6000G O...

Страница 23: ...nd Power ON OFF Input signal select Picture mute Bright Contrast Color 1 Sharpness 1 Tint 2 Volume 3 Sound mute 3 Source information Static convergence Normalize Enter End Power ON OFF Input signal select Picture mute Remote control data input Acceptable Full function remote control unit RC 601 I User remote control unit RC 6010 Remote cable 4m 13ft Remote cable 16m 52ft AC line cable Ceiling moun...

Страница 24: ...or changing the on screen display mode If the main power is not supplied to the projector for three days or more the built in clock may have to be reset If this happens consult your dealer for setting date and time Screen Format in Projecting a Picture 01 17 93 12 00 00 M 01 S 01 X X X X Date Current time Input Source name ...

Отзывы: