


2-30
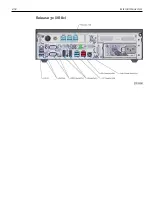
External Connectors
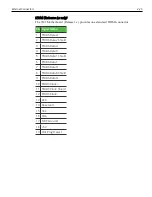
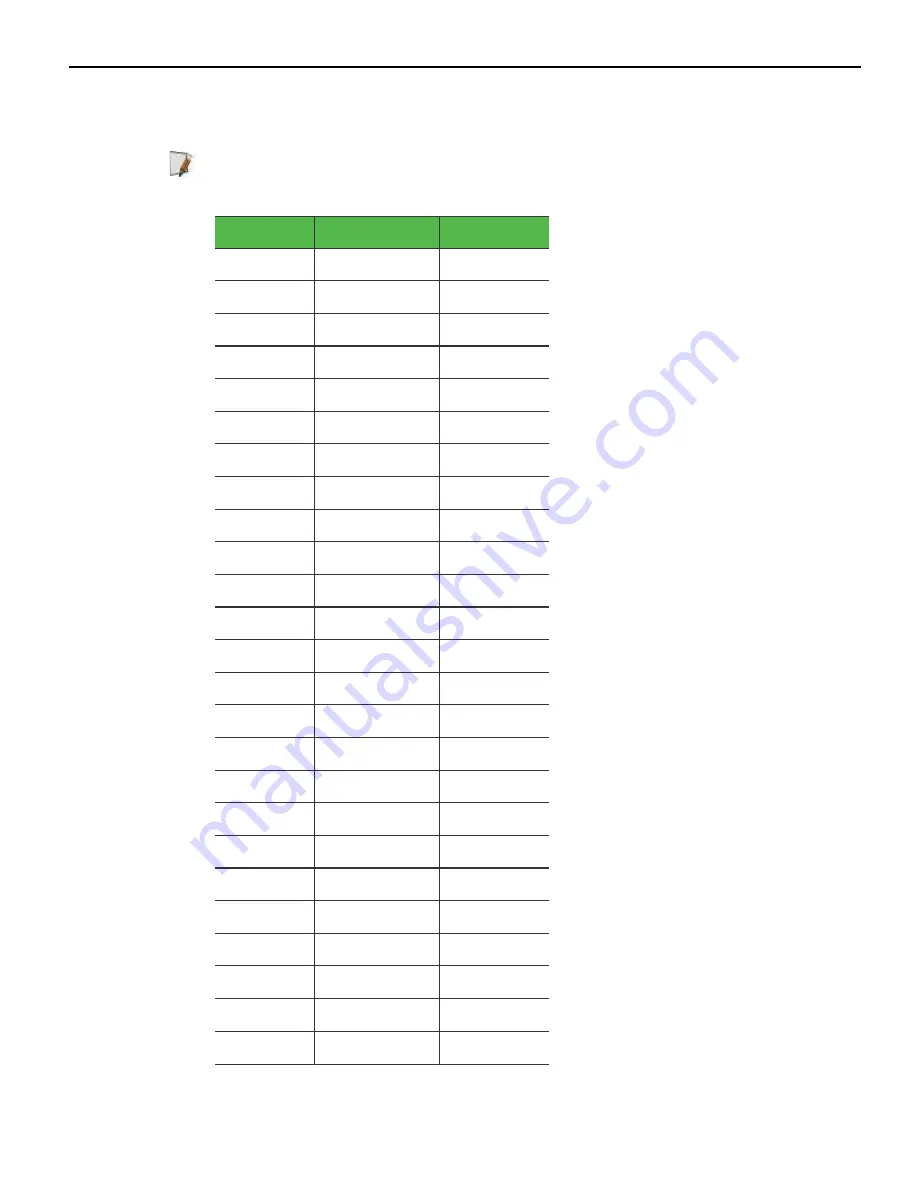
The daughter card interfaces through the Riser Card through a PCIx4 connector with
the following pinouts.
Note:
The orientation of this connector will be 180 degrees from the standard usage of
the connector to differentiate it from a standard PCIe connector.
Pin Number Side B
Side A
1
SIO_FAN_TACH GND
2
GND
MCLK
3
MDATA
KCLK
4
KDATA
GND
5
GND
PSON#
6
GPIO PCH
NC
7
NC
NC
8
GND
USB2_OC01#
9
USB2 DP0
GND
10
USB2_DN0
GND
11
GND
PERST#
KEY
12
NC
NC
13
NC
NC
14
NC
NC
15
NC
NC
16
NC
NC
17
NC
NC
18
NC
NC
19
GND
+12V
20
GND
+12V
21
GND
+12V
22
GND
+12V
23
GND
+12V
24
GND
5VSB
Содержание POS XR8
Страница 1: ...User Guide NCR POS XR8 XR8c 7607 B005 0000 2436 Issue C ...
Страница 9: ...vii Touch Screen Cleaning Procedures 141 ...
Страница 27: ...Chapter 2 External Connectors Motherboard Release 1 x Release 2 x Display Port Connections ...
Страница 28: ...2 18 External Connectors Release 3 x XR8c ...
Страница 42: ...2 32 ...
Страница 59: ...Hardware Installation 3 49 24V Powered USB and RS232 Cables ...
Страница 61: ...Hardware Installation 3 51 24V Powered USB and RS232 Cables ...
Страница 65: ...Hardware Installation 3 55 2185 Cash Drawer Fliptop with Locking lid The NCR 2185 is a Fliptop Cash Drawer ...
Страница 70: ...3 60 Hardware Installation NCR 5932 5715 Big Ticket USB Keyboard ...
Страница 72: ...3 62 Hardware Installation NCR 5932 6674 POS Compact Alphanumeric USB Keyboard ...
Страница 77: ...Hardware Installation 3 67 3 Disconnect the SATA Power connector from the Drive ...
Страница 78: ...3 68 Hardware Installation 4 Unscrew the Drive from the Hard Drive chassis Retain the screws ...
Страница 79: ...Hardware Installation 3 69 5 Slide the drive out of the chassis bracket ...
Страница 80: ...3 70 Hardware Installation 6 Slide in the new drive and secure with the retained screws ...
Страница 81: ...Hardware Installation 3 71 7 Connect the SATA Power connector to the Drive ...
Страница 82: ...3 72 Hardware Installation 8 Replace the Sled Cover and reconnect power to the terminal ...
Страница 85: ...Hardware Installation 3 75 5 Remove the HDD from the Bracket 6 Install the new HDD to the Bracket ...
Страница 92: ...5 82 ...
Страница 104: ...6 94 Disk Image Backup and Recovery Tool A message is displayed when the load is complete 5 Reboot the POS ...
Страница 130: ...7 120 ...
Страница 147: ...Configuring a Second HDD for RAID 10 137 7 Select Next ...
Страница 152: ...11 142 ...


