9-130
Configuring AMT
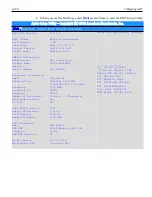
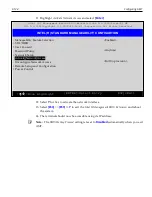
4. Enable
Intel AMT
.
a. Highlight
Intel AMT
and select
[Enter]
.
Aptio Setup Utility - Copyright (C) 2016 American Megatrends, Inc.
Main .
Advanced
.
Chipset
.
Boot . Security . Save & Exit
Intel AMT
BIOS Hotkey Pressed
MEBx Selection Screen
Hide Un-Configure ME Confirmation
MEBx Debug Message Output
Un-Configure ME
AMT Wait Timer
Disable ME
ASF
Activate Remote Assistance Process
USB Configure
PET Progress
AMT CIRA Timeout
Watchdog
. OS Timer
. BIOS Timer
[Disabled]
[Disabled]
[Disabled]
[Disabled]
[Disabled]
[Disabled]
0
[No]
[Enabled]
[Disabled]
[Ensable]
[Enabled]
0
[Disabled]
0
0
OEMFlag Bit 1:
Enable/Disable
BIOS hotkey press.
___________________
→←: Select Screen
↑↓/Click: Select Item
Enter/Dbl Click: Select
+-: Change Opt.
F1: General Help
F2: Previous Values
F9: Load Defaults
F10: Save and Exit
ESC/Right Click: Exit
b. Set to
Enabled
.
c. Select
[Enter]
.
Содержание POS XR8
Страница 1: ...User Guide NCR POS XR8 XR8c 7607 B005 0000 2436 Issue C ...
Страница 9: ...vii Touch Screen Cleaning Procedures 141 ...
Страница 27: ...Chapter 2 External Connectors Motherboard Release 1 x Release 2 x Display Port Connections ...
Страница 28: ...2 18 External Connectors Release 3 x XR8c ...
Страница 42: ...2 32 ...
Страница 59: ...Hardware Installation 3 49 24V Powered USB and RS232 Cables ...
Страница 61: ...Hardware Installation 3 51 24V Powered USB and RS232 Cables ...
Страница 65: ...Hardware Installation 3 55 2185 Cash Drawer Fliptop with Locking lid The NCR 2185 is a Fliptop Cash Drawer ...
Страница 70: ...3 60 Hardware Installation NCR 5932 5715 Big Ticket USB Keyboard ...
Страница 72: ...3 62 Hardware Installation NCR 5932 6674 POS Compact Alphanumeric USB Keyboard ...
Страница 77: ...Hardware Installation 3 67 3 Disconnect the SATA Power connector from the Drive ...
Страница 78: ...3 68 Hardware Installation 4 Unscrew the Drive from the Hard Drive chassis Retain the screws ...
Страница 79: ...Hardware Installation 3 69 5 Slide the drive out of the chassis bracket ...
Страница 80: ...3 70 Hardware Installation 6 Slide in the new drive and secure with the retained screws ...
Страница 81: ...Hardware Installation 3 71 7 Connect the SATA Power connector to the Drive ...
Страница 82: ...3 72 Hardware Installation 8 Replace the Sled Cover and reconnect power to the terminal ...
Страница 85: ...Hardware Installation 3 75 5 Remove the HDD from the Bracket 6 Install the new HDD to the Bracket ...
Страница 92: ...5 82 ...
Страница 104: ...6 94 Disk Image Backup and Recovery Tool A message is displayed when the load is complete 5 Reboot the POS ...
Страница 130: ...7 120 ...
Страница 147: ...Configuring a Second HDD for RAID 10 137 7 Select Next ...
Страница 152: ...11 142 ...


