Index-155
Index
—7—
7401, 2-48
—A—
Advanced power management, 1-22
Audio, 1-15
Auto-Logon
setting, 2-40
—B—
BIOS default CMOS values, 3-27
BIOS Recovery
using CD-ROM, 5-1
BIOS values
Celeron processor, 3-27, 3-64
Pentium III processor, 3-64
—C—
Cable connector identification, 2-9
Cash drawer
Installation, 2-18, 2-19
CD-ROM drive, B-10
CMOS values
Celeron processor, 3-27, 3-64
Pentium III processor, 3-64
Compatibility, 1-37
Configuration diagram, 1-8, 1-9
—D—
Dual RS-232 Port, B-17
—E—
Ethernet 10/100Base-T, 1-11
—F—
Features/kits
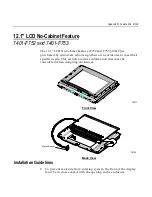
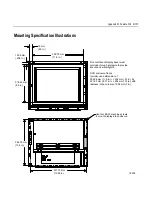
12.1, B-149
15, B-152
CD-ROM drive (2336-K007), B-10
Countertop swivel mount bracket
(7401-K535), B-63
Dual RS-232 Port (7401-K070), B-17
Fixed-angle mount tilt bracket (7401-
K536), B-59
Fixed-Angle Mount to Tilt Mount
Conversion (7401-K501), B-81
Fixed-angle to-tilt conversion (7401-
K501), B-81
Flash disk (7454-K040), B-20
Floor Standing Pedestal (2336-
K052/2336-K053), B-130
Integrated CD-ROM (Tilt-Mount
Model) (7401-K059), B-138
Modem (2336-K033), B-6
No-cabinet (7401-F752 and F753), B-149
No-cabinet (7401-F757), B-152
PCMCIA port (7401-K060), B-22
Содержание 7401 Web Kiosk
Страница 1: ...NCR 7401 Web Kiosk Release 2 3 Hardware User s Guide 16436 NCR B005 0000 1254 Issue D...
Страница 80: ...Chapter 2 Hardware Installation 2 21 2 Remove the Core Module from the Fixed Angle Mount 16397...
Страница 132: ...Chapter 3 Setup 3 23 5 Move the cursor to the Exit Menu select Save Changes Exit or Save Changes and press Enter...
Страница 154: ...Chapter 3 Setup 3 45 2 Press Enter and then select the desired setting from the drop down menu Other RS 232...
Страница 183: ...3 74 Chapter 3 Setup...
Страница 221: ...Appendix B Feature Kits B 13 3 Select Install or Update BACKPACK Driver 4 Select Finish to restart the computer...
Страница 232: ...B 24 Appendix B Feature Kits 5 Install the Antenna Cover and secure it with screws 2 16874 Wireless Antenna Cover...
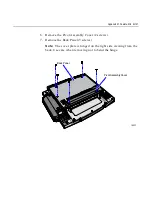
Страница 249: ...Appendix B Feature Kits B 41 10 Slide the Keyboard Shelf onto the Bottom Plate and install the four screws 17372...
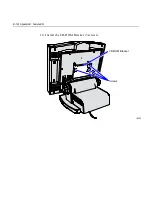
Страница 251: ...Appendix B Feature Kits B 43 12 Install a Strain Relief Bushing through the Mounting Bracket 18530 Strain Relief Bushing...
Страница 259: ...Appendix B Feature Kits B 51 5 Wrap the metal strap around the pole and loop it through the other end of the clamp 17356...
Страница 260: ...B 52 Appendix B Feature Kits 6 Snug the clamp and then crimp the metal strap with a pair of pliers 17357...
Страница 263: ...Appendix B Feature Kits B 55 11 Route the cables in the Wall Bracket as shown below 17359...
Страница 294: ...B 86 Appendix B Feature Kits 5 Push in the Core Module Support and lower the Core Module 6 Remove the Core Module 17345...
Страница 302: ...B 94 Appendix B Feature Kits 17729 Pole Mount Wall Mount...
Страница 311: ...Appendix B Feature Kits B 103 10 Route the cables in the Wall Bracket as shown below 17734 Mounting Screw on both sides...
Страница 326: ...B 118 Appendix B Feature Kits 2 Insert the end of the paper into the Paper Guide 16731...
Страница 328: ...B 120 Appendix B Feature Kits 4 Remove the cut paper waste from the Presenter 16965...
Страница 334: ...B 126 Appendix B Feature Kits 19050...
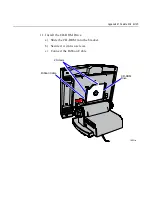
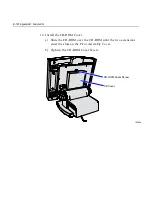
Страница 352: ...B 144 Appendix B Feature Kits 10 Install the CD ROM Bracket 3 screws 19232 Screws CD ROM Bracket...
Страница 366: ...Index 158 USB RS 232 port server 1 34 1 35 B 14 V Video subsystem 1 11 W Wireless LAN communications 1 12...
Страница 367: ...Index 159...
Страница 368: ...B005 0000 1254 September 2001 Printed on recycled paper...

