Appendix A:
Cables
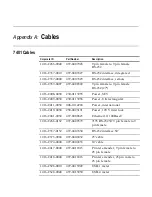
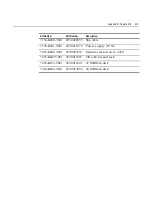
7401 Cables
Corporate ID
Part Number
Description
1416-C266-0040
497-0407943
9 pin female to 9 pin female
RS-232
1416-C337-0010
497-0407427
RS-232 interface, integrated
1416-C337-0040
497-0407429
RS-232 interface, remote
1416-C359-0007
497-0408349
9 pin female to 9 pin female
RS-232 (27")
1416-C408-0030
230-0113955
Power, SEV
1416-C409-0030
230-0113956
Power, UK rectangular
1416-C411-0030
006-1012224
Power, international
1416-C419-0030
250-0023191
Power, 120 V twist lock
1416-C041-0030
497-0008623
Ethernet 10/100BaseT
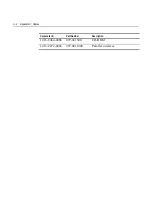
1416-C266-0152
497-0409379
7193 RS-232 50' 9 pin female to 9
pin female
1416-C337-0152
497-0407430
RS-232 interface 50'
1416-C373-0080
497-0409432
25' cable
1416-C374-0040
497-0409433
14' cable
1416-C417-0040
497-0411815
Printer extender, 9 pin female to
25 pin female
1416-C418-0040
497-0411816
Printer extender, 25 pin male to
25 pin female
1416-C528-0010
497-0415949
USB, 1 meter
1416-C528-0040
497-0415950
USB, 4 meter
Содержание 7401 Web Kiosk
Страница 1: ...NCR 7401 Web Kiosk Release 2 3 Hardware User s Guide 16436 NCR B005 0000 1254 Issue D...
Страница 80: ...Chapter 2 Hardware Installation 2 21 2 Remove the Core Module from the Fixed Angle Mount 16397...
Страница 132: ...Chapter 3 Setup 3 23 5 Move the cursor to the Exit Menu select Save Changes Exit or Save Changes and press Enter...
Страница 154: ...Chapter 3 Setup 3 45 2 Press Enter and then select the desired setting from the drop down menu Other RS 232...
Страница 183: ...3 74 Chapter 3 Setup...
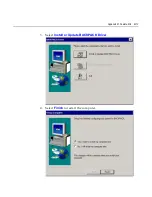
Страница 221: ...Appendix B Feature Kits B 13 3 Select Install or Update BACKPACK Driver 4 Select Finish to restart the computer...
Страница 232: ...B 24 Appendix B Feature Kits 5 Install the Antenna Cover and secure it with screws 2 16874 Wireless Antenna Cover...
Страница 249: ...Appendix B Feature Kits B 41 10 Slide the Keyboard Shelf onto the Bottom Plate and install the four screws 17372...
Страница 251: ...Appendix B Feature Kits B 43 12 Install a Strain Relief Bushing through the Mounting Bracket 18530 Strain Relief Bushing...
Страница 259: ...Appendix B Feature Kits B 51 5 Wrap the metal strap around the pole and loop it through the other end of the clamp 17356...
Страница 260: ...B 52 Appendix B Feature Kits 6 Snug the clamp and then crimp the metal strap with a pair of pliers 17357...
Страница 263: ...Appendix B Feature Kits B 55 11 Route the cables in the Wall Bracket as shown below 17359...
Страница 294: ...B 86 Appendix B Feature Kits 5 Push in the Core Module Support and lower the Core Module 6 Remove the Core Module 17345...
Страница 302: ...B 94 Appendix B Feature Kits 17729 Pole Mount Wall Mount...
Страница 311: ...Appendix B Feature Kits B 103 10 Route the cables in the Wall Bracket as shown below 17734 Mounting Screw on both sides...
Страница 326: ...B 118 Appendix B Feature Kits 2 Insert the end of the paper into the Paper Guide 16731...
Страница 328: ...B 120 Appendix B Feature Kits 4 Remove the cut paper waste from the Presenter 16965...
Страница 334: ...B 126 Appendix B Feature Kits 19050...
Страница 352: ...B 144 Appendix B Feature Kits 10 Install the CD ROM Bracket 3 screws 19232 Screws CD ROM Bracket...
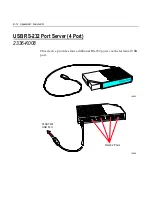
Страница 366: ...Index 158 USB RS 232 port server 1 34 1 35 B 14 V Video subsystem 1 11 W Wireless LAN communications 1 12...
Страница 367: ...Index 159...
Страница 368: ...B005 0000 1254 September 2001 Printed on recycled paper...

