background image

Installing Additional Memory

6-4

  Installing Optional Equipment in the Monitor Support Base

Disassembling the Monitor Support Base

1. Remove all cables connected to the base. If a 

PCMCIA

 card is installed, 

remove it. 

2. Place the base with the top up and the front facing you (preferably, on an 

anti-static mat).

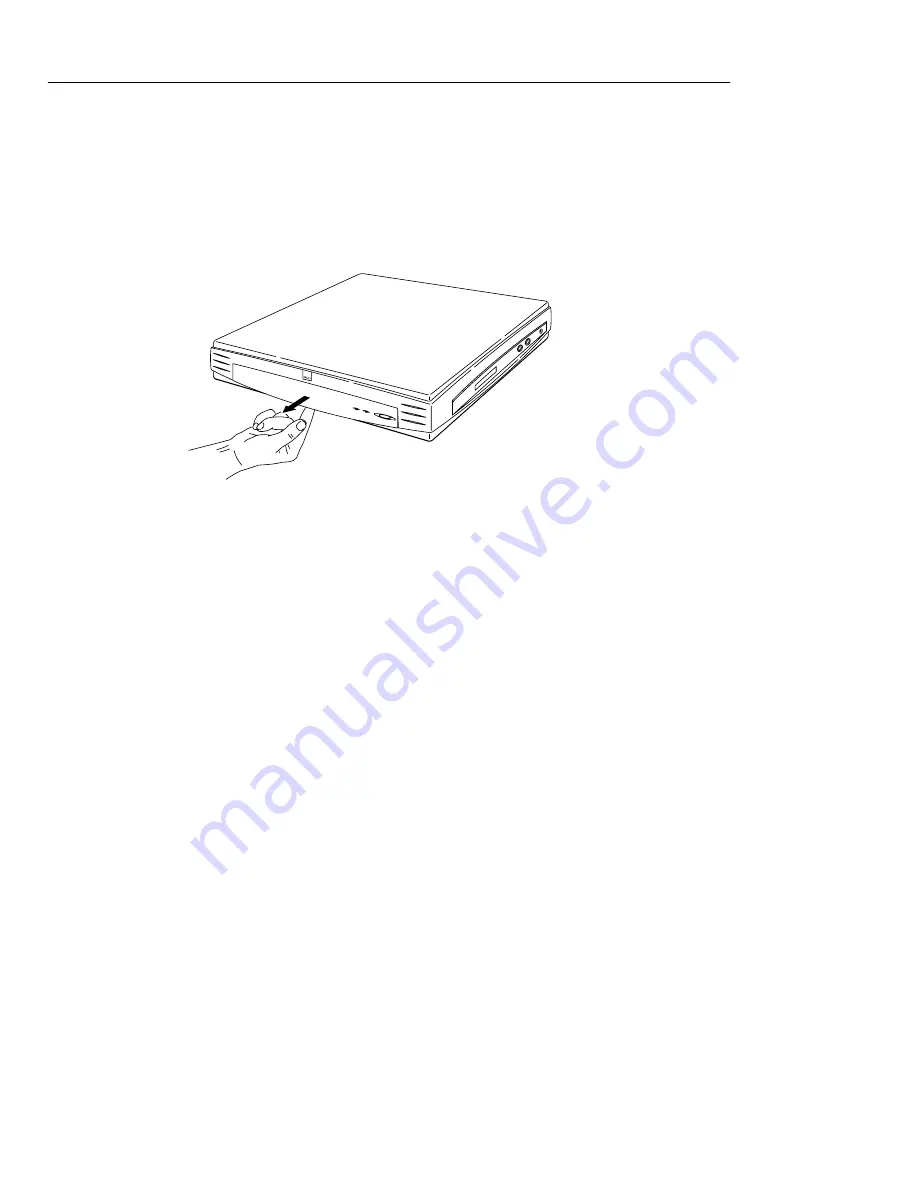
3. Use your finger to release the clip on the front control panel and remove 

the panel. See Figure 6-2.

4. Use a small flat-blade screwdriver to release the two tabs located on the 

front of the 

NC

, as shown in Figure 6-3.

Figure 6-2  Removing the Front Control Panel

Содержание Explora 450 Series

Страница 1: ...Installing Your Explora 400 450 Network Computer Part Number 9300586 Rev A October 1997 Network Computing Devices Inc 350 North Bernardo Avenue Mountain View California 94043 Email support ncd com...

Страница 2: ...s book should not be regarded as affecting the validity of any trademark or service mark Revisions Revision history of this document Warnings and Certifications This equipment has been tested and foun...

Страница 3: ...36 EEC 73 23 EEC Standards to which Conformity is Declared EN 55022 EN 50082 1 EN 60950 Importer s Name Network Computing Devices France SARL Importer s Address 5 bis rue de Petit Robinson 78353 Jouy...

Страница 4: ...wrists when working with your mouse Place your display monitor at a comfortable viewing distance Many people favor a distance of 16 to 28 inches 0 4 to 0 7 m from their eyes Position the screen so th...

Страница 5: ...en though the preponderance of professional opinion is that VDTs are safe some of our customers have asked us for information on how to reduce their exposure to VLF and ELF emissions Although NCD does...

Страница 6: ......

Страница 7: ...ctions for Outside the USA 3 6 Power Cord for the UK 3 7 Controls and Indicators 3 7 Chapter 4 Selecting Screen Resolution Chapter 5 Installing Optional Equipment in the Space Saver Base Installing Ad...

Страница 8: ...s 6 6 Removing SIMMs 6 9 Reassembling the Monitor Support Base 6 10 Testing Memory 6 11 Installing PCMCIA Cards 6 12 Installing the Power Y Cable 6 14 Chapter 7 Specifications Chapter 8 Troubleshootin...

Страница 9: ...in one of two bases a monitor a mouse and a keyboard You can purchase the NC alone or with a monitor The two bases are The space saver base shown in Figure 1 2 has an ergonomic design with as small a...

Страница 10: ...de the following features VGA SVGA XGA SXGA monitor support PS 2 mouse support Multiple keyboard choices Serial RS 232 C port Parallel port Externally accessible PCMCIA card also called PC card slot A...

Страница 11: ...Explora 450 with the optional thin coax Ethernet in place of the stereo audio output as the Model 454 As an ENERGY STAR Partner Network Computing Devices Inc has determined that this product meets th...

Страница 12: ...Dimension Space Saver Base Space Saver Base in Stand Monitor Support Base Height 1 9 inches 4 8 cm 9 6 inches 24 4 cm 2 1 inches 5 3 cm Width 7 6 inches 19 3 cm 5 5 inches 13 9 cm 12 8 inches 32 5 cm...

Страница 13: ...omponents that you ordered If any components are missing or appear damaged contact NCD at 650 691 7445 or your representative immediately PCMCIA Space saver base shown in its stand Power supplies and...

Страница 14: ...2 2 Explora 400 450 Series Product Line...

Страница 15: ...designed to support the weight of a monitor Use the NC only in an office or business environment Do not subject the NC to vibration dust or corrosive gases because the NC is not designed to be used in...

Страница 16: ...ne exception the connectors are the same for the Explora 400 and Explora 450 Explora 400 always has a stereo audio output connector Explora 450 has the stereo audio output connector as standard You ca...

Страница 17: ...Figure 3 1 Explora 400 450 Connectors Space Saver Base Parallel if used Serial if used Monitor Stereo audio output if used Twisted pair network connection Explora 450 optional thin Ethernet BNC conne...

Страница 18: ...er supply make this connection last Twisted pair network connection Stereo audio output if used Explora 450 optional thin Ethernet BNC connector replaces stereo audio output If you have this option ma...

Страница 19: ...ion The stand has two supports one support has a large hole in it while the other support has a small hole Orient the stand so that the support with the large hole aligns with the power connector Powe...

Страница 20: ...Outside the USA If you ordered your NC for use outside the USA you received either the optional Y cable with a power transformer and one line cord or the following items power transformer that requir...

Страница 21: ...sed of the same rating The fuse cover is detachable Never use the plug with the cover omitted Controls and Indicators The controls and indicators are the same for the Explora 400 and Explora 450 They...

Страница 22: ...on Network activity indicator Front view Twisted pair link look through hole Figure 3 6 Explora 400 450 Controls and Indicators Monitor Support Base Power indicator Power switch Back view Explora 400...

Страница 23: ...r documentation for its supported resolutions The Boot Monitor provides a menu that selects the correct resolution and changes the dpi dots per inch setting for the monitor Caution If you are using th...

Страница 24: ...wn Go to previous or next field within the current menu Control U Delete to beginninbg of line Escape Restore previous value Help for each field within a menu is shown along the bottom of the screen E...

Страница 25: ...the monitor the test pattern will either not appear or not be stable 9 Press any key to return to the Boot Monitor Main menu Help Keyboard Monitor Network Boot Done Monitor Resolution Automatic Detec...

Страница 26: ...s the settings and returns you to the Boot Monitor Undo reloads the parameters that were in effect when you entered the menus The system continues to display the menus 12 Press the Return key If you s...

Страница 27: ...on 3 Basic Installation on page 3 1 Installing Additional Memory You can add memory to your NC at any time You may purchase it from NCD or other vendors Only SIMMs supplied by NCD are covered under NC...

Страница 28: ...5 2 on page 5 3 for a list of SIMM specifications The following rules apply It makes no difference which slot is used as the first slot and which is used as the second For the Explora 400 only you can...

Страница 29: ...n page 5 8 4 Test the memory after your NC is up and running See Testing Memory on page 5 10 The only tool you need is a small flat blade screwdriver Table 5 2 SIMM Specifications Speed Fast page mode...

Страница 30: ...ove the NC from the stand 3 Place the NC on a flat surface preferably on an anti static mat with the top facing up as shown in Figure 5 2 As you face the NC the three connectors are on your right 4 Us...

Страница 31: ...possible set the NC on an anti static mat and wear a grounding strap Always handle SIMMs only by the edges Your NC already has a SIMM or SIMMs installed The SIMM slots located on the left side of the...

Страница 32: ...al Equipment in the Space Saver Base To install the SIMM s 1 Orient the SIMM so that the notch is facing towards the back of the logic board See Figure 5 5 Figure 5 4 Location of the SIMM Slots SIMM s...

Страница 33: ...wn on both ends of the SIMM until it clicks into place The SIMM should go past the metal tabs on each end of the slot The SIMM should lie at about a 25 to 30 degree angle in the slot Removing SIMMs To...

Страница 34: ...Reassembling the Space Saver Base To reassemble the NC follow these steps 1 Swing the front of the top section over the front edge of the bottom section and continue down placing the hooks on the top...

Страница 35: ...til the two tabs click through the two openings on the bottom section See Figure 5 10 3 Install the cabling See Section 3 Basic Installation on page 3 1 4 After the system is installed perform the mem...

Страница 36: ...IP address Using IP address IP address of terminal Searching for subnet mask Using subnet mask subnet mask Press Escape to interrupt booting Memory Test Run the memory test as follows 1 Type a questi...

Страница 37: ...Monitor commands refer to NCDware software documentation Installing PCMCIA Cards The PCMCIA cards are 68 pin credit card size devices that fit into the NC s PCMCIA slot You can order these cards dire...

Страница 38: ...12 With the NC s PCMCIA slot on your left and the PCMCIA card s arrow side facing up slide the card into the PCMCIA slot until you feel the card make contact with the pins in the socket Caution Do no...

Страница 39: ...able power transformer and line cord as shown in Figure 5 13 Installing the Security Device and Mounting Bracket The security device and mounting bracket option includes all screws and an installation...

Страница 40: ...Installing the Security Device and Mounting Bracket 5 14 Installing Optional Equipment in the Space Saver Base...

Страница 41: ...available for the monitor support base If you are adding additional memory do so before doing Section 3 Basic Installation on page 3 1 Installing Additional Memory You can add memory to your unit at a...

Страница 42: ...ble 6 2 on page 6 3 for a list of SIMM specifications The following rules apply It makes no difference which slot is used as first slot and which is used as the second For the Explora 400 only you can...

Страница 43: ...Base on page 6 10 4 Test the memory after your NC is up and running See Testing Memory on page 6 11 The only tool you need is a small flat blade screwdriver Table 6 2 SIMM Specifications Speed Fast pa...

Страница 44: ...IA card is installed remove it 2 Place the base with the top up and the front facing you preferably on an anti static mat 3 Use your finger to release the clip on the front control panel and remove th...

Страница 45: ...ront so you can slide the top s tabs from the bottom section s slots to separate the cover from the bottom See Figure 6 4 Caution Lift the top section up at the front only until you can slide the top...

Страница 46: ...ion Electrostatic Discharge ESD can damage SIMMs and other components located on the logic board Make sure you touch a suitable ground before handling any SIMM If possible set the NC on an anti static...

Страница 47: ...labeled J9 and J10 See Figure 6 5 Observe the SIMM s currently in the slots and refer to Table 6 1 Memory Configurations on page 6 2 to determine your configuration Decide what you want your new conf...

Страница 48: ...re 6 6 2 Insert the SIMM into the slot at about a 45 degree angle See Figure 6 7 3 When you are certain the SIMM is inserted all the way press down on both ends of the SIMM until it clicks into place...

Страница 49: ...ers or your thumbs to pull back on the two metal tabs located on each end of the SIMM slot See Figure 6 8 2 As you pull back on the tabs the SIMM pops up past the metal tabs See Figure 6 9 3 Hold the...

Страница 50: ...lots on the bottom section as shown in Figure 6 10 2 Lower the front of the top section until the three tabs slide through the three slots on the bottom section 3 Replace the front control panel 4 Rep...

Страница 51: ...or IP address Using IP address IP address of terminal Searching for subnet mask Using subnet mask subnet mask Press Escape to interrupt booting Memory Test Run the memory test as follows 1 Type a ques...

Страница 52: ...Monitor commands refer to NCDware software documentation Installing PCMCIA Cards The PCMCIA cards are 68 pin credit card size devices that fit into the base PCMCIA slot You can order these cards direc...

Страница 53: ...set it to OFF 3 With the arrow side facing up slide the card into the PCMCIA slot until you feel the card make contact with the pins in the socket Caution Do not force the card into the socket The car...

Страница 54: ...the monitor s line cord when you have a power transformer that requires its own line cord Install the Y cable power transformer and line cord as shown in Figure 6 13 305mm 6 0 in 152mm 48 0 in 1220mm...

Страница 55: ...r S3 TRIO64V2 DX both models DRAM Explora 400 8 MB fast page mode Explora 450 8 MB EDO PROM 512KB flash both models Memory upgrades Explora 400 2 SIMM slots 32 bit 60ns fast page mode SIMMs Explora 45...

Страница 56: ...t Controls and indicators NC Power switch Power LED Network Activity and Twisted Pair Link Indicator Keyboard N 97K Three configurable LEDs Unlabeled Caps Lock and Network Activity N 101M N 101MPS N 1...

Страница 57: ...hree button PS 2 Communications Ethernet Explora 400 Built in 10BaseT twisted pair transceiver Explora 450 All Built in 10 100BaseTX twisted pair transceiver Option in place of audio output Thin coax...

Страница 58: ...pport base Height Width Depth Weight 1 9 inches 4 8 cm 7 6 inches 19 3 cm 11 3 inches 28 7 cm 2 6 pounds 1 2 kg 9 6 inches 24 4 cm 5 5 inches 13 9 cm 11 3 inches 28 7 cm 2 8 pounds 1 3 kg 2 1 inches 5...

Страница 59: ...eyboard appears to be faulty turn off the NC disconnect the keyboard and connect a keyboard from another NCD NC If the second keyboard works you know that the problem is with the first keyboard and no...

Страница 60: ...e If you find you must return a base for repair send it in the same configuration as when it failed In Case of Trouble If you encounter difficulties either contact your local NCD representative or Pho...

Страница 61: ...at you take it to a commercial packing and shipping company 3 Mark each return package with the assigned RMA number and address each package as shown below to avoid problems or delays Customer Service...

Страница 62: ...In Case of Trouble 8 4 Troubleshooting...

Отзывы: