background image

2

Important Safety Instructions 


3


Safety Warning Labels / Serial Number   

6

 Earthing 

Instructions 


7


Emergency Stop Procedure 


7

Speci

¿

cations  

%

efore 

$

ssembly  

Parts  

9

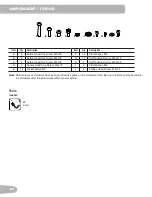
Hardware  

10

Tools  

10

Assembly  

11

Storage and Moving the Machine 


23

Unfolding the Machine 


24

Leveling the Machine 


25

Features  

26

 Console 

Features 


27

 Bluetooth

®

 Connectivity  


30


Remote Heart Rate Monitor 


31


Remote Speed and Incline Controls 


32

Operations  

33

 Getting 

Started 


33


Power Up / Idle Mode 


34

 Initial 

Setup 


34


Quick Start Program 


35

 User 

Pro

¿

les  

35

 Pro

¿

le Programs 


3


Compare Pacer Display 


41


Fitness Score Display 


42


Pausing or Stopping 


43


Results / Cool Down Mode 


43

 GOAL 

TRACK 

Statistics 


43

Console Setup Mode 


45

Maintenance  

46


Cleaning 


46


 Adjusting the Walking Belt 


47


 Aligning the Walking Belt 


47


 Lubricating the Walking Belt 


4


 Heart Rate Chest Strap Battery Replacement 

49


Maintenance 

Parts 


50

Troubleshooting  

52

Nautilus, Inc., www.nautilusinternational.com | Nautilus, Inc., 5415 Centerpoint Parkway, Groveport, OH 43125 USA | Printed 
in China | 

‹

 2016 Nautilus, Inc. | Nautilus, the Cam logo, Nautilus T62

, Nautilus Trainer, Bow

À

e

[

, Schwinn, and Universal 

are trademarks owned by or licensed to Nautilus, Inc., which are registered or otherwise protected by common law in the 
United States and other countries. Polar

®

, OwnCode

®

, Google

TM

, MyFitnessPal

®

, Under Armour

®

, WD-40

®

, and Lube-N-Walk

®


are trademarks of their respective owners. App Store is a service mark of Apple Inc. The Bluetooth

®

 word mark and logos are 

registered trademarks owned by Bluetooth SIG, Inc., and any use of such marks by Nautilus, Inc. is under license.

ORIGINAL MANUAL - ENGLISH VERSION ONLY

TABLE OF CONTENTS

To validate warranty support, keep the original proof of purchase and record the following information:

Serial Number __________________________

Date of Purchase ____________________

To register your product warranty, contact your local distributor. 

For details regarding product warranty or if you have questions or problems with your product, please contact 
your local Nautilus distributor. To 

¿

nd your local distributor, go to: 

www.nautilusinternational.com

Содержание T628

Страница 1: ...ASSEMBLY MANUAL OWNER S MANUAL T628...

Страница 2: ...s Inc 5415 Centerpoint Parkway Groveport OH 43125 USA Printed in China 2016 Nautilus Inc Nautilus the Cam logo Nautilus T62 Nautilus Trainer Bow e Schwinn and Universal are trademarks owned by or lice...

Страница 3: ...or pose a risk of injury to the user Do not drop or put objects into any opening of the machine Never operate this treadmill with the air openings blocked Keep the air openings free of lint hair and t...

Страница 4: ...lied foot support platforms for stability before walking on the moving belt Disconnect all power before servicing this machine Do not operate this machine outdoors or in moist or wet locations To prev...

Страница 5: ...fore putting on or taking off parts Use this machine only for its intended use as described in this manual Do not use attachments not recommended by the manufacturer This appliance is not intended for...

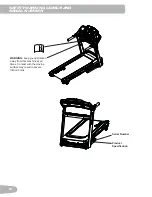
Страница 6: ...FETY WARNING LABELS AND SERIAL NUMBER Serial Number Product 6SHFL FDWLRQ WARNING keep young children away from this machine at all times Contact with the moving surface may result in severe friction b...

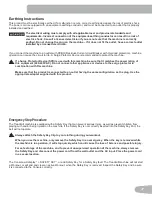
Страница 7: ...or devices to the surge protector in combination with this machine 0DNH VXUH WKDW WKH SURGXFW LV FRQQHFWHG WR DQ RXWOHW KDYLQJ WKH VDPH FRQ JXUDWLRQ DV WKH SOXJ 8VH WKH appropriate adapter supplied wi...

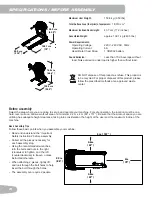
Страница 8: ...6 157 Be sure that the workout space you are utilizing has adequate height clearance taking into consideration the height of the user and the ma imum incline of the machine Basic Assembly Tips Follow...

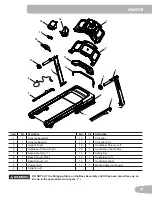
Страница 9: ...hroud Right 13 1 Heart Rate Chest Strap 5 1 Base Assembly 14 1 Safety Key 6 1 Base Shroud Right 15 1 Cupholder Left 7 1 Base Shroud Left 16 1 Cupholder Right 1 Power Cord 17 1 Media Cable not shown 9...

Страница 10: ...apping Screw M4 2 16 C 6 Button Head He Screw M 20 H 6 Self Tapping Screw M3 9 9 5 D 4 Socket Head Cap Screw M 16 I 2 Flat Washer M4 E 18 Lock Washer M J 4 Phillips Head Screw M4 16 Note Select pieces...

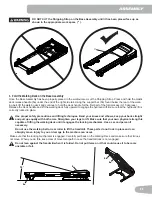
Страница 11: ...orrectly locked in place 8VH SURSHU VDIHW SUHFDXWLRQV DQG OLIWLQJ WHFKQLTXHV HQG RXU NQHHV DQG HOERZV NHHS RXU EDFN VWUDLJKW and pull up equally with both arms Straighten your legs to lift Make sure t...

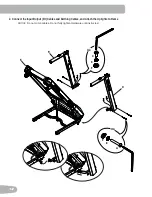
Страница 12: ...12 2 Connect the Input Output I O Cables and Earthing Cables and Attach the Uprights to Frame NOTICE Do not crimp cables Do not fully tighten Hardware until instructed A F X4 E C F E X4 5 9 3...

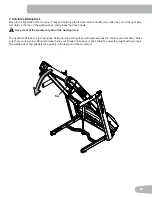
Страница 13: ...release the deck handle Keep clear of the movement path of the walking deck The hydraulic lift is set up to drop lightly Hold onto the walking deck until appro imately 2 3 of the movement down Make su...

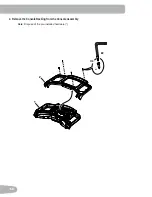
Страница 14: ...14 1 2 2 X4 4 Remove the Console Backing from the Console Assembly Note Dispose of the pre installed hardware...

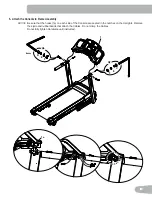
Страница 15: ...e sure that the hooks 1a on each side of the Console are seated in the notches on the Uprights Remove the ziptie and rubberbands that attach the Cables Do not crimp the Cables Do not fully tighten Har...

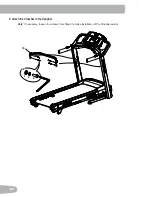
Страница 16: ...16 B E F X4 10 6 Attach the Crossbar to the Uprights Note If necessary loosen the screws from Step 5 to make installation of the Crossbar easier...

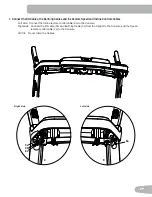
Страница 17: ...s Cables Left side Connect the Incline remote control cable 9a to the Console Right side Connect the I O cable 3b and Earthing Cable 3c from the Upright to the Console and the Speed remote control cab...

Страница 18: ...18 9 Fold the Walking Deck and tighten ALL Hardware from previous steps 8 Attach the Cupholders to the Console NOTICE Cupholder edges should be flush with the face of Console 15 X6 H 16...

Страница 19: ...19 10 Attach the Base Shrouds to the Frame Assembly and then unfold the Walking Deck Note Unfold the Walking Deck after the Base Shrouds have been installed 7 6 J 2 I X2 2 X2 J...

Страница 20: ...20 11 Attach the Console Backing to the Console Assembly NOTICE Attach the hardware marked below with the first then the hardware with the followed by the remaining hardware 2 G X13 2...

Страница 21: ...Shrouds to the Frame Assembly Note Slide the Handlebar Shrouds onto the handlebars and tilt to pass over the remote control buttons Be sure the tabs on the shrouds snap into the Console 12 4 13 Place...

Страница 22: ...tions 15 Final Inspection Inspect your machine to ensure that all hardware is tight and components are properly assembled Be sure to record the serial number in the eld provided at the front of this m...

Страница 23: ...t of the fold process 0 15 degrees Release the deck handle and lift the walking deck fully upward and engage the hydraulic lift Be sure that the hydraulic lift is correctly locked in place You will he...

Страница 24: ...or other objects that may KDPSHU RXU DELOLW WR PRYH IUHHO ZLWK D VXI FLHQW FOHDU ZRUNRXW DUHD UXEEHU PDW EHORZ WKH PDFKLQH LV UHFRPPHQGHG WR SUHYHQW HOHFWURVWDWLF GLVFKDUJH DQG SURWHFW RXU RRU H VXUH...

Страница 25: ...mill comes equipped with a durable high quality walking belt designed to provide many hours of reliable ser vice The walking belt on a treadmill that has not been operated for a length of time either...

Страница 26: ...Switch L Handlebar AA AC Inlet M Heart Rate Chest Strap BB Telemetry Heart Rate HR Receiver not shown N Side Foot Support Rails CC Bluetooth Connectivity not shown O Walking Belt and Deck DD Media Cab...

Страница 27: ...of goal Distance Time or Calories and the value for it User Placement Display The User Placement Display shows the difference between the User and the Pacer The arrows tell if the User is in front UP...

Страница 28: ...le Setup Mode Speed Enter button Adjusts the speed of the Walking Belt to the selected Pre Set Speed value LCD Display Data 3URJUDP 3UR OH LVSOD The Program Pro le Display shows the course pro le for...

Страница 29: ...nce Lap Count The Distance display shows the distance count miles or km in the workout The Lap Count display shows the total number of Laps completed during the workout During a workout this workout v...

Страница 30: ...artners 86 KDUJLQJ If a USB Device is attached to the USB Port the Port will attempt to charge the Device Note Depending on the amperage of device the power supplied from the USB Port may not be enoug...

Страница 31: ...s must make contact with the sensors for the Console to detect a pulse After the Console detects four stable pulse signals your initial pulse rate will be shown Once the Console has your initial heart...

Страница 32: ...ult your physician for your individual target heart rate zone Note As with all e ercises and tness regimens always use your best judgment when you increase your e ercise time or intensity 4 52 4 2 4 2...

Страница 33: ...ncline of the deck 1 With the tness machine in your workout area inspect the walking belt to make sure it is centered and aligned If necessary refer to the Aligning the Walking Belt Procedure in the M...

Страница 34: ...curve of the front and rear rollers This is a common occurrence and does not indicate a problem with your machine After the treadmill has been used for a short period of time the thumping noise will...

Страница 35: ...P as the Walking Belt gets up to speed 4 To change the Incline or Speed level push the appropriate Increase or Decrease buttons The time will count up from 00 00 Note The ma imum time for a Quick Star...

Страница 36: ...s RQWDFW RXU GRFWRU IRU PRUH LQIRUPDWLRQ DERXW RG 0DVV QGH 0 DQG WKH ZHLJKW WKDW LV DSSURSULDWH IRU RX 8VH WKH YDOXHV FDOFXODWHG RU PHDVXUHG E WKH PDFKLQH V FRPSXWHU IRU UHIHUHQFH SXUSRVHV RQO 7 The C...

Страница 37: ...ion 6 Push OK to make your selection 7 The Console will go to the Power Up Mode screen Changing Incline Levels Push the Incline Level Increase c or Decrease d buttons to change the incline angle of th...

Страница 38: ...VHJPHQW RI WKH ZRUNRXW KDV D FKDQJH LQ QFOLQH RU 6SHHG H SUHSDUHG IRU FKDQJHV LQ QFOLQH DQG 6SHHG ZLWK HDFK VHJPHQW FKDQJH The currently selected Category will be active on the Console with the first...

Страница 39: ...M INC Incline USER DEFINED RUNRXW 3UR OH DQG RDO 3URJUDP The Console lets you select the Pro le Program and type of Goal for your workout Distance Time or Calories and set the Goal value Note For cert...

Страница 40: ...ed Heart Rate Control Workout Programs The Heart Rate Control programs let you set a heart rate goal for your workout The program monitors your heart rate in beats per minute BPM from the Contact Hear...

Страница 41: ...shows the User where they are in relation to the pacer with a time value and an UP arrow in front or DOWN arrow behind the pacer The User Indicator Lights across the top of the Console quickly show th...

Страница 42: ...e heart rate or an estimate of average heart rate if that data is unavailable VO2 Ma is the ma imal o ygen consumption of the aerobic physical tness of the individual and is a determinant of the endur...

Страница 43: ...workouts e cept Quick Start and the Heart Rate Control programs have a 3 minute Cool Down period During this Cool Down period the Console shows the Workout Results The Console will cycle through the w...

Страница 44: ...ht f buttons to force the cycle between the workout results Push the Decrease d button to move to the LAST WORKOUT The Console will display the workout values from the last workout The Console will cy...

Страница 45: ...he Console display shows the UNITS prompt with the current setting Push the Increase Decrease buttons to change between MILES and KM 7 Push OK to set The Console display shows the Sound Settings promp...

Страница 46: ...orkout use a damp cloth to wipe your machine and Console free of moisture LWK WKH DONLQJ HFN ORZHUHG LI DQ HGJH RI WKH DONLQJ HOW FDQ EH VHHQ DGMXVW LW until the edge is not viewable Note Avoid e cess...

Страница 47: ...es unnecessary friction and wears the belt motor and electronics 4 Push PAUSE STOP twice to stop the walking belt and end the Quick Start workout 6mm 6mm OLJQLQJ WKH DONLQJ HOW The walking belt should...

Страница 48: ...achine Place the power cord in a secure location Note Make sure the treadmill is located on a surface that is easy to clean 3 Fold the treadmill Refer to the Moving the Machine procedure in this manua...

Страница 49: ...our machine and start the belt at the slowest speed Let the belt operate for appro imately 15 seconds H VXUH QRW WR WRXFK D PRYLQJ ZDONLQJ EHOW RU VWHS RQ WKH SRZHU FRUG HHS E VWDQGHUV DQG FKLOGUHQ DZ...

Страница 50: ...E Console Cable I O O Remote Speed Control Y Handlebar Shroud Left F Remote Speed Control Wire Upper P Handlebar Shroud Right Z Remote Incline Control G Console Earthing Cable Q Base Shroud Right AA R...

Страница 51: ...ller RR Deck Release Cable EE Fuse LL Walking Deck SS Incline Adjuster FF Power Input MM Base Support TT Pivot Assembly GG Motor Control Board MCB Cover NN Deck Cushioners UU Belt Tensioner HH Motor C...

Страница 52: ...trode cream heart rate cream can help make better conduct These are available on the web or at medical or some larger tness stores If tests reveal no other issues contact your local distributor for fu...

Страница 53: ...efer to the procedures for adjusting tension and aligning the belt in this manual Motor sounds strained Silicone lubrication on walking belt Apply silicone to the inner surface of the walking belt Ref...

Страница 54: ...istance Workout results not post ing from Nautilus Train er to MyFitnessPal Under Armour Connect ed Fitness Sync accounts From the Menu icon on the Nautilus Trainer App select the Sync to MyFitnessPal...

Страница 55: ...55...

Страница 56: ...Nautilus Bow e Schwinn Universal 01207 11011 E EN...

Отзывы: