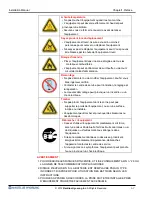
manualshive.com logo in svg
background image


Installation Manual 

MX7600I System 


V01.00.04 (2015.04.12)


© 2012 

Nautilus Hyosung Inc. 

All Rights Reserved. 

Содержание MX7600I

Страница 1: ...Installation Manual MX7600I System V01 00 04 2015 04 12 2012 Nautilus Hyosung Inc All Rights Reserved...

Страница 2: ...enance Space for MX7600I ATM Plan View 1 Modified Anchor 3 V01 00 02 2012 08 27 Added Height and Depth Main Fascia Items Chapter3 4 V01 00 03 2012 10 10 Added Safety Precautions in French Chapter1 5 V...

Страница 3: ...imensions Weight 3 2 ATM Dimensions 3 3 Height and Depth Main Fascia Items 3 5 Fascia Item Locations for Voice Guidance 3 6 Recommended Installation and Service Clearance 3 7 AC Inlet Box 3 10 Termina...

Страница 4: ...ephone numbers provided to you separately What is in This Manual In addition to installation guidelines for the MX7600I this manual includes important warnings you must take into consideration during...

Страница 5: ...dispenser Servicing and maintenance refer to the supervisor operator and technician s tasks performed to keep the ATM operational Screen refers to the text appearing on the customer display Abbreviat...

Страница 6: ...MCU Magnetic Card Unit 30 OPL Operation Panel for Customers to Operate 31 OSD board On Screen Display Board 32 P S Power Supply 33 PIN Personal Identification Number 34 PNC Panel Control Board 35 PRT...

Страница 7: ...sponsible for compliance could void the user s authority to operate the equipment Note This equipment has been tested and found to comply with the limits for a Class A digital device pursuant to part...

Страница 8: ...where the floor cannot sustain the weight of the equipment or on slanted or unstable surface Equipment may fall and cause injury or damage Unplug the Equipment Stop using the equipment immediately if...

Страница 9: ...tain changement ou des modifications dans la construction de ce dispositif qui ne sont pas express ment approuv s par la partie responsable de la conformit pourraient annuler l autorit de l utilisateu...

Страница 10: ...Le mauvais d montage peut provoquer un incendie ou un choc lectrique Tomber Ne pas placer l quipement dont le sol ne peut pas supporter le poids de l quipement ou sur une surface inclin e ou instable...

Страница 11: ...DU BATIMENT AVANT D UTILISER Related Document Related documents are listed as follows If needed please contact the Nautilus Hyosung technical support team or maintenance team for copies Operator Manua...

Страница 12: ...needs The benefits that the new concept MX7600I provides are as follows 1 Removes inconvenience which occurs when bank tellers directly handle cash and checks with customers and relieves workload upo...

Страница 13: ...g Inc All Rights Reserved 2 2 Installation Manual Chapter2 Introduction System Identification Label The System Label below shows the layout of the product identification label which is fixed inside th...

Страница 14: ...3 The floor must allow easy wheelchair access from the front or the side 4 Space required for servicing the machine should be considered before installation Note 1 A canopy is recommended for the conv...

Страница 15: ...er3 Installation Information Packing Dimensions Weight Packaging Dimensions In some cases it may be necessary to store the ATM in its box before it is installed See figure below for information on the...

Страница 16: ...2012 Nautilus Hyosung Inc All Rights Reserved 3 3 Installation Manual Chapter3 Installation Information ATM Dimensions The figure below shows the dimensions of MX7600I ATM viewed from the front...

Страница 17: ...2012 Nautilus Hyosung Inc All Rights Reserved 3 4 Installation Manual Chapter3 Installation Information The figure below shows the dimensions of MX7600I ATM viewed from the side...

Страница 18: ...se of the ATM That satisfies the ADA standard and allows good accessibility and convenience for both of unhandicapped and handicapped people The height and depth of main fascia items Symbol Height Dep...

Страница 19: ...3 6 Installation Manual Chapter3 Installation Information Fascia Item Locations for Voice Guidance Unit MCU CCIM CDU SPR Symbol A B C D Distance 127 6mm 254 5mm 406 1mm 72 2mm From 5 02in 10 01in 15 9...

Страница 20: ...l Chapter3 Installation Information Recommended Installation and Service Clearance The Monimax7600I ATM can be placed on a new or existing concrete island The following diagrams describe the recommend...

Страница 21: ...tilus Hyosung Inc All Rights Reserved 3 8 Installation Manual Chapter3 Installation Information Thefollowing diagram describes the recommended areas required for installing and servicing the MX7600I S...

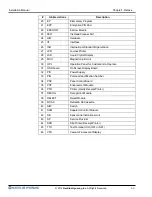
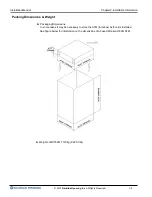
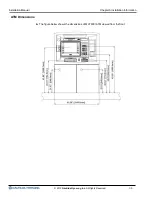
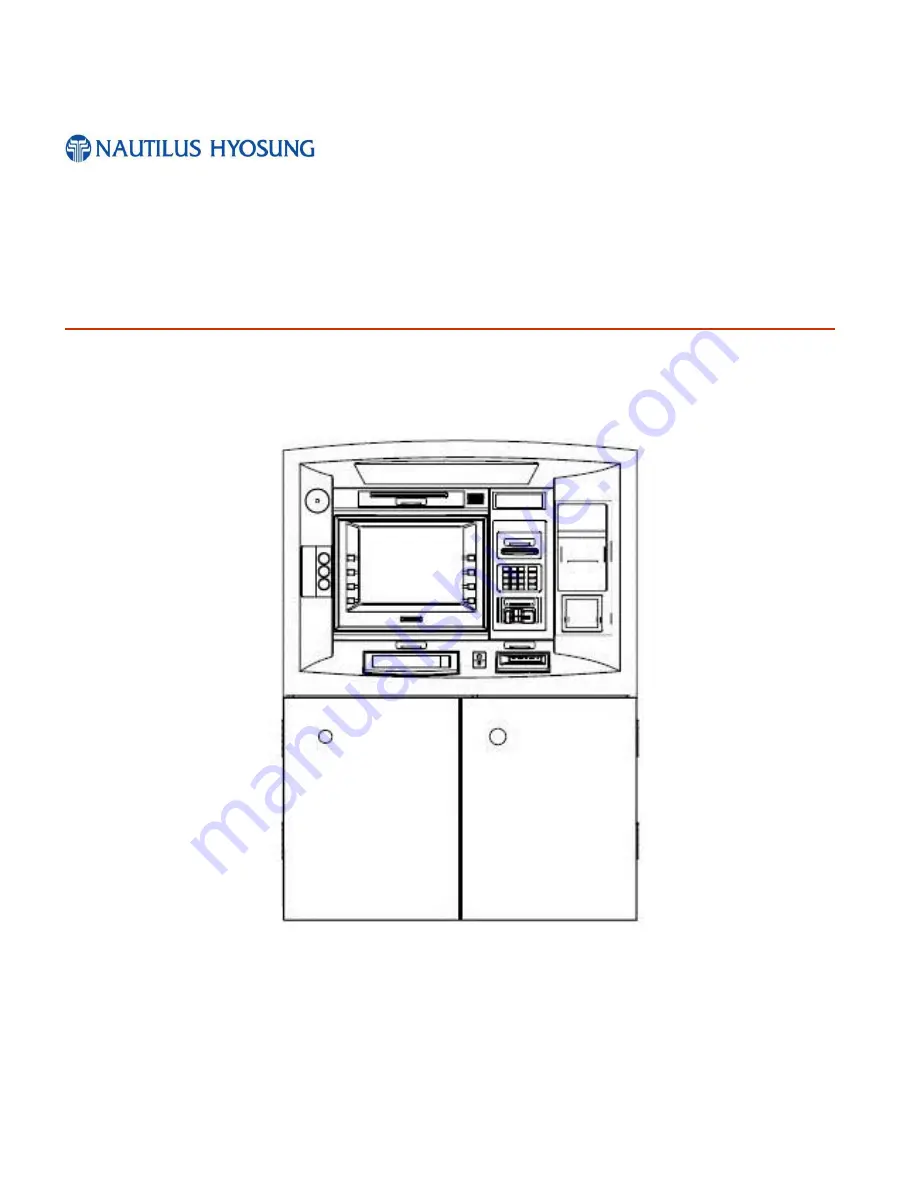
Страница 22: ...2012 Nautilus Hyosung Inc All Rights Reserved 3 9 Installation Manual Chapter3 Installation Information...

Страница 23: ...Inlet of the AC Inlet Box Due to the electrical shock hazard be sure to connect Power code to AC Inlet Box after removing the Power Cable Plug from AC Source NOTE2 Circuit Protector If the over curren...

Страница 24: ...description therefore be sure not to install the unit with exceed capacity additionally 4 The Total amount of each units should not exceed the above AC Inlet Box specification Power Cable The ATM is...

Страница 25: ...2012 Nautilus Hyosung Inc All Rights Reserved 3 12 Installation Manual Chapter3 Installation Information Terminal Block Interface Terminal Block Interface 1...

Страница 26: ...2012 Nautilus Hyosung Inc All Rights Reserved 3 13 Installation Manual Chapter3 Installation Information Terminal Block Interface 2...

Страница 27: ...a safe place to re use or discard of appropriately 4 Verify the contents carefully with the packing list to be sure all items listed are included Notify your distributor of any shortages 5 If only the...

Страница 28: ...ill not tip over when opening the upper lower modules or the door 2 Place the anchor bolt location sheet where the MX7600I is to be installed 3 Drill the correct diameter and depth holes at the locati...

Страница 29: ...ics and so on are completely connected or not It is likely that one of them to be disconnected due to long and unsafe transportation and may cause unexpected problem after the installation Topper Inst...

Страница 30: ...is a topper cover inside the ATM 5 Remove 3 nuts around the topper cover through inside the ATM using nut driver 6 Then remove topper cover and install the topper on the ATM Insert the topper cable in...

Страница 31: ...erved A 3 Installation Manual Appendix ATM Signage Be supposed to paste the decoration label on the light where the bank logo or advertisement is printed Decorate Label where the bank logo or advertis...

Страница 32: ...the Safety Body Removing the Protective Material from the main body of Cash Check In Module Bundle Section 1 Remove the tape from the Bundle Door 2 Lift up the door and remove the Bubble Bag inside Re...

Страница 33: ...r After Moving the location of the Screw A fasten the screw B again 2 Move the location of the Screw C fastened on the Body Section Moving the location of the screw fixing the guide on Escrow Section...

Страница 34: ...th the key and remove the tape from the fixing section of upper Push Plate and 2 points and door 1 point Procedure to remove the protective material from the cassette section RT A6 Cassette Section 1...

Страница 35: ...ed A 7 Installation Manual Appendix Installing Section Installing the Cash Check RT A6 Cassette Section Insert and push the Cash Check RT A6 cassette in body module completely Then it is locked automa...

Страница 36: ...l Rights Reserved A 8 Installation Manual Appendix 1 Pulling the green knob until stopping at the same time rotating right and pulling it completely 2 After opening the green grip insert the ink cartr...

Страница 37: ...ndix 3 And then release the green grip the ink cartridge is locked Before mounting it see the ink cartridge installation guide on the packing bag 4 Push the green knob completely to the left arrow dir...

Страница 38: ...2012 Nautilus Hyosung Inc All Rights Reserved Notes 1 Installation Manual Notes Notes...

Отзывы: