012-16026A
|
1
|
PASCO Wireless Drop Counter PS-3214
www.pasco.com - (800) 772-8700
Software: SPARKvue or PASCO Capstone
Power: Rechargeable Battery
Connection:
or
USB
Connection:
or USB
012-16026A
|
1
|
Software: SPARKvue or PASCO Capstone
Power: Rechargeable Battery
PASCO Wireless Drop Counter PS-3214
www.pasco.com - (800) 772-8700
INITIAL STEP -
Charge it:
On the bottom of the sensor, pry open the
rubber cover to reveal the Micro USB Port. Use the included micro
USB cable to connect the sensor to a USB port or a USB charger (such
as PS-2575). If the cable is connected to a USB
port
, the Battery LED
shines yellow to show that the battery is charging. When the battery
is charged, the Battery LED shines green. If the cable is connected to
a USB
charger
, the Battery LED shines yellow
and
the Bluetooth sta-
tus LED blinks red to indicate that the sensor is ready to connect to a
device (such as a computer or tablet).
1. Make the Connection:
Start the PASCO data collection software.
• For
USB connection to a USB port
: Make sure the USB cable is
connected. In
SPARKvue
: Click or Touch the “Sensor Data” icon in
the Welcome Screen. In
PASCO Capstone
, select ‘Hardware Setup”
and check that the sensor appears in the “Hardware Setup” window.
• For
Bluetooth connection
: If the sensor is not already on, press
the ON button at the top of the sensor to turn it on. (NOTE: The following procedure also works if the sensor is connected to a USB
charger
.) In
SPARKvue
: Touch or Click the Sensor Data icon in the Welcome Screen. In the “Connected Devices” list, select the correct address that matches
the XXX-XXX Device ID number found on the sensor. Select a measurement, and then select a “Template” to open a data display. In
PASCO
Capstone
, select “Hardware Setup” in the “Tools” palette. Select the desired sensor type that matches the Device ID XXX-XXX number on the
sensor. Close the “Hardware Setup” window.
2. Set Up the Sensor:
Arrange the sensor with the included syringe holder, syringe, and drop dispenser so that drops will pass through the Drop
Window into a receptacle below.
3. Collect Data:
In
SPARKvue,
Select the “Start” button. In
PASCO Capstone:
Select a display, set up the measurement in the display, and select
“Record”.
4. Analyze the Data:
Use the PASCO Data Collection software (SPARKvue or Capstone) to interpret the data.
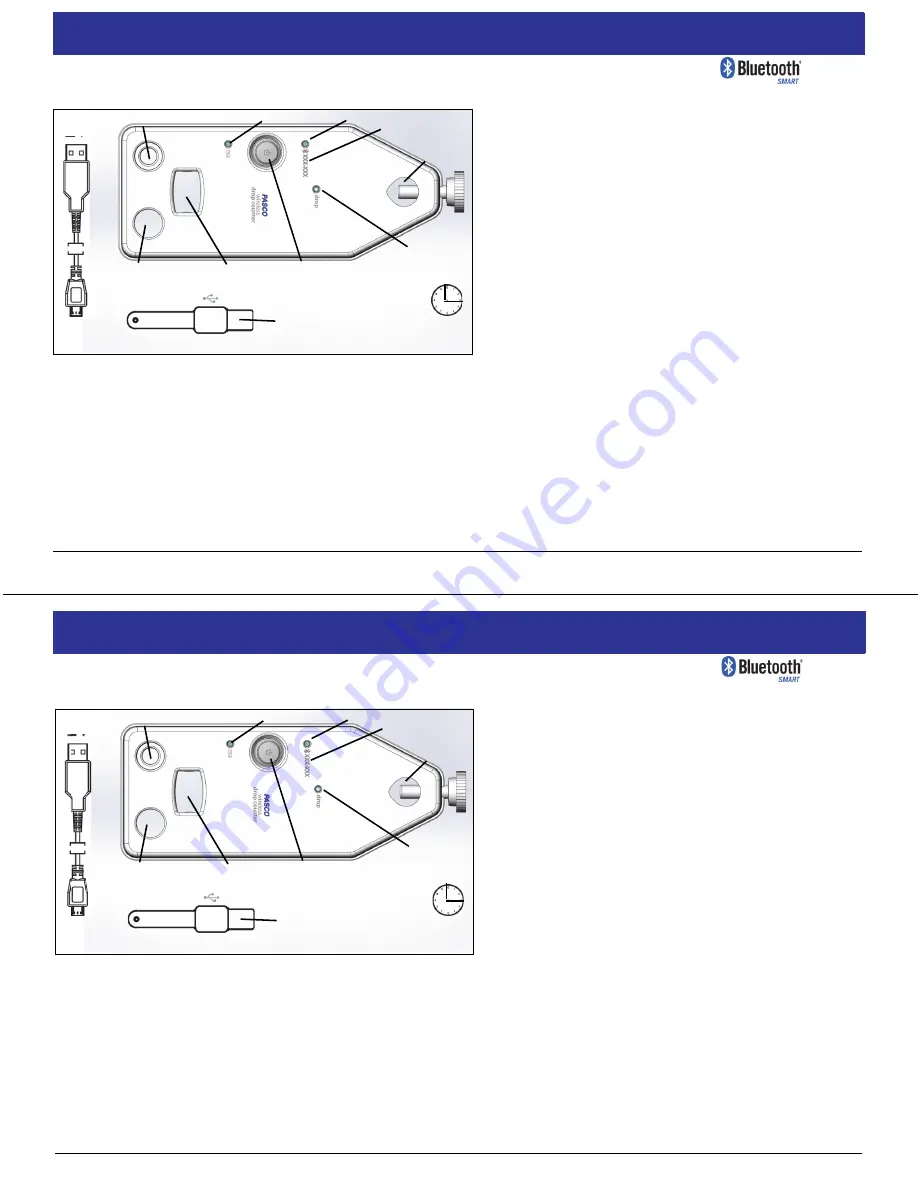
Battery LED
Micro
USB
Cable
Charging Time:
About 3 hours
Top view
For Temperature Sensor
For pH Sensor
Bluetooth LED
Drop Indicator LED
Drop Window
Device ID
For Support
Rod
ON/OFF
USB Port Cover on
the Bottom of the
Sensor
INITIAL STEP -
Charge it:
On the bottom of the sensor, pry open the
rubber cover to reveal the Micro USB Port. Use the included micro
USB cable to connect the sensor to a USB port or a USB charger (such
as PS-2575). If the cable is connected to a USB
port
, the Battery LED
shines yellow to show that the battery is charging. When the battery
is charged, the Battery LED shines green. If the cable is connected to
a USB
charger
, the Battery LED shines yellow
and
the Bluetooth sta-
tus LED blinks red to indicate that the sensor is ready to connect to a
device (such as a computer or tablet).
1. Make the Connection:
Start the PASCO data collection software.
• For
USB connection to a USB port
: Make sure the USB cable is
connected. In
SPARKvue
: Click or Touch the “Sensor Data” icon in
the Welcome Screen. In
PASCO Capstone
, select ‘Hardware Setup”
and check that the sensor appears in the “Hardware Setup” window.
• For
Bluetooth connection
: If the sensor is not already on, press
the ON button at the top of the sensor to turn it on. (NOTE: The following procedure also works if the sensor is connected to a USB
charger
.) In
SPARKvue
: Touch or Click the Sensor Data icon in the Welcome Screen. In the “Connected Devices” list, select the correct address that matches
the XXX-XXX Device ID number found on the sensor. Select a measurement, and then select a “Template” to open a data display. In
PASCO
Capstone
, select “Hardware Setup” in the “Tools” palette. Select the desired sensor type that matches the Device ID XXX-XXX number on the
sensor. Close the “Hardware Setup” window.
2. Set Up the Sensor:
Arrange the sensor with the included syringe holder, syringe, and drop dispenser so that drops will pass through the Drop
Window into a receptacle below.
3. Collect Data:
In
SPARKvue,
Select the “Start” button. In
PASCO Capstone:
Select a display, set up the measurement in the display, and select
“Record”.
4. Analyze the Data:
Use the PASCO Data Collection software (SPARKvue or Capstone) to interpret the data.
Battery LED
Micro
USB
Cable
Charging Time:
About 3 hours
Top view
For Temperature Sensor
For pH Sensor
Bluetooth LED
Drop Indicator LED
Drop Window
Device ID
For Support
Rod
ON/OFF
USB Port Cover on
the Bottom of the
Sensor