


©
National Instruments Corporation
9
SCXI Quick Start Guide
Step 7. Connect Modules to the DAQ Device
1.
Attach the cable adapter, if necessary.
•
If you have several modules in the system, determine which of the
modules occurs first in the following list. Attach the cable adapter
to the rear connector of this SCXI module.
–
SCXI-1520, SCXI-1530, SCXI-1531, SCXI-1540,
SCXI-1581, SCXI-1140
–
SCXI-1102, SCXI-1102/B/C, SCXI-1104/C, SCXI-1112,
SCXI-1125, SCXI-1126, SCXI-1141, SCXI-1142,
SCXI-1143
–
SCXI-1100, SCXI-1120/D, SCXI-1121, SCXI-1122
–
SCXI-1124, SCXI-116
x
•
If you have only one module, attach the cable adapter to the
module.
Use the screws provided to secure the adapter to the chassis.
Caution
Do
not
force the adapter if there is resistance. Forcing the adapter can bend pins.
2.
Connect one end of the cable to the adapter or module and the other
end to the DAQ device. Notice which SCXI module is connected to the
DAQ device; you will use this information in a later step.
Step 8. Power on the SCXI Chassis
The chassis power switch is shown in step 3.
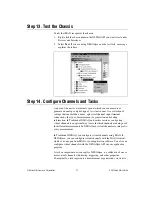
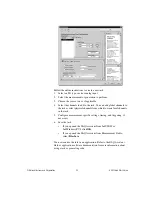
Step 9. Launch Measurement & Automation Explorer (MAX)
Double-click the
Measurement & Automation Explorer
icon on the
desktop to launch MAX.
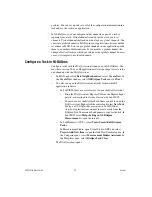
Note
Refer to the Hardware Installation Wizard at
ni.com/support/install
for
SCXI configuration instructions with RT Series products. Select
Hardware
Configuration
and click
Real-Time Configuration Wizard
.