


SCXI Quick Start Guide
10
ni.com
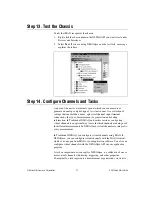
Step 10. Add the SCXI Chassis
1.
Right-click
Devices and Interfaces
and select
Create New
.
2.
Select the SCXI chassis from the Create New window.
If you are using more than one NI-DAQ API to control an SCXI
chassis in your application, add the chassis in each NI-DAQ API you
are using.
•
If you are using Traditional NI-DAQ, select the chassis under
Traditional NI-DAQ Device
.
•
If you are using NI-DAQmx, select the chassis under
NI-DAQmx
Device»NI-DAQmx SCXI Chassis
.
When a device is supported by both Traditional NI-DAQ and
NI-DAQmx and both are installed, the same device is listed with a
different name under the Traditional NI-DAQ and NI-DAQmx folders
in Devices and Interfaces.
Note
For more information about the Traditional NI-DAQ and NI-DAQmx Application
Programming Interfaces (APIs), refer to the
DAQ Quick Start Guide for NI-DAQ 7.0
.
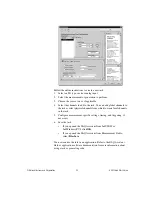
3.
Click
Finish
when you are done. A configuration window appears.
Refer to
Step 11. Configure the Chassis
for more information.
If your device does not automatically appear, press <F5> to refresh the
view in MAX. If the device is still not recognized, refer to
ni.com/support/install
for troubleshooting information.
If you are using Traditional NI-DAQ, there is an alternative way to add an
SCXI chassis. Right-click
Devices & Interfaces»Traditional NI-DAQ
Devices
and select
Add SCXI Chassis
.
If you are using NI-DAQmx, there is an alternative way to add an SCXI
chassis. Right-click
Devices & Interfaces»NI-DAQmx Devices
and select
Create New NI-DAQmx Device
. Select
NI-DAQmx SCXI Chassis
and
choose the chassis.