background image

Safety Guidelines for Hazardous Locations

The chassis is suitable for use in Class I, Division 2, Groups A, B, C, D, T4 hazardous
locations; Class I, Zone 2, AEx nA IIC T4 and Ex nA IIC T4 hazardous locations; and
nonhazardous locations only. Follow these guidelines if you are installing the chassis in a
potentially explosive environment. Not following these guidelines may result in serious injury
or death.

Caution


Do not disconnect I/O-side wires or connectors unless power has been

switched off or the area is known to be nonhazardous.

Caution


Do not remove modules unless power has been switched off or the area is

known to be nonhazardous.

Caution


Substitution of components may impair suitability for Class I, Division 2.

Caution


For Division 2 and Zone 2 applications, install the system in an enclosure

rated to at least IP54 as defined by IEC/EN 60079-15.

Special Conditions for Hazardous Locations Use in Europe and
Internationally

The chassis has been evaluated as Ex nA IIC T4 Gc equipment under DEMKO 07
ATEX 0626664X and is IECEx UL 14.0089X certified. Each device is marked   II 3G and is
suitable for use in Zone 2 hazardous locations, in ambient temperatures of -40 °C ≤ Ta ≤
70 °C.

Caution


You must make sure that transient disturbances do not exceed 140% of

the rated voltage.

Caution


The system shall only be used in an area of not more than Pollution

Degree 2, as defined in IEC/EN 60664-1.

Caution


The system shall be mounted in an ATEX/IECEx-certified enclosure with

a minimum ingress protection rating of at least IP54 as defined in IEC/EN 60079-15.

Caution


The enclosure must have a door or cover accessible only by the use of a

tool.

Electromagnetic Compatibility Guidelines

This product was tested and complies with the regulatory requirements and limits for
electromagnetic compatibility (EMC) stated in the product specifications. These requirements
and limits provide reasonable protection against harmful interference when the product is
operated in the intended operational electromagnetic environment.

2

  | 

ni.com

  | 

NI cRIO-9111/9112/9113/9114/9116/9118

Содержание NI cRIO-9111

Страница 1: ...is cRIO 9111 9113 This document describes how to install an NI cRIO 9111 cRIO 9112 cRIO 9113 cRIO 9114 cRIO 9116 or cRIO 9118 In this document the NI cRIO 9111 cRIO 9112 cRIO 9113 cRIO 9114 cRIO 9116...

Страница 2: ...lly The chassis has been evaluated as Ex nA IIC T4 Gc equipment under DEMKO 07 ATEX 0626664X and is IECEx UL 14 0089X certified Each device is marked II 3G and is suitable for use in Zone 2 hazardous...

Страница 3: ...n and search for the LR certificate or look for the Lloyd s Register mark on the product Caution In order to meet the EMC requirements for marine applications install the product in a shielded enclosu...

Страница 4: ...learn the basics of LabVIEW software LabVIEW Help access information about LabVIEW programming concepts step by step instructions for using LabVIEW and reference information about LabVIEW VIs functio...

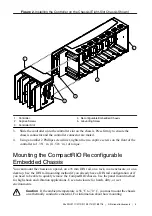
Страница 5: ...5 lb in of torque Mounting the CompactRIO Reconfigurable Embedded Chassis You can mount the chassis on a panel on a 35 mm DIN rail on a rack in an enclosure or on a desktop Use the DIN rail mounting m...

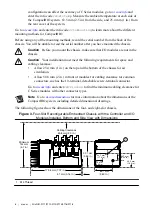
Страница 6: ...Allow 25 4 mm 1 in on the top and the bottom of the chassis for air circulation Allow 50 8 mm 2 in in front of modules for cabling clearance for common connectors such as the 10 terminal detachable s...

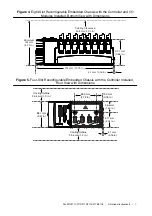
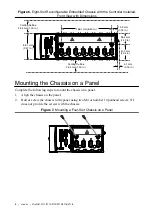
Страница 7: ...0 in 93 1 mm 3 66 in 274 mm 10 79 in 4 1 mm 0 16 in Figure 5 Four Slot Reconfigurable Embedded Chassis with the Controller Installed Front View with Dimensions Cooling Outline 25 4 mm 1 0 in Cooling O...

Страница 8: ...m 1 43 in 19 0 mm 0 75 in 88 1 mm 3 47 in 165 1 mm 6 50 in Mounting the Chassis on a Panel Complete the following steps to mount the chassis on a panel 1 Align the chassis on the panel 2 Bolt or screw...

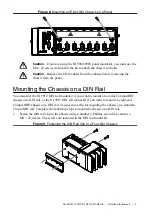
Страница 9: ...want to mount a four slot CompactRIO chassis on a DIN rail or the NI 9915 DIN rail mount kit if you want to mount an eight slot CompactRIO chassis on a DIN rail You need one clip for mounting the cha...

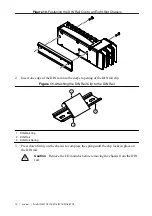
Страница 10: ...lip Figure 11 Attaching the DIN Rail Clip to the DIN Rail 3 2 1 1 DIN Rail Clip 2 DIN Rail 3 DIN Rail Spring 3 Press down firmly on the chassis to compress the spring until the clip locks in place on...

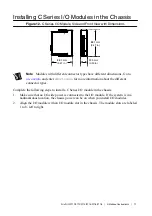
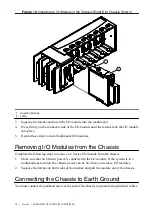
Страница 11: ...r more information about the different connector types Complete the following steps to install a C Series I O module in the chassis 1 Make sure that no I O side power is connected to the I O module If...

Страница 12: ...I O Modules from the Chassis Complete the following steps to remove a C Series I O module from the chassis 1 Make sure that no I O side power is connected to the I O module If the system is in a nonh...

Страница 13: ...ory to the FPGA when the controller powers on Autoload VI on device reboot Loads the FPGA bit stream from flash memory to the FPGA when you reboot the controller either with or without cycling power R...

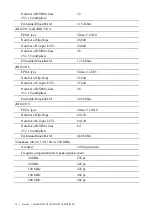
Страница 14: ...lops 51 840 Number of 6 input LUTs 51 840 Number of DSP48 slices 25 x 18 multipliers 48 Embedded block RAM 3 456 kbits cRIO 9118 FPGA type Virtex 5 LX110 Number of flip flops 69 120 Number of 6 input...

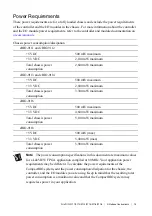
Страница 15: ...00 mW maximum cRIO 9116 5 VDC 500 mW maximum 3 3 VDC 4 600 mW maximum Total chassis power consumption 5 100 mW maximum cRIO 9118 5 VDC 500 mW max 3 3 VDC 5 400 mW max Total chassis power consumption 5...

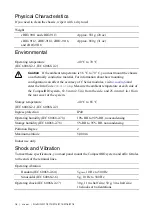
Страница 16: ...of the CompactRIO system 63 5 mm 2 5 in from the side and 25 4 mm 1 in from the rear cover of the system Storage temperature IEC 60068 2 1 IEC 60068 2 2 40 C to 85 C Ingress protection IP40 Operating...

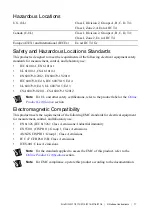
Страница 17: ...0 2011 CSA 60079 15 2012 Note For UL and other safety certifications refer to the product label or the Online Product Certification section Electromagnetic Compatibility This product meets the requir...

Страница 18: ...Our Environmental Impact web page at ni com environment This page contains the environmental regulations and directives with which NI complies as well as other environmental information not included...

Страница 19: ...ation If your product supports calibration you can obtain the calibration certificate for your product at ni com calibration NI corporate headquarters is located at 11500 North Mopac Expressway Austin...

Страница 20: ...arty legal notices in the readme file for your NI product Refer to the Export Compliance Information at ni com legal export compliance for the NI global trade compliance policy and how to obtain relev...

Отзывы: