8
|
ni.com
|
Getting Started with NI SMD-7620/7621 and NI 73xx
Step 1: Connect and Configure the UMI-7772/7774
Complete the following steps to connect and configure the UMI-7772/7774.
Tip
For more information about connecting external power, encoders, and other
motion I/O signals to the UMI-7772/7774, refer to the
National Instruments
Universal Motion Interface (UMI)-7772/7774 User Manual and Specifications
.
1.
Connect the SHC68-C68-S 68-pin shielded cable between the Motion I/O connector on the
NI 73xx motion controller and the Motion I/O connector on the UMI-7772/7774.
2.
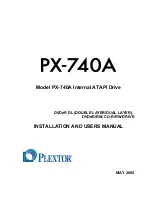
Configure the UMI-7772/7774 DIP switches. You must set the UMI-7772/7774 switches to
the following settings to match the polarity configuration for the NI SMD-7620/7621:
•
Fault—Active High
•
Enable—Active High
The UMI-7772/7774 DIP switch configuration is shown in Figure 2.
Figure 2.
UMI-7772/7774 Fault and Ena
b
le DIP Switch Settings
Note
Configuring the limit and home status LEDs on the UMI-7772/7774 does not
configure the limit and home inputs themselves as active-high or active-low. You
must configure the limit and home inputs separately on the National Instruments
motion controller using MAX or the NI-Motion driver software. This DIP switch
does not need to be configured when the UMI-7772/7774 is used with the
NI SMD-7620/7621 stepper drives.
18
19
20
21
22
2
3
24
25
17
16
15
14
1
6
7
8
9
10
11
12
1
3
5
4
3
2
AXIS 1
DISABLED
FAULT
FWD
HOME
REV
ACTIVE
LOW
ACTIVE
HIGH
LIMIT LED
FAULT
ENABLE
CONTROL
FEEDBACK
1
2
3
4
5
6
7
8
9
10
11
12
1
3
14
15