background image

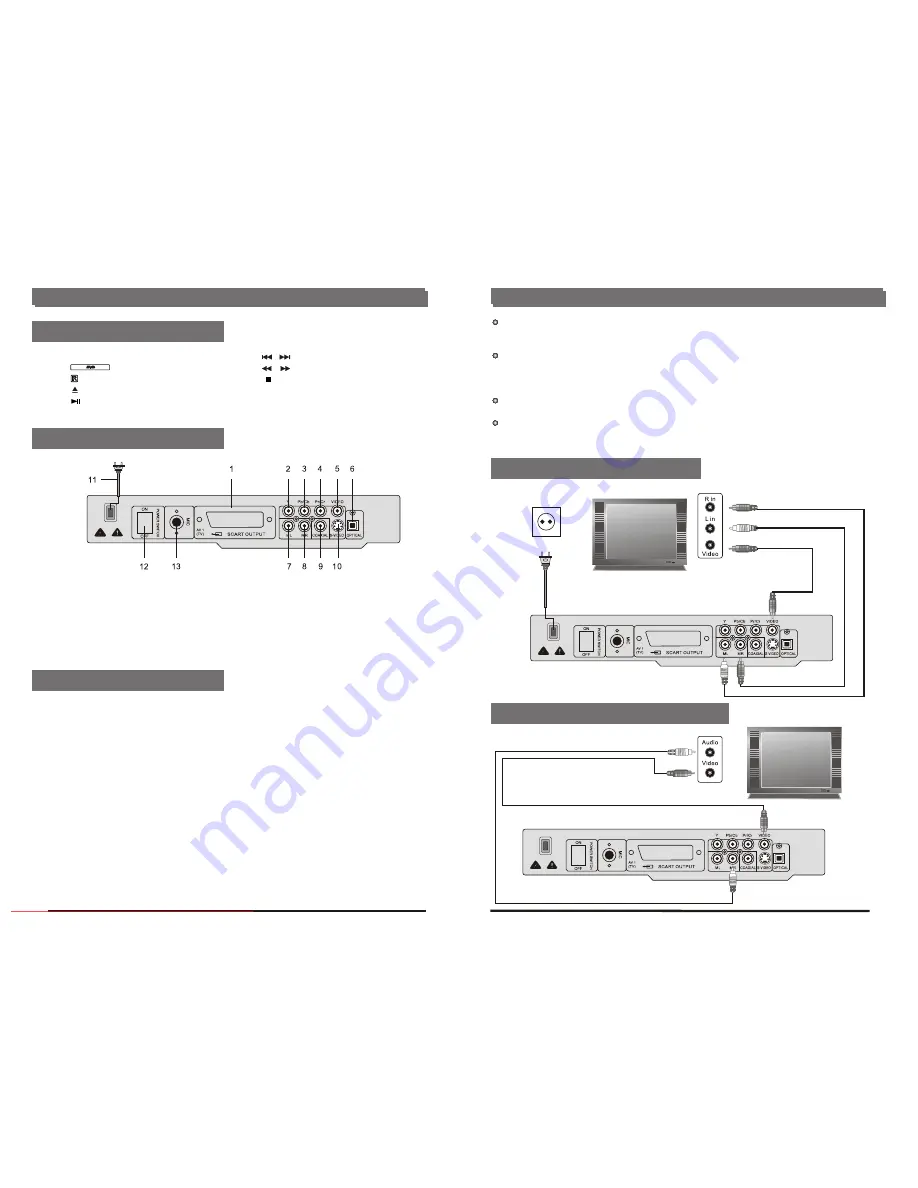
Connecting to a monaural TV set

Red or white

yellow

yellow

To video input connector (yellow)
To audio input connectors(red or white)

Video cable

Audio cable

Red or white to ML or MR

TV set

To power
outlet

Basic connection

Control reference guide

1. POWER: Power on/off
2.                  :Disc tray
3.     : Receiver window
4.      : Open/Close key
5.      : Play/Pause key

6.               : Previous/Next key
7.               : Fast backward/Fast forward
8.        : Stop play key
9. L/R : Select the mono or stereo when 
       playing SVCD / VCD

1.  
2.  Component Video (Y) Output
3.  Component Video (Pb/Cb) Output
4.  Component Video (Pr/Cr) Output
5.  Composite Video Output
6.  Digital Optical Audio Output

SCART Output 

7.  Left Audio Output

7

6

It is recommended to connect a multi-system TV.
Ensure that this player and other equipment to be connected are set to the standby mode or 
off and disconnect the AC power cords before commencing connection.
Do not block ventilation holes of any of the equipment and arrange them so that air can 
circulate freely. Read through the instructions before connecting other equipment.
Ensure that you observe the color coding when connecting audio and video cables.

Note:

During DVD play, the TV volume may be at a lower level than during TV broadcasts, etc. lf this 
is the case, adjust the volume to the desired level.
If the DVD/VCD/CD Player is connected to the TV through a video cassette recorder, the 
picture may not be played back normally with some DVDs. lf this is the case, do not connect 
the player via the VCR.

FRONT PANEL:

REAR PANEL:

Connecting to a stereo TV set

8.   Right Audio Output
9.   Digital Coaxial Output
10. S-Video Output
11.  Power cord
12.  
13.  


POWER: Power on/off
Microphone input jack

Before playing KARAOK song, please carries on the following preparatory work first:

1.  Make sure output audio Signal with ML/MR or FR/FL ports.
2.  Press 

SETUP

 button in remote control and enter the system, press the button to choose 


AUDIO SETUP \ Karaoke Setup

 item, setting 

MIC Setup

 into 

ON

, setting  

MIC VOL

 in 2-15 

     scope. (This machine has tacitly approved in appropriate position)
3.  Insert MIC plug into inlets of MIC 1/MIC 2 in the front panel, turn on the MIC switch.
4.  Put Karaoke Disc into the CD-tray
5.  Choose the Songs to play
6.  Press 

R/L

 button in the remote control to delete the original singer's voice.

7.  Turn 

MIC VOL

 to control the MIC's volume

8.  Press the button ECHO+/- in the remote control to control echo, Press the button VOL+/- in the 
     remote the control to adjustment sound accompaniment and singing sound volume proportion.

Attention:  When has the grating sound, please test the following solution:

     1)  Avoids MIC to be near the television or the speaker 
     2)  Lower the television or amplifier' s volume.
     3)  Lower MIC's volume

KARAOKE FUNCTION

white

red

yellow

To video input connector (yellow)
To audio input connectors(red,white)

A

u

d

io

 c

a

b

le

Video cable

white

red

yellow

AC power
cord

TV set

Downloaded From DvDPlayer-Manual.com Nash Manuals

Содержание DIVX-251DSS

Страница 1: ...DIVX 251DSS D I V X D I V X DVD PLAYER Downloaded From DvDPlayer Manual com Nash Manuals ...

Страница 2: ...odak Picture CD JPEG CD 14 Play mode 14 Skip to next previous picture 14 Enjoying Video CDs with playback control 15 ON Screen display information 15 Advanced Operation Initial Settings For Reference Repeat play 16 Repeat viewing listening 16 A B repeat play 16 Changing subtitle language DVD only 17 Changing subtitle language DVD VCD disc 17 Viewing from different angle DVD only 17 General setup 1...

Страница 3: ...e DISPLAY button on the remote control unit information on the player and disc can be displayed on the TV screen for easy identification The player s operations and settings can easily be performed by operating the remote control while monitoring the TV screen MULTI AUDIO FUNCTION The audio soundtrack can be heard in up to 8 languages The number of audio sound languages depends on the software MUL...

Страница 4: ... CLOESE open or close disc tray 33 STOP stop play 34 TIME press TIME type in the desired starting time of and press ENTER Number keys 0 9 10 10 0 PROG arrange program VCD ZOOM zoom in or out the current picture DISPLAY time indication title indication chapter indication RETURN return to disc menu playback VCD SETUP menu setup DIRECTION KEY cursor direction ECHO increase echo decrease echo TITLE ti...

Страница 5: ... picture may not be played back normally with some DVDs lf this is the case do not connect the player via the VCR FRONT PANEL REAR PANEL Connecting to a stereo TV set 8 Right Audio Output 9 Digital Coaxial Output 10 S Video Output 11 Power cord 12 13 POWER Power on off Microphone input jack Before playing KARAOK song please carries on the following preparatory work first 1 Make sure output audio S...

Страница 6: ...r details SCART Output Connect the special scart cable to scart output on the unit and scart input on TV TV SCART input L R SR SW SL C Connecting to a decoder with Dolby Digital AC 3 DTS Processing TV set Video audio cable S video cable or video cable Coaxial digital audio cable or Optical digital audio cable To optical digital audio input connector To coaxial digital audio input connector Decoder...

Страница 7: ...e the amplifier power on the speakers may be damaged The output sound of the DVD video player has a wide dynamic range Be sure to adjust the receiver s volume to a moderate listening level Otherwise the speakers may be damaged by a sudden high volume sound Before enjoying MPEG4 DVD Video CD CD BASIC PLAY Preparations Basic play The On Screen menu language of your player has been factory pre set to...

Страница 8: ...a motion or motionless picture Press ZOOM button when playing the screen shows 13 12 SIOW MOTION PLAY DVD VCD 1 1 1 4 MPEG4 MP3 PLAYBACK Basic play Play mode On the remote control unit Press SLOW button during playback Plays the disc at a 1 1 of normal speed at first Each time The button is pressed the play speed becomes slow at 1 1 1 2 1 3 1 4times Press PLAY button normal play will resume 1 Inse...

Страница 9: ...kip to the previous picture Note lf no key is pressed for 5 seconds if will skip to next picture automatically 15 14 Enjoying video CDs with playback control After a few seconds a menu will appear on the screen ON Screen display information TITLE ELAPSED TT 02 03 CH 07 28 0 19 20 TITLE REMAIN TT 02 03 CH 07 28 1 17 00 CHAPTER ELAPSED TT 02 03 CH 07 28 0 01 53 CHAPTER REMAIN TT 02 03 CH 07 28 0 01 ...

Страница 10: ...display the current language 2 Press SUBTITLE button again to change language or turn off NOTE When no subtitles are recorded press this button will not work It is possible to change the audio soundtrack language to a different language from the one selected at the initial settings This operation works only with discs on which multiple audio soundtrack languages are recorded Press AUDIO button dur...

Страница 11: ...put all signals without any limit 2 1 Speaker Setup it is used to set the speaker outputs levels Downmix mode Options Lt Rt Left Right mix mode General Dolby Video Preference Audio Audio SetupPage Speaker Setup Spdif Setup Karaoke Setup Go to Audiosetup page General Audio Video Preference Dolby Dolby Digital Setup Dual Mono Dynamic Go to Dolby digital setup page General Audio Dolby Preference Vide...

Страница 12: ...s A title is sub divided into many sections each of which is numbered and specific parts of video presentations can be searched quickly using these numbers DVD This refers to a high density optical disc on which high quality pictures and sound have been obtained by means of digital signals incorporation a new video compression technology MPEG II and high density recording technology DVD enables es...

Страница 13: ...rostatic prevention products as well as sloutions which contain benzene thinner or any other vaporizing substances as they may damage the disc surface Storage of disc Do not keep the disc in the direct sunlight near the heat source in the dusty places or moisture kitchen bathroom Keep the disc vertically in the disc storage case Heavy objects on the disc case will cause deformation to the disc Cop...

Страница 14: ... is pressed Play starts but then stops immediately The player is automatically set to the standby mode after approx 30minutes in the stop mode auto power off fun ction turn the power on again Condensation has formed wait about l to 2 hours to allow the player to dry out This player cannot play a disc other than DVD Video CD SVCD and CD The disc may be dirty and may require cleaning Ensure that the...

Страница 15: ...tive audio soundtrack or subtitle languages fail to be selected An alternative language is not selected with discs which do not contain more than one language In the case of some discs the alternative language cannot be selected by operating the AUDIO or SUB TITLE button Try selecting it from the DVD menu if one is available Angle cannot be changed This function is dependent on software availabili...

Отзывы: