


5
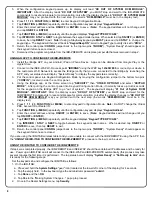
RESET
WAN
4 3 2 1
POWE
WAN
4 3 2 1
12V/1A
CUSTOMER'S
BROADBAND
CONNECTION
(MODEM OR
NETWORK)
WAN
(INTERNET)
(CUSTOMER'S
PC AND OTHER
DEVICES)
CUSTOMER'S
ROUTER
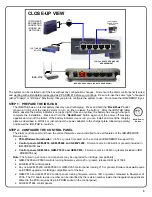
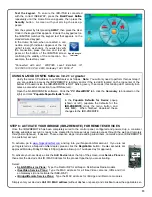
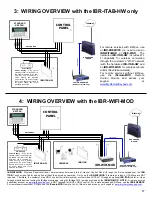
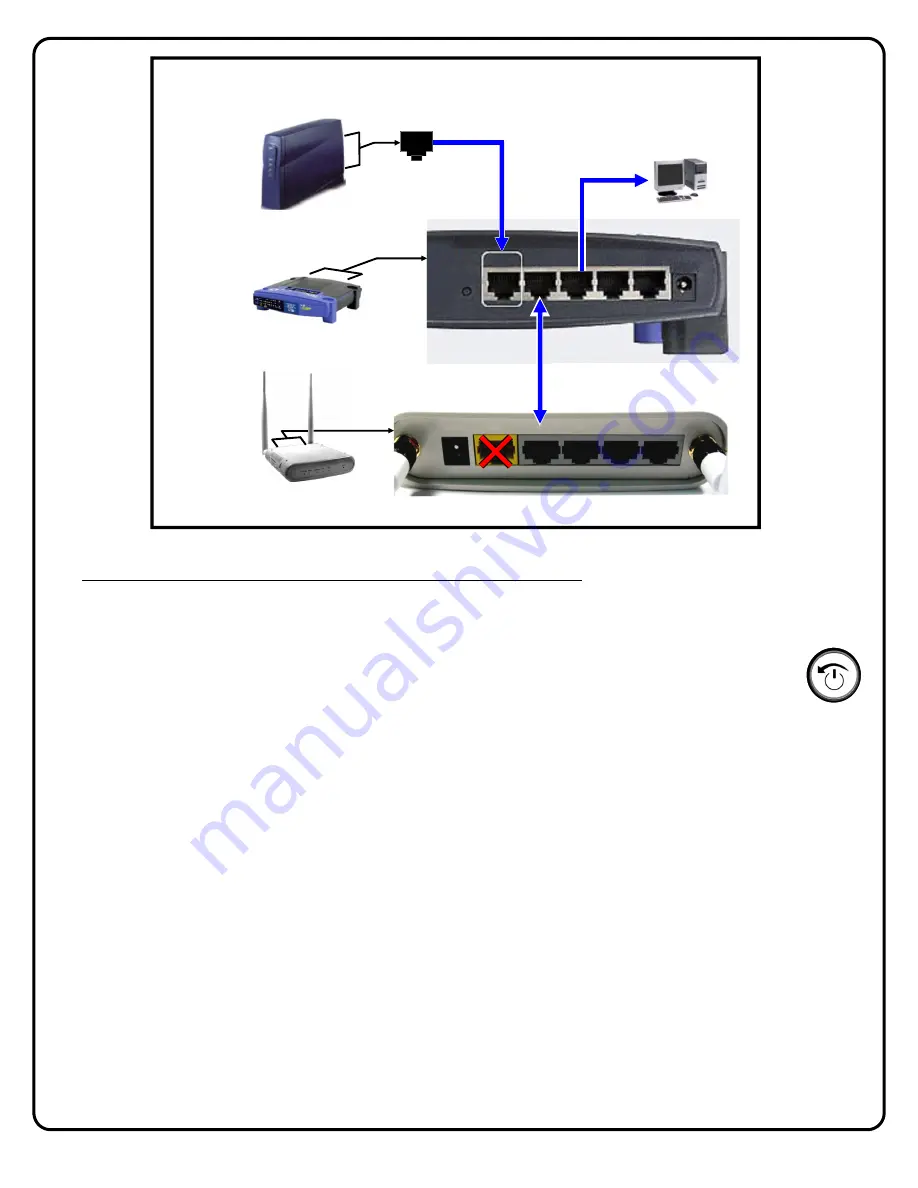
ISEE-WAP
ISEE-WAP REAR PORTS (DO NOT USE WAN PORT)
TYPICAL ROUTER REAR PORT
ARRANGEMENT
CLOSE-UP VIEW
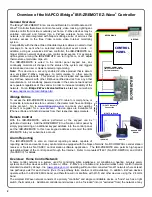
The system can be installed out of the box without any configuration changes. First ensure the alarm control panel is wired
and working with a standard wired keypad as KP ADDR #1 before you continue. Be sure to use the same "type" of keypad
(either "Classic" or "K Series" Stay/Away) that you plan to configure the system to use. Do not wire the IBR-ZREMOTE yet.
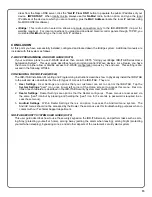
STEP 1: PREPARE THE IBR-ITAB
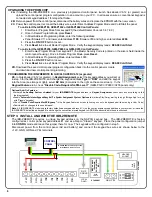
The IBR-ITAB has an internal battery that may need recharging. Press and hold the "
Back/Power
" button
(shown at right) until the display starts to turn on (then release the button). After the IBR-ITAB tablet
starts, observe the battery indicator icon (upper right); if green or yellow, the battery has enough charge to
complete the installation. Press and hold the "
Back/Power
" button again until the power off message
appears and turn off the tablet. If the battery indicator icon is red, you can install and mount the charging
plate as described in WI1944 or just connect the power adapter to the charger plate (observing polarity)
and power the IBR-ITAB to continue.
STEP 2: CONFIGURE THE CONTROL PANEL
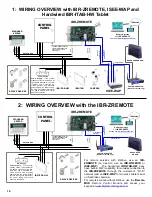
The alarm control panel must have the correct firmware version installed to use all features of the IBR-ZREMOTE.
Required are:
PCD-Windows Quickloader:
V6.12 or greater (located on the enclosed IBR-ZREMOTE support CD)
Control panels GEM-X255, GEM-P9600 and GEM-P3200:
Firmware version 60A22-4 or greater (included in
IBR-ZREMOTE box)
Control panels GEM-1664, GEM-P1632 and GEM-P816:
Firmware version 30R-9 or greater (included in IBR
-ZREMOTE box)
Note:
The following version control panels may be upgraded for iBridge compatibility:
GEM-P3200 and P9600 controls running firmware version 20 or greater, released in May of 1999
All GEM-X255 control panels
Any new GEM-P3200, GEM-P9600 or GEM-X255 control panel running V70 or greater firmware does
not
require
an EPROM upgrade, it is iBridge compatible out of the box.
GEM-P816 and GEM-P1632 control panels running firmware version 10D or greater, released in November of
2005. The PC board revision number can be identified by the revision number inside the triangular shaped sticker
affixed to the PCB (requires 32 pin EPROM socket in the control panel)
All GEM-P1664 control panels
Back / Power
Button
Содержание iBridge Suite
Страница 18: ...18 NOTES...


