


19
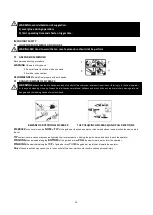
Fig. 2A
Fig. 2B
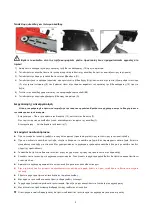
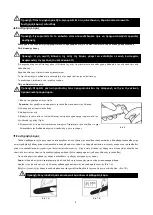
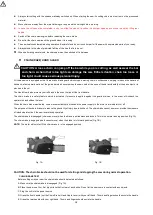
F. Depress the LOCK/OFF button with your right thumb. Squeeze the trigger with your index finger.
G. While the motor is running; activate the chain brake by rolling your left hand forward against the lever.
H. Chain and motor should stop abruptly.
WARNING: If the chain and motor fail to stop
when the chain brake is engaged, take the
saw to the
nearest professional Service Center. Do not use the saw if the chain brake is not in proper working
order.
GENERAL CUTTING INSTRUCTION
S
•
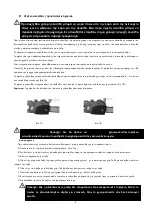
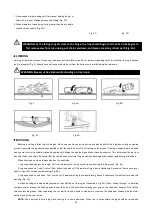
FELLING
Felling is the term for cutting down a tree. Small trees up to 15-18cm in diameter are usually cut in a single cut. Larger trees require notch
cuts. Notch cuts determine the direction the tree will fall.
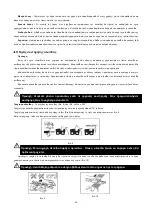
FELLING A TREE:
WARNING: A retreat path (A) should be planned and cleared as necessary before cuts are started.
The retreat path should extend back and diagonally to the rear of the expected
line of fall, as
illustrated in Fig. 2.
WARNING: If felling a tree on sloping ground,
the chain
saw operator should keep on the uphill side
of the terrain,
as the tree is likely to roll or slide downhill after it is felled.
NOTE:
Direction of fall (B) is controlled by the notching cut. Before any cuts
are made, consider the location of larger branches andnatural lean of the
tree to determine the way the tree will fall.
WARNING: Do not cut down a tree during high or changing winds or if there is a danger to properly.
Consult a tree professional. Do not cut down a tree if there is a danger of striking utility wires; notify the
utility company before making any cuts.
•
GENERAL GUIDELINES FOR FELLING TREES
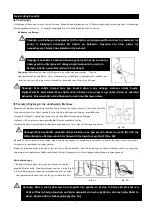
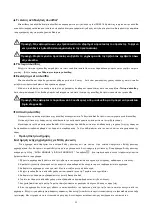
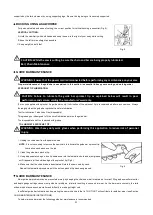
Normally felling consists of 2 main cutting operations, notching (C) and making the felling cut (D).
Start making the upper notch cut (C) on the side of the tree facing the felling direction (E).
Be sure you don’t make the lower cut too deep into the trunk.
The notch (C) should be deep enough to create a hinge (F) of sufficient width and strength.
The notch should be wide enough to direct the fall of the tree for as long as possible.
WARNING: Never walk in front of a tree that has been notched. Make the felling cut (D) from the other
side of the tree and 3-5cm above the edge of the notch (C) (Fig. 2B)
.
Never saw completely through the trunk. Always leave a hinge. The hinge guides the tree. If the trunk is completely cut through, control
over the felling direction is lost.
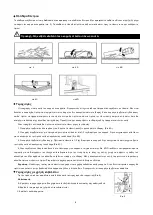
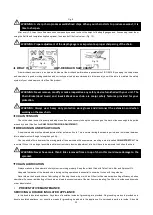
Insert a wedge or felling lever in the cut well before the tree becomes unstable and starts to move. This will prevent the guide bar from
binding in the felling cut if you have misjudged the falling direction. Make sure no bystanders have entered the range of the falling tree
before you push it over.
FELLING CUT:
Содержание EC2040
Страница 1: ...Ec2040 Owner s manual Art Nr 013440 WWW NAKAYAMATOOLS COM...
Страница 2: ...1 1 2 3 4 5 6 7 8 9 10 1 2 3 4 5 6 7 8 9 10 1 a b c 2 a b c d e f...
Страница 3: ...2 3 a a b c Off d e f g 4 a b c d e f g 5 a...
Страница 4: ...3 1 2...
Страница 5: ...4 1 2 3 4 EC2040 1 2 10 3 11 4 12 5 13 6 14 7 15 8 9 Sprocket Cover...
Страница 6: ...5 1 10 2 3 G 4 G H F 10 5 B4 6 G 13 7 1 7...
Страница 7: ...6 1A 1B A 1A B C D E F G H 1A 1B...
Страница 8: ...7 Fig 2B 2C 2D S 15 18cm A 2 g 2 B C D C E C F D 3 5cm C 2B 1 G H Fig 2C 2 Fig 2D 2A...
Страница 9: ...8 3 4C A 3 1 4A 2 1 3 4B 3 1 3 4C 4 4D 5 A B C 4A 4B 4D 5...
Страница 10: ...9 7A 7B 1 2 3 Fig 6 4 8 7A 7B 6...
Страница 11: ...10 8 5 8 3 8 LoPro x 050 3 16 4 8mm 9 8 3 4 10 9 10...
Страница 12: ...11 ISO 9518 5 3 1 2 3 4 5 6 7 8...


