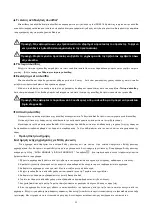


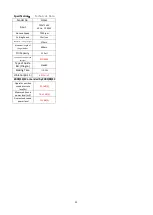

17
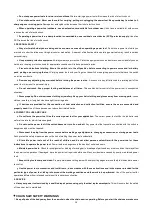
Chain saw Installation and chain tensioning.
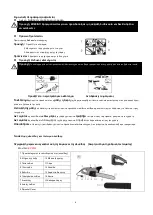
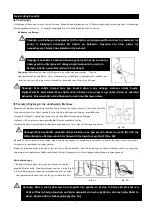
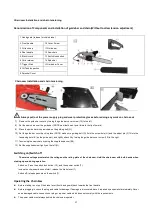
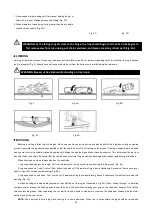
Denomination of Components and Installation of guide bar and chain(Without toolless tension adjustment)
Chain saw Installation and chain tensioning.
Always pull out the power supply plug and wear protective gloves before doing any work on chain saw!
7)
Remove the guide bar cover by turning the guide bar cover screw (10) to the left.
8)
Set the saw chain over the guide bar (NOTE: saw teeth must point forward the tip of sword)
9)
Place the guide bar with saw chain on the guiding bolt (G).
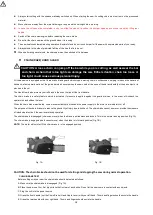
10) Set the guide bar cover back in place (NOTE: make sure guiding bolt (G) fix in the screw hole (H) and the adjust pin (F) fit into the
tensioning hole (E) on the guide bar.), and lightly attach it by turning the guide bar cover screw (10) to the right.
11) Tensioning the saw chain by using the supplied spanner (B4).
12) Set the supplied screw tightly on the left (G).
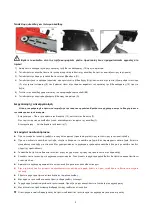
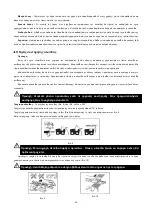
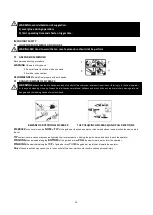
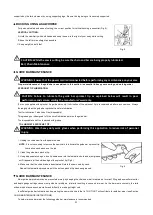
Switching on/Switch off
The mains voltage must match the voltage on the rating plate of the chain saw. Hold the chain saw with both hands when
starting up and during operation.
Switch on- Press the switch lock button (13), and then power switch (7).
In case the chain saw does not start, release the brake lever (1).
Switch off- release pressure on the switch (7).
Operating the Chain Saw
Before starting to cut, pull the brake lever (front hand guard) back towards the front handle.
Before plugging in, check the plug and cable for damage. If damage is discovered, have it repaired by a specialist immediately. Never
use a damaged cable, connection or plug or a power cable which does not comply with the requirements.
The power cable must always behind the chain saw operator.
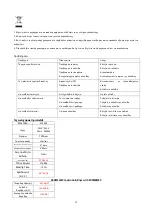
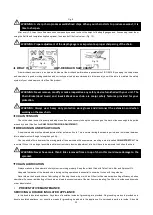
1 Hand guard (release for chain brake)
2 Front handle
10 Cover Screw
3 Oil tank cap
11 Guide bar
4 Real handle
12 Saw chain
5 Electric cord
13 Switch lock button
6 Cord retainer
14 Spike bar
7 Trigger Start
15
Guide bar Cover
8 Oil Tank Inspection
9 Sprocket Cover
Содержание EC2040
Страница 1: ...Ec2040 Owner s manual Art Nr 013440 WWW NAKAYAMATOOLS COM...
Страница 2: ...1 1 2 3 4 5 6 7 8 9 10 1 2 3 4 5 6 7 8 9 10 1 a b c 2 a b c d e f...
Страница 3: ...2 3 a a b c Off d e f g 4 a b c d e f g 5 a...
Страница 4: ...3 1 2...
Страница 5: ...4 1 2 3 4 EC2040 1 2 10 3 11 4 12 5 13 6 14 7 15 8 9 Sprocket Cover...
Страница 6: ...5 1 10 2 3 G 4 G H F 10 5 B4 6 G 13 7 1 7...
Страница 7: ...6 1A 1B A 1A B C D E F G H 1A 1B...
Страница 8: ...7 Fig 2B 2C 2D S 15 18cm A 2 g 2 B C D C E C F D 3 5cm C 2B 1 G H Fig 2C 2 Fig 2D 2A...
Страница 9: ...8 3 4C A 3 1 4A 2 1 3 4B 3 1 3 4C 4 4D 5 A B C 4A 4B 4D 5...
Страница 10: ...9 7A 7B 1 2 3 Fig 6 4 8 7A 7B 6...
Страница 11: ...10 8 5 8 3 8 LoPro x 050 3 16 4 8mm 9 8 3 4 10 9 10...
Страница 12: ...11 ISO 9518 5 3 1 2 3 4 5 6 7 8...


