ENGLISH
12
IDENTIFICATION OF CONTROLS
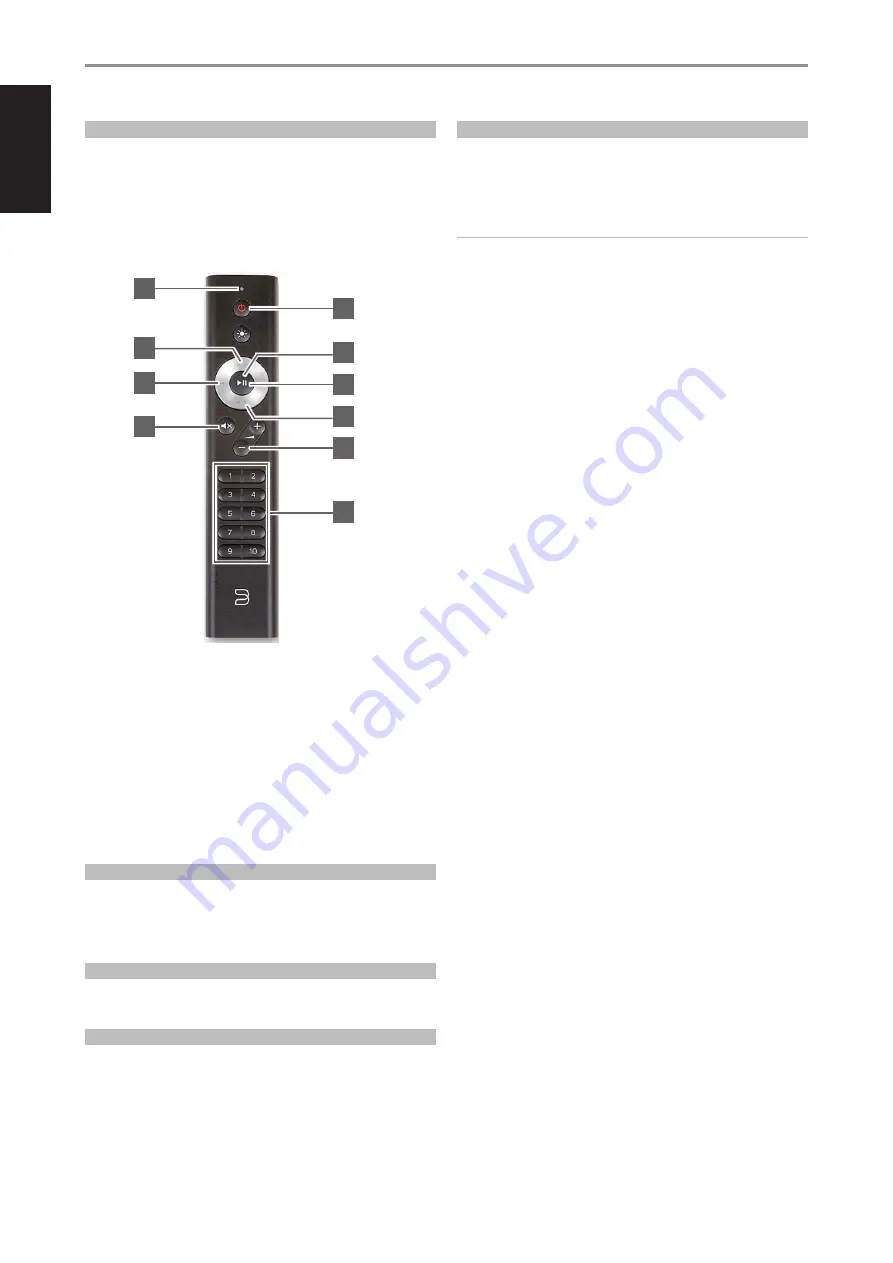
BluOS REMOTE CONTROL
USING BluOS REMOTE CONTROL
The BluOS remote control will allow you to control your music without the
BluOS app. The BluOS remote control comes pre-programmed for your
M10 V2 and other applicable NAD and Bluesound* players and requires no
configuration out of the box.
* Bluesound belongs to the Lenbrook Group of Companies where NAD is
also a member.
1 LED indicator:
Blinks whenever a command is selected.
2 Network standby:
Unit wakes up from network standby mode or
goes to network standby mode.
3
p/+
,
-/q
: User defined. Function can be assigned via IR Learning.
4
uj
: Start or pause playback
5
9
: Go to the beginning or previous song/file
6
:
: Go to the next song/file
7 MUTE:
Audio is temporarily switched off or restored. Restore audio by
pressing MUTE again or press +/- .
8 +/-
: Increase or decrease volume level
9 1 to 10 numbered buttons:
Select Preset number
SETUP
To set up the BluOS remote control, remove the back panel of the remote
using a nail or coin, and insert the two 3V batteries included with the
remote. Once the batteries are inserted, you can simply point the BluOS
remote control at your M10 V2 to start controlling your music.
PRESETS
With the Preset buttons on the BluOS remote control, you can switch
between your Preset 1 to 10 quickly without opening the BluOS app.
PROGRAMMING
Both
p/+
and
-/q
buttons on the navigation dial of the BluOS remote
control are not assigned any commands and are programmable. You can
assign or program applicable commands to these buttons via IR Learning
(Settings > Player > IR Remote > IR Learning).
CHANGING CHANNELS
If you are using multiple NAD and Bluesound players in your home
environment which you would like to control with your BluOS remote
control, you can change the Channel the remote control uses to prevent
unintended commands from being sent to one of your players.
IMPORTANT
Ensure your BluOS remote control works correctly with your player by
having them both configured and set to the same Channel.
Changing the Channel on your BluOS remote control
The BluOS remote control can be programmed from Channel 0 to
Channel 7.
1
To change the Channel on your BluOS remote control, hold both
the Network Standby button and the Preset button corresponding
with the Channel you would like to use until the LED indicator at
the top of your BluOS remote control flashes green. The BluOS
remote control can be programmed from Channel 0 to Channel 7.
2
To change to Channel 0, hold both Network Standby button and
Preset 10.
Changing the Channel on your BluOS Player
To change the Channel being used by your BluOS player
1
Open the BluOS App.
2
Select the player you would like to configure the Channel.
3
Go to Settings > Player > IR Remote > BluOS Remote.
4
Select the IR Channel setting (Channel 0 to Channel 7). For your
BluOS remote control and player to work together, the IR Channel
setting of the player must be the same as that of the BluOS remote
control.
1
7
5
3
3
2
6
8
9
4


