background image

10

Argent installation

• An Argent installation is normally defined as an AABP 9600bps system.

• Telstra will supply the Argent Terminal Adaptor (ATA) to be used in the installation.

•  The connection from the ATA to the PC is via a standard 2-pin to 9-pin RS22 modem 

cable. This is generally not supplied by Telstra and will need to be purchased separately.

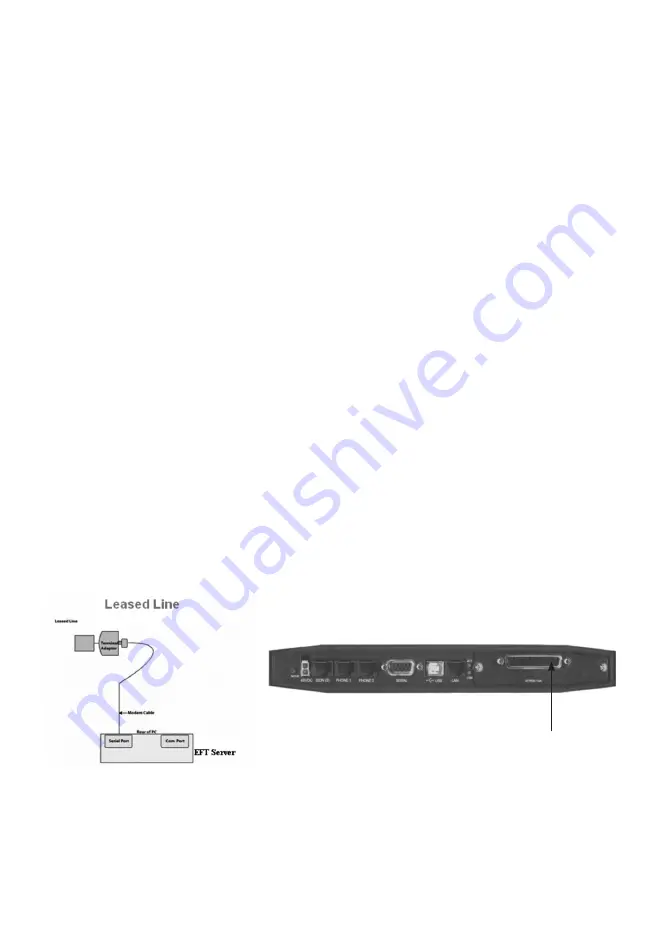
• See back-plate of the ATA for correct connection of RS22 cable.

• 


You will need your “POSAME” or “Argent Terminal ID” when installing the Telstra ATA. 
This is supplied by Telstra.

Required equipment

• Argent ATA from Telstra.

• Installation of ISDN service from Telstra.

• Standard RS22 modem cable.

Installation steps

1.  Connect the Argent ATA to the ISDN service.

2.   Connect the RS22 modem cable from the COM port on the POS to the V24 port  

on the Argent ATA.

.   The ATA should go to a steady dot after a short while. This indicates that the  

ISDN is connected.

PCEFTPOS gateway 

Refer to PCEFTPOS for these installations at the PC-EFTPOS website:

http://www.pceftpos.com/index.php?page=gateway

Argent Enhanced Terminal Adaptor Back-plate

RS22  

cable  

connects  

to here

Содержание EFTPOS

Страница 1: ...EFTPOS Quick Reference Guide for NAB Integrated...

Страница 2: ...l RS232 to USB adaptor if your POS does not have a COM port available for use optional A P66 P67 modem Argent or PCEFTPOS Gateway connection If the site is using a dial up service a P66 P67 is only re...

Страница 3: ...efore contacting the Merchant Service Centre in regard to any error message please note all the error information as well as your merchant and terminal numbers so the problem can be correctly reported...

Страница 4: ...s 23 Signature required 18 Host generated response codes 24 Terminal generated response codes 27 Argent Error Codes 34 China UnionPay CUP 37 CUP credit cards 39 CUP debit cards 40 Refund CUP 41 Troubl...

Страница 5: ...erifying their retail transactions with a signature as usual or entering their PIN into the PIN pad All they need to do is swipe or dip their card into the EFTPOS machine press the credit button enter...

Страница 6: ...rated is configured to be used with a POS all the EFTPOS functionality is initiated through the POS Consult your POS vendor on the operation of EFTPOS through your POS The terminal may be configured t...

Страница 7: ...nt options Settlement Pre settlement Last settlement Sub totals Summary totals Shift totals Note Your terminal will automatically settle at 9 30pm EST daily unless a manual settlement is performed The...

Страница 8: ...each EFTPOS terminal Merchant ID This number uniquely identifies each merchant POS AME This number is unique to each Argent leased line This number is often called a Tran end ID a Telstra ID or an Ar...

Страница 9: ...1 Power the terminal Connect the power pack and cord then plug into a power point 2 Connect the power adaptor to the power socket on the back of the terminal 3 Connect the RS232 cable supplied to the...

Страница 10: ...t Terminal ID when installing the Telstra ATA This is supplied by Telstra Required equipment Argent ATA from Telstra Installation of ISDN service from Telstra Standard RS232 modem cable Installation s...

Страница 11: ...internal printer of NPT Host Interface This is normally blank It is the IP address of the EFTSRV which is normally on this machine NPT indicates to use the internal GPRS modem Tracing This is enabled...

Страница 12: ...Using the Internal GPRS Modem Open the EFT Client Change Host Interface Address to NPT and then click on Apply Setup Page Enter terminal details Press APPLY and then 7410 when prompted for the passwor...

Страница 13: ...Using the Internal Printer on the terminal Open the EFT Client Change Printer to NPT and then click on Apply...

Страница 14: ...tware please refer to the PC EFTPOS EFT Client and EFT Server Installation Guides or call the PC EFTPOS Helpdesk on 02 9998 9800 Configure terminal To configure the terminal either From the PC EFTPOS...

Страница 15: ...logon 1 Double click on the EFT Client icon 2 Click on the Ctrl Panel button 3 Click on the Logon button from the Eftpos F2 tab Ready to go If the previous steps were successful the PINpad is ready t...

Страница 16: ...not go back a step in the transaction flow FUNCTION SELECT ACCOUNT TYPE CHQ SAV CR Customer selects the account type from the options available on the terminal Note Cancellation can only occur on the...

Страница 17: ...n display Action TRANSACTION RESULT PRINTING PLEASE WAIT The transaction has been approved a receipt is printed and the dialogue box shown The dialogue box automatically closes after 5 seconds or alte...

Страница 18: ...PROVED PRINTING PLEASE WAIT The transaction has been approved a receipt is printed and the dialogue box shown The dialogue box automatically closes after 5 seconds or alternatively if the OK button is...

Страница 19: ...utomatically closes after 5 seconds or alternatively if the OK button is pressed it shall close immediately ECLIPSE READY The terminal returns to the idle state Function key menus To access the functi...

Страница 20: ...es password Diagnostics Menu Accessed via EFT Client Option Description 1 Print Merchant List 2 Print Configuration 3 Print Statistics 4 Print and Clear SAF Caution SAF will be cleared Administrative...

Отзывы: