


M1.2.TPT820.NLFREN 21112017
10
NL
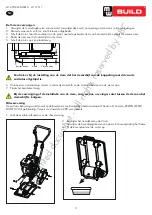
7 Onderhoud
Een regelmatige onderhoud verlengd de levensduur van de machine en van de componenten.
Preventief onderhoud
1. Schakel de motor uit en laat deze afkoelen.
2. Houd de gashendel in de stationaire stand (SLOW), en verwijder de bougiekabel.
3. Controleer de trilplaat op goede algemene toestand. Controleer of er losgedraaide schroeven zijn, of niet goed uitgelijnde
of vastzittende bewegende delen, gebarsten of gebroken delen of andere storingen.
4. Verwijder vuil van de machine met een zachte borstel, een stofzuiger of perslucht. Smeer vervolgens alle bewegende delen
met lichte machineolie.
5. Maak de basisplaat van de machine zodra deze met gronddeeltjes vuil wordt. Het werkresultaat kan niet optimaal zijn, als
het plaatoppervlak niet glad en schoon is.
6. Vervang de bougiekabel.
Gebruik nooit een hogedrukreiniger om de machine schoon te maken. Water kan in kleine
ruimtes binnendringen en assen, katrollen, lagers of de motor beschadigen. Het gebruik van een
hogedrukreiniger vermindert de levensduur en de efficiëntie van de machine.
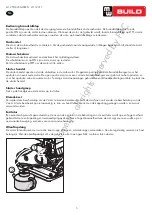
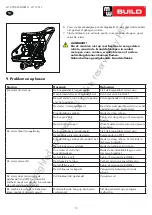
De V-riem controleren
De V-riem moet steeds in goede staat zijn, voor een goede overbrenging van de motor naar de excentrische as.
1. Zet de motor stil en laat deze afkoelen.
2. Verwijder de beschermkap, om de V-riem te kunnen bereiken.
3. Controleer de goede staat van de V-riem. Vervang deze indien gebarsten, gerafeld of glad.
4. Controleer de riemspanning door in het midden te drukken. De riem moet zich van 9 tot 12 mm (3/8 tot 1/2”) laten
indrukken als u met de vinger duwt.
Controleer de riemspanning op een nieuwe machine of na installatie van een nieuwe riem na 20 werkuren, en daarna
alle 50 werkuren.
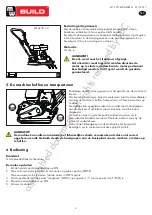
De riemspanning instellen
De juiste riemspanning is belangrijk voor goede prestaties. Een correcte instelling zorgt voor een lange levensduur van de riem.
Een te onjuiste spanning kan de riem beschadigen.
1. Draai de 4 montagebouten van de motor los (verwijder deze niet), net genoeg om de motor te kunnen bewegen.
2. Draai de moeren B los, door voldoende ruimte
tussen de moeren en de beugel te laten.
3. Duw de motor naar de achterkant van de plaat door de
instelbouten A te draaien, om de speling van de riem te
elimineren.
Controleer bij de instelling van de riem dat het riemschijf van de koppeling met dit van de
excitator uitgelijnd is.
4. Wanneer de riemspanning correct is, draai de moeren B tegen de beugel terug aan.
5. Draai de montagebouten van de motor terug aan.
6. Plaats het riemdeksel terug.
Als de riem niet meer ingesteld kan worden, moet deze vervangen worden.
11
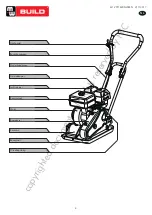
Vibratory Plate Compactor
Turn off engine. Engine must be cool.
Remove the belt guard to access the V-belt(s).
Check the condition of the V-belt(s). If any V-
belt is cracked, frayed, or glazed, it should be
replaced as soon as convenient.
Check the V-belt tension by squeezing them in
the center. The normal deflection on each side
should be 9mm (3/8”) to 13mm (1/2”) with
moderate pressure from your thumb or finger.
1.
2.
3.
4.
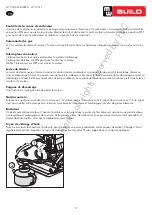
Tensioning V-Belt(s)
Loosen 4 engine mount bolts (do not remove)
only enough to move the engine forward.
Proper belt tension is critical to good performance.
Proper adjustment will assure long belt life. Too
much or too little belt tension will cause premature
belt failure.
1.
When the V-belt tension is correct, tighten the
jam nuts
B
against the bracket.
Tighten the engine mount bolts.
Replace the belt guard.
4.
5.
6.
If the adjustment bolts have no more
adjustment left, the belt(s) may have to
be replaced.
Replacing V-Belt(s)
For #29142 & #29155, both V-belts should
be replaced at the same time because they
will wear evenly through normal use. Work
on one belt at a time.
Loose 4 engine mount bolts (do not remove)
only enough to move the engine forward.
Loosen the jam nuts
B
and bolts
A
shown in
above figure.
Slide the engine toward the front of plate and
slip the old V-belt(s) off of the wheel pulley and
install the new V-belt(s) in their place.
Position the V-belt(s) over the engine pulley.
Move the engine back.
1.
2.
3.
4.
5.
6.
Replace the belt guard.
7.
A
B
On new machines or after installing a
new belt, check belt tension after first
20 hours of operation. Check and adjust
belt every 50 hours thereafter.
When adjusting the belt(s), make sure
that the clutch pulley is in alignment
with exciter pulley.
When adjusting the belt(s), make sure
that the clutch pulley is in alignment
with exciter pulley.
When the V-belt tension is correct, tighten the
jam nuts
B
and the engine mount bolts.
V-belt
Clutch pulley
Exciter pulley
V-belt
Clutch pulley
Exciter pulley
Loosen the jam nuts
B
, leaving enough space
between the nut and bracket.
Push engine toward the back of the plate by
turning the adjustment bolts
A
to remove any
slack in V-belt(s).
2.
3.
11
Vibratory Plate Compactor
Turn off engine. Engine must be cool.
Remove the belt guard to access the V-belt(s).
Check the condition of the V-belt(s). If any V-
belt is cracked, frayed, or glazed, it should be
replaced as soon as convenient.
Check the V-belt tension by squeezing them in
the center. The normal deflection on each side
should be 9mm (3/8”) to 13mm (1/2”) with
moderate pressure from your thumb or finger.
1.
2.
3.
4.
Tensioning V-Belt(s)
Loosen 4 engine mount bolts (do not remove)
only enough to move the engine forward.
Proper belt tension is critical to good performance.
Proper adjustment will assure long belt life. Too
much or too little belt tension will cause premature
belt failure.
1.
When the V-belt tension is correct, tighten the
jam nuts
B
against the bracket.
Tighten the engine mount bolts.
Replace the belt guard.
4.
5.
6.
If the adjustment bolts have no more
adjustment left, the belt(s) may have to
be replaced.
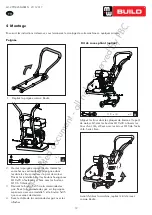
Replacing V-Belt(s)
For #29142 & #29155, both V-belts should
be replaced at the same time because they
will wear evenly through normal use. Work
on one belt at a time.
Loose 4 engine mount bolts (do not remove)
only enough to move the engine forward.
Loosen the jam nuts
B
and bolts
A
shown in
above figure.
Slide the engine toward the front of plate and
slip the old V-belt(s) off of the wheel pulley and
install the new V-belt(s) in their place.
Position the V-belt(s) over the engine pulley.
Move the engine back.
1.
2.
3.
4.
5.
6.
Replace the belt guard.
7.
A
B
On new machines or after installing a
new belt, check belt tension after first
20 hours of operation. Check and adjust
belt every 50 hours thereafter.
When adjusting the belt(s), make sure
that the clutch pulley is in alignment
with exciter pulley.
When adjusting the belt(s), make sure
that the clutch pulley is in alignment
with exciter pulley.
When the V-belt tension is correct, tighten the
jam nuts
B
and the engine mount bolts.
V-belt
Clutch pulley
Exciter pulley
V-belt
Clutch pulley
Exciter pulley
Loosen the jam nuts
B
, leaving enough space
between the nut and bracket.
Push engine toward the back of the plate by
turning the adjustment bolts
A
to remove any
slack in V-belt(s).
2.
3.
copyrighted
document
- all
rights
reserved
by
FBC