Spitfire 100 Extreme series printers Users Guide
79
AP-75194 - Rev. 2.2
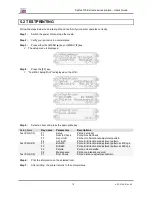
5.2 TESTPRINTING
Follow the steps below to do a test print and confirm if your printer operates correctly.
Step 1 :
Switch the power ON and load the media.
Step 2 :
Verify your printer is in normal status.
Step 3 :
Press either the [MENU
] key or [MENU
] key.
The setup menu is displayed.
Step 4 :
Press the [F3] key.
"TestPrint: SetupPrint" is displayed on the LCD.
Step 5 :
Select an item and press the appropriate key.
Setup items
Key name
Parameters
Descriptions
Test Print (1/3)
F1
Setup
Print a setup list
F2
Nozzle Check
Print a NozzleCheck
F3
Adj. Uni-D
Print a Uni-Directional adjustment pattern
F4
Adj. Bi-D
Print a Bi-Directional adjustment pattern
Test Print (2/3)
F1
Bi-D400
Print a Bi-Directional adjustment pattern at 400 cps
F2
Bi-D480
Print a Bi-Directional adjustment pattern at 480 cps
F3
Palette
Print a colour palette
F4
Maintenance
Print a maintenance record
Test Print (3/3)
F1
Dist. Check
Print a distance adjustment pattern
Step 6 :
Print the information on the selected item.
Step 7 :
After printing, the printer returns to the normal status.
Содержание Spitfire 100 Extreme
Страница 2: ...Spitfire 100 Extreme series printers User s Guide 2 AP 75194 Rev 2 2 ...
Страница 4: ...Spitfire 100 Extreme series printers User s Guide 4 AP 75194 Rev 2 2 ...
Страница 13: ...Spitfire 100 Extreme series printers User s Guide 13 AP 75194 Rev 2 2 1 6 2 2 Rear of the machine ...
Страница 26: ...Spitfire 100 Extreme series printers User s Guide 26 AP 75194 Rev 2 2 ...
Страница 58: ...Spitfire 100 Extreme series printers User s Guide 58 AP 75194 Rev 2 2 ...
Страница 90: ...Spitfire 100 Extreme series printers User s Guide 90 AP 75194 Rev 2 2 ...
Страница 164: ...Spitfire 100 Extreme series printers User s Guide 164 AP 75194 Rev 2 2 ...


