Spitfire 100 Extreme series printers Users Guide
73
AP-75194 - Rev. 2.2
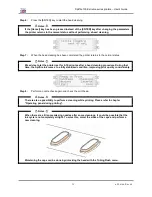
Step 6 :
Press the [ENTER] key to start the head cleaning.
Notes
If the [Cancel] key has been pressed instead of the [ENTER] key after changing the parameters,
the printer returns to the normal status without performing a head cleaning.
Step 7 :
When the head cleaning has been completed, the printer returns to the normal status.
Notes
We advise to let the printer rest for 5-10 minutes after a head cleaning procedure. During that
time, the Spitfire ink comes to a fully stabilized condition, improving print quality considerably.
Step 8 :
Perform a nozzle check again and check the print head.
Notes
There is also a possibility to perform a cleaning while printing. Please refer to chapter
Operating panel during printing.
Notes
When there are still some missing nozzles after some cleanings, it could be possible that the
ink cycle is not completely airtight. To solve this, moist the sides of the caps and perform a
new cleaning.
Moistening the caps can be done by unlocking the head with the TubingFlush menu.
Содержание Spitfire 100 Extreme
Страница 2: ...Spitfire 100 Extreme series printers User s Guide 2 AP 75194 Rev 2 2 ...
Страница 4: ...Spitfire 100 Extreme series printers User s Guide 4 AP 75194 Rev 2 2 ...
Страница 13: ...Spitfire 100 Extreme series printers User s Guide 13 AP 75194 Rev 2 2 1 6 2 2 Rear of the machine ...
Страница 26: ...Spitfire 100 Extreme series printers User s Guide 26 AP 75194 Rev 2 2 ...
Страница 58: ...Spitfire 100 Extreme series printers User s Guide 58 AP 75194 Rev 2 2 ...
Страница 90: ...Spitfire 100 Extreme series printers User s Guide 90 AP 75194 Rev 2 2 ...
Страница 164: ...Spitfire 100 Extreme series printers User s Guide 164 AP 75194 Rev 2 2 ...


