


STAIN -- STAINS are coloring agents and should only be used if you dislike the natural color of the wood. We usually
do not apply stains to our projects, especially when they are made with naturally beautiful hardwoods such as on this project.
These woods look very nice with just a clear finish. But, if you want to color the wood differently, your staining should be
accomplished before applying a surface finish such as oil, varnish, or lacquer.
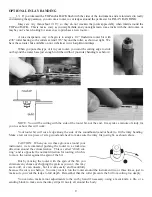
OIL -- An oil finish will give your wood a low luster appearance, bringing out the natural color of the grain, but it
tends soak into the wood and appear dry and “thirsty” after awhile. The principal advantage of an oil finish is that it can be
applied and wiped dry immediately, so you can proceed to installing hardware (and strings) right away. The disadvantage of
oil is that it usually does not give much surface protection or sheen, although there are some brands that include waxes and/or
varnishes to give more surface build-up and luster. If you want a hand-rubbed oil finish, be sure to purchase the highest quality
oil designed for hand-rubbing.
VARNISH -- Any satin or semi-gloss varnish will work on this project, but we like a wipe-on gel urethane best. We
offer this type of clear top coat, called MUSICMAKER’S INSTRUMENT FINISH. Our complete finishing kit includes
instructions, sandpaper sheets and a half-pint can of satin gel urethane wiping varnish. The advantages of this finish are its
simple application, durability, minimal odor during application, and deep, soft luster.
LACQUER -- Many professional instrument makers use nitrocellulose lacquer for their finish. The most readily avail-
able lacquer is called Deft Clear Wood Finish. The semi-gloss version is the easiest to apply successfully. It is best to purchase
a can of liquid DEFT to brush on as a sealer coat first, and then use an aerosol can of the same product to spray on the final
coats. The advantage of this finish is its quick drying time, but the disadvantage is the strong odor of the toxic lacquer fumes.
OUR BEST ADVICE: AVOID GLOSS FINISHES unless you are an expert with spray equipment! Glossy finishes
show off every speck of dust and irregularity in your sanding. Satin or semi-gloss is much easier for the amateur.
So go ahead and apply the finish of your choice, following the instructions on the container. Sand between
coats with fine (400-600 grit) sandpaper or #0000 steel wool. Consult instructions on the can for proper drying
time. If you want to change the sheen of the finish after it dries, you can smooth it out by rubbing with 0000 steel
wool or with a Scotchbright scrubber. We often follow this procedure with a coat or two of paste wax (the same
product that you would use on a wood floor) to bring out a nice luster.
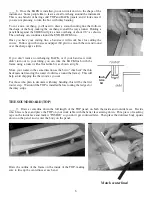
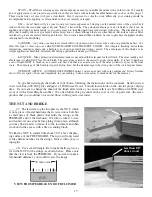
_____27. The last item to glue into place is the NUT, which
is not a piece of metal hardware that screws onto a bolt, but
a small piece of black plastic that holds the strings at the
PEGHEAD end of the fretboard. We like to trim it to size
and round over one edge before gluing it into place, although
you may find it easier to fasten it to the instrument and then
work down the excess with a file or sanding block.
We like the NUT to stand a little about 3/32” above the play-
ing surface of the FRETBOARD. Then you will only need
to file shallow notches for the strings. Glue it with epoxy or
superglue.
NUT
less than 1/8”
above wood
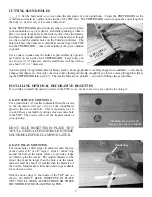
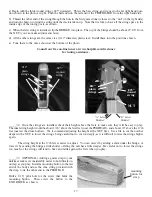
_____28. Use a small triangle file to make shallow grooves
for in the NUT for the strings, as shown below. Please note
that the view is from the PEGHEAD. If you wish to make a
left-handed dulcimer, you would reverse the image.
VIEW FROM PEGHEAD END OF DULCIMER
38 mm overall
THE NUT AND BRIDGE
4 13 13 4 4
15


