background image

MAYCO LS300P CONCRETE PUMP • OPERATION MANUAL — REV. #1 (02/20/17) — PAGE 63

the ball andcoupler system. All bent or broken coupler parts 

must be replaced before towing the trailer.
THE TOW VEHICLE, PINTLE HITCH AND PINTLE 

COUPLER MUST HAVE A RATED TOWING CAPACITY 

EQUAL TO OR GREATER THAN THE TRAILER 

Gross 

Vehicle Weight Rating (GVWR)

.

IT IS ESSENTIAL THAT THE PINTLE HITCH BE OF THE 

SAME SIZE AS THE PINTLE COUPLER.
The coupler size and load rating (capacity) are marked on 

the coupler. Hitch capacity is marked on the hitch.


Rock the pintle eye coupler to make sure it is secured 

tightly to the hitch.


Wipe the inside and outside of the pintle coupler. Clean 

and inspect it visually for cracks and deformations. Feel 

the inside of the coupler for worn spots and pits.


Be sure the coupler is secured tightly to the tongue of the 

trailer. All coupler fasteners must be visibly solid against 

the trailer frame.


Raise the bottom surface of the coupler to be above the 

top of the pintle hitch hook. Use the tongue jackstand 

to support the trailer tongue. Wood or concrete blocks 

may also be used.

  WARNING

Coupler-to-hitch mismatch can result in uncoupling, 

leading to death or serious injury.
Be sure the LOAD RATING of the pintle hitch hook is 

equal or greater than the load rating of the pintle eye 

coupler.
Be sure the SIZE of the pintle hitch hook matches the 

size of the pintle eye coupler.

  WARNING

A worn, cracked or corroded pintle hitch hook can fail 

while towing, and may result in death or serious injury.
Before coupling trailer, inspect the pintle hitch hook for 

wear, corrosion and cracks.
Replace worn or damaged pintle hitch hook.

Coupling Trailer to Tow Vehicle (Pintle Coupler)


Slowly back up the tow vehicle so that the pintle 

hitch hook is near or aligned under the pintle eye ring 

coupler.


Using the jackstand at the front of trailer (tongue), turn 

the jackstand crank handle to raise the trailer. If the pintle 

eye coupler does not line up with the pintle hitch hook, 

adjust the position of the tow vehicle.


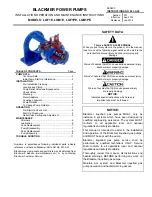
OPEN the pintle hook locking mechanism (Figure H). 

Place the hook inside the eye coupler. CLOSE the pintle 

hook mechanism.

Figure H. Attaching Safety Chain (Pintle Hitch)


Insert a pin or lock through the hole in the locking 

mechanism.


Be sure the pintle hook is inserted completely through 

the eye ring and the locking mechanism is engaged.  

A properly engaged locking mechanism will allow the 

coupler to raise the rear of the tow vehicle.  Using the 

trailer jack, test to see that you can raise the rear of the 

tow vehicle by1-inch after the coupler is locked to the 

hitch.


Lower the trailer so that its entire tongue weight is held 

by the hitch.


Raise the jackstand to a height where it will not interfere 

with the road.

  WARNING

A defective pintle hitch not properly fastened can result 

in uncoupling, leading to death or serious injury.
Be sure the pintle hook is securly tighten to the tow 

vehicle before coupling the trailer.

TRAILER

TONGUE

SAFETY CHAIN

MASTER LINK

TOW

VEHICLE

CROSS BOTH

SAFETY CHAINS

IMPORTANT!

PINTLE

HOOK

PINTLE

RING “EYE”

SAFETY

CHAIN

TRAILER GUIDELINES

To order go to Discount-Equipment.com

Содержание MAYCO LS300P

Страница 1: ...MANUAL THIS MANUAL MUST ACCOMPANY THE EQUIPMENT AT ALL TIMES Revision 1 02 20 17 SERIES MODEL LS300P CONCRETE PUMP Perkins 404D 22TA DIESEL ENGINE T o o r d e r g o t o D i s c o u n t E q u i p m e...

Страница 2: ...Curtis Gehl Pavers Heli Honda ICS PowerGrit IHI Partner Imer Clipper MMD Koshin Rice CH E General Equip ment Amida Coleman NAC Gradall Square Shooter Kent Stanley Tamco Toku Hatz Kohler Robin Wiscons...

Страница 3: ...eexamplesofthesechemicalsare Lead from lead based paints Crystalline silica from bricks Cement and other masonry products Arsenic and chromium from chemically treated lumber Your risk from these expos...

Страница 4: ...r reproductive harm If you are unfamiliar with the risks associated with the particular process and or material being cut or the composition of the tool being used review the material safety data shee...

Страница 5: ...r Guidelines 55 69 Appendix Concrete Mix Information 70 72 Troubleshooting Pump 74 75 Troubleshooting Engine 76 Troubleshooting Hydraulic Brakes 77 Troubleshooting Electrical 78 79 Control Box Compone...

Страница 6: ...FETY SYMBOLS DANGER Indicates a hazardous situation which if not avoided WILL result in DEATH or SERIOUS INJURY WARNING Indicates a hazardous situation which if not avoided COULD result in DEATH or SE...

Страница 7: ...e doctor and fire department This information will be invaluable in the case of an emergency PUMP SAFETY DANGER NEVER pump volatile explosive flammable or low flash point fluids These fluids could ign...

Страница 8: ...bolt lock nut and wheel lug nuts for wear Test the pump s emergency stop switch The purpose of this test is to shut down the engine in the event of an emergency Refer to the Perkins Engine Owner s Man...

Страница 9: ...DANGER DO NOT drop the battery There is a possibility that the battery will explode DO NOT expose the battery to open flames sparks cigarettes etc The battery contains combustible gases and liquids If...

Страница 10: ...e are rated equal to or greater than the trailer gross vehicle weight rating ALWAYS inspect the hitch and coupling for wear NEVER tow a trailer with defective hitches couplings chains etc Check the ti...

Страница 11: ...Metal recycling involves the collection of metal from discarded products and its transformation into raw materials to use in manufacturing a new product Recyclers and manufacturers alike promote the p...

Страница 12: ...ine Model Perkins Turbo Diesel 404D 22TA Weight with fluids 3 750 lbs 1 701 kg Tire Size ST 225 75 R15 Options Wireless Remote Control Hopper Screen Vibrator Volume output will vary depending on mix d...

Страница 13: ...1 02 20 17 PAGE 13 D B C A E Table 3 Pump Dimensions Reference Letter Dimensions in mm A 158 4 013 2 B 44 1 117 6 C 81 2 057 4 D 21 5 546 1 E 63 5 1 612 9 Figure 1 Dimensions DIMENSIONS T o o r d e r...

Страница 14: ...TE UP CHUTE DOWN STOP START PUMP SPEED UP SLOW PUMP DOWN STOP PUMP LITTLE BIT ADD WATER 4 GALLONS ALL DONE CLEAN UP DRIVE IN BACK UP PULL FORWARD BACK IN IMPORTANT HAND SIGNALS Figure 2 Operation Hand...

Страница 15: ...ith a lubricating seal of mortar There are four ways in which this seal can be lost 1 By pumping excessively wet mixes which do not have enough cohesion to hold together 2 By pumping harsh undersanded...

Страница 16: ...can be used to pump a large aggregate hard rock as follows Pea rock 1 2 minus pump with mixes being as low as 30 rock and 70 sand reference maintenance for recommendations on cleaning the pump Shorte...

Страница 17: ...many jobs being pumped in excess of 100 feet high Line pressures are always less using steel pipe as compared to hose When pumping vertically using all hose it is recommended not to go higher than 50...

Страница 18: ...es turn off the engine so the vibration does not separate the mix in the hopper which can cause a blockage in the manifold when the pump is started GENERAL INFORMATION 3 If it is necessary to wait 10...

Страница 19: ...her pumping DO NOT increase the engine speed to clear the blockage Increasing the engine speed will only compound the problem If a blockage occurs in a hose walk the hose until you find the point of t...

Страница 20: ...y knock the end of the hose away from the reducer GENERAL INFORMATION 5 Chip the concrete out of the reducer with the pry bar 6 Remove the reducer From the discharge end chip the concrete out of the s...

Страница 21: ...S SHUTTLE TUBE SLAVE OIL SHUTTLE TUBE MOTION A B Figure 4 Pumping Cycle 2 In the first cycle Figure 3 hydraulic pressure is applied to cylinder B causing the hydraulic piston which is connected to the...

Страница 22: ...YCO LS300P CONCRETE PUMP OPERATION MANUAL REV 1 02 20 17 Table 4 Figure 5 Pump Components 1 1 2 15 3 4 5 6 7 8 9 11 13 12 10 14 2 2 PUMP COMPONENTS T o o r d e r g o t o D i s c o u n t E q u i p m e...

Страница 23: ...NOTICE Operating the engine without an air filter with a damaged air filter or a filter in need of replacement will allow dirt to enter the engine causing rapid engine wear 7 Muffler Used to reduce n...

Страница 24: ...PUMP OPERATION MANUAL REV 1 02 20 17 PUMP COMPONENTS CONTINUED Table 5 Figure 6 Pump Components 2 18 26 23 19 22 27 20 21 24 28 29 30 16 17 31 33 34 36 37 38 25 32 35 T o o r d e r g o t o D i s c o...

Страница 25: ...ge Used to monitor pressure in the concrete cylinders and shuttle tube 27 Stroke Volume Control Knob Turns CW CCW to increase or decrease the number of strokes per minute of the pump 28 Rear Running L...

Страница 26: ...ng Switch This 2 position switch allows the operator to manually jog the cylinders to assist in clearing material line packs and is used to testpumpingpressure SeeInitialStart upProcedure section of t...

Страница 27: ...nal status of the various 12 volt solenoids Swing A circuit Main A circuit Main B circuit Screen 6 Displays the ON OFF electrical signal status for the Proximity Switch A Proximity Switch B Engine Fue...

Страница 28: ...vents dirt and other debris from entering the fuel system Service the fuel filter as recommended in the maintenance section of this manual 12 Front Rear Lifting Eye When lifting of the engine is requi...

Страница 29: ...maintenance service on the pump NOTICE ReferenceFigures5 6 and7forthelocationofanycontrol or component referenced in this section DANGER Handle fuel safely Motor fuels are highly flammable and can be...

Страница 30: ...through filler hole but DO NOT overfill 5 The oil listed in Table 6 is recommended to ensure better engine performance Use class CD or higher grade motor oil DIPSTICK Hydraulic Oil Check 1 Determine...

Страница 31: ...afe operating level Use Shell oil Tellus 46 Figure 14 Adding Hydraulic Oil Filler Hole 3 Check the oil level in the lubrication box Figure 15 If low fill with up to 4 4 gallons of SAE 30 motor oil Fig...

Страница 32: ...e handle tee to release the stabilizer jack Figure 17 Rear Stabilizer Jack WARNING NEVER place feet under jack while operating ALWAYS retract rear stabilizer jacks prior to towing ALWAYS retract rear...

Страница 33: ...ot start To start the engine make sure the emergency stop switch is in the OPEN position fully extended AUTOMATIC JOG LOCAL REMOTE CENTER OFF 4 Place the direction control switch to the FORWARD positi...

Страница 34: ...tion the first ready mix truck at the hopper Check the concrete DO NOT discharge concrete into hopper at this time 5 Place the direction control switch in the FORWARD position This will start the flow...

Страница 35: ...rred Immediately place the switch in the OFF position Refer to Clearing Concrete Blockage Section THROTTLE ON STROKES 100 STROKES MIN 10 0 YDS HR 0 0 7 HYDRAULIC OIL TEMPERATURE 7 It is important that...

Страница 36: ...C TIO N VO LU ME LOC AL FOR WA RD AUT OM ATIC JOG RES ET SET DEC REA SE INC REA SE SCR OLL JOG A CYL IND ER STR OKE JOG B REV ERS E CEN TER OFF REM OTE ST AR T REMOVE 2 SCREWS CONTROL BOX FRONT PANEL...

Страница 37: ...F Starts and stops the forward pumping PUMP REV momentarily pumps in reverse direction LOCAL REMOTE CENTER OFF E STOP ON OFF PUMP REV VOLUME VOLUME PUMP ON OFF POWER LED NOTE OLDER MODELS MAY INDICATE...

Страница 38: ...Control Cable Before the remote control cable can be used the pumping volume rate must be set 1 Start the pump as outlined in the pumping section of this manual 2 Place the pumping control switch in...

Страница 39: ...Condition X Check for Leaks X Check for Loosening of Parts X Replace Engine Oil and Filter 1 X Clean Air Filter X Check Fuel Filter Water Separator Bowl X Clean Unit Inside and Outside X Change Fuel F...

Страница 40: ...ct negative battery cable from battery before servicing WARNING Some maintenance operations may require the engine to be run Ensure that the maintenance area is well ventilated Exhaust contains poison...

Страница 41: ...T INNER ELEMENT OPTION EVACUATOR VALVE ARROW MARK CASE NOTICE Operating the engine with loose or damaged air cleaner components could allow unfiltered air into the engine causing premature wear and fa...

Страница 42: ...8 for recommended oil viscosity 1 Prepare a waste oil collector to drain the oil into 2 Remove the oil filler cap while draining the oil to allow the engine to drain easily Figure 41 Oil Service Compo...

Страница 43: ...s which can cause severe burns Table 9 Anti Freeze OperatingTemperatures Vol Anti Freeze Freezing Point Boiling Point C F C F 50 37 34 108 226 Radiator Maintenance 1 Check radiator for leaks that woul...

Страница 44: ...NCE In Line Fuel Filter Replace the engine in line fuel filter Figure 46 every year or 300 hours Figure 46 In Line Fuel Filter Oil And Fuel Lines 1 Check the oil and fuel lines and connections regular...

Страница 45: ...ort circuit Disconnect battery cables before inspecting electrical system and never spark battery terminals to test for charge CAUTION Battery Safety Wear safety glasses or face mask protective clothe...

Страница 46: ...mixer truck to prevent hook from jumping off of the drum Run the pump at 6 strokes per minute maximum speed NOTICE NEVER use muriatic acid to clean the pump Acid will dissolve the chrome finish on mat...

Страница 47: ...weight motor oil 2 As the rubber piston cups naturally wear fine cement particles will accumulate in the box Once the concrete paste reaches a height of about inch from the bottom of the box drain an...

Страница 48: ...nt Due to the motion of the shuttle tube the cutting ring experiences a quicker rate of wear as opposed to the wear plate The wear ring typically requires replacement two times per wear plate 2 to 1 W...

Страница 49: ...ll over alignment studs and into concrete cylinders NOTICE Felt ring must be saturated with 30 wt oil prior to installation 13 Insert one 3 8 16x3 bolt into the open bolt hole remove the alignment stu...

Страница 50: ...his section is intended to make sure the cooling fan is working properly Under normal conditions the fan should be running any time the engine is turned on PressureTest 1 To determine the pressure of...

Страница 51: ...Curtis Gehl Pavers Heli Honda ICS PowerGrit IHI Partner Imer Clipper MMD Koshin Rice CH E General Equip ment Amida Coleman NAC Gradall Square Shooter Kent Stanley Tamco Toku Hatz Kohler Robin Wiscons...

Страница 52: ...links and pivots to prevent any rusting 3 Remove wheel and drum assemblies and spray a good anti corrosion compound CRC formula 5 56 under rubber boot on forward end of brake wheel cylinder Avoid spra...

Страница 53: ...e adjuster assembly to expand the brake shoes Adjust the brake shoes out until the pressure of the linings against the drum makes the wheel very difficult to turn Note Your trailer maybe equipped with...

Страница 54: ...Replace and correct Dragging Brakes Brake lining thickness incorrect or not adjusted correctly Install new shoes and linings Enough brake fluid or correct fluid Replace rubber parts fill with dot 4 f...

Страница 55: ...he trailer falling thus causing equipment damage and severe bodily harm even death DANGER When performing trailer inspection and maintenance activities you must jack up the trailer using jacks and jac...

Страница 56: ...ith a trailer is 4 times the passing distance without the trailer Shift your automatic transmission into a lower gear for city driving ALWAYS use lower gears for climbing and descending grades DO NOT...

Страница 57: ...lighting conditions deteriorate Always check for local trailer tow speed limits in your area WARNING Do not transport people on the trailer The transport of people puts their lives at risk and may be...

Страница 58: ...of it WARNING Improper electrical connection between the tow vehicle and the trailer will result in inoperable lights and can lead to collision Before each tow check that the tail lights brake lights...

Страница 59: ...hout the trailer coupled Some of the trailer weight will be transferred from the trailer to the tow vehicle axles and an axle scale weighs all axles including the tow vehicle axles TOW VEHICLE The tow...

Страница 60: ...h Coupler Pintel Eye Coupler BALL HITCH COUPLER A ball hitch coupler Figure C connects to a ball that is located on or under the rear bumper of tow vehicle This system of coupling a trailer to a tow v...

Страница 61: ...t can result in uncoupling leading to death or serious injury Be sure the hitch ball is tight to the hitch before coupling the trailer the trailer tongue Wood or concrete blocks may also be used Coupl...

Страница 62: ...loops specifically for that purpose Cross chains underneath hitch and coupler with enough slack to permit turning and to hold tongue up if the trailer comes loose Breakaway Brake System If the couple...

Страница 63: ...ects to a pintle hook hitch that is located on or under the rear bumper of the tow vehicle This system of coupling a trailer to a tow vehicle is sometimes referred to as a lunette eye tow ring or G I...

Страница 64: ...lt in death or serious injury Before coupling trailer inspect the pintle hitch hook for wear corrosion and cracks Replace worn or damaged pintle hitch hook CouplingTrailer toTow Vehicle Pintle Coupler...

Страница 65: ...trailer dealer tighten the lug nuts to the proper torque WARNING Metal creep between the wheel rim and lug nuts will cause rim to loosen and could result in a wheel coming off leading to death or seri...

Страница 66: ...r See Figure I The weight of cargo should never exceed XXX kg Or XXX lbs TIRE FRONT REAR SPARE SIZE COLD TIRE PRESSURE TIRE AND LOADING INFORMATION SEE OWNER S MANUAL FOR ADDITIONAL INFORMATION Determ...

Страница 67: ...You may not find this information on all tires because it is not required by law M S The M S or M S indicates that the tire has some mud and snow capability Most radial tires have these markings henc...

Страница 68: ...ure when the tire is used as a single Load Range This information identifies the tire s load carrying capabilities and its inflation limits Tire SafetyTips Slow down if you have to go over a pothole o...

Страница 69: ...bearing adjustment and balance tires Flat Spots Wheel lockup and tire skidding Avoid sudden stops when possible and adjust brakes WARNING ALWAYS wear safety glasses when removing or installing force f...

Страница 70: ...20 25 35 40 50 65 13 20 25 35 40 50 65 14 20 25 50 60 90 120 15 20 25 50 60 90 120 16 20 25 50 60 90 120 Replace any broken or burned out lamps as necessary Check the wire harness for cuts fraying or...

Страница 71: ...lbs in 28 days Gallons per sack 7 1 Washed Sand 200 wash 1 3 Organic matter OK Specific gravity SSD Sand 2 58 Pea Gravel 2 60 SIEVE ANALYSIS PERCENT PASSING Material 1 5 1 3 4 3 8 4 8 16 30 50 100 20...

Страница 72: ...300P CONCRETE PUMP OPERATION MANUAL REV 1 02 20 17 PAGE 71 APPENDIX CONCRETE MIX INFORMATION A S T M STANDARD SPECIFICATION FOR GRADING AGGREGATE T o o r d e r g o t o D i s c o u n t E q u i p m e n...

Страница 73: ...layer Figure O Slump Test 2 3 Full 5 Fill cone to overflowing Figure P Rod this layer 25 times with rod penetrating into but not through the second layer Distribute rodding evenly over the entire cro...

Страница 74: ...MAYCO LS300P CONCRETE PUMP OPERATION MANUAL REV 1 02 20 17 PAGE 73 NOTES T o o r d e r g o t o D i s c o u n t E q u i p m e n t c o m...

Страница 75: ...ol Valve Incorrect Engine RPM setting Verify the engine s high RPM speed is set to 2400 2550 RPM Incorrect Main Hydraulic System Operating Pressure Check the pump pressure gage Verify it is approx 320...

Страница 76: ...d pressure Low engine speed Check engine RPM Volume control set to low Adjust control to full open setting Main hydraulic pressure too low Check for proper pressure or for contaminated relief cartridg...

Страница 77: ...ect type of oil for winter environment Defective battery Replace battery Engine fires but stops soon as starter is switched off Fuel filter blocked Replace fuel filter Fuel supply blocked Check the en...

Страница 78: ...correct fluid Fill with DOT 4 fluid Brakes squeak chatter or chuck Overheated wheel bearing Replace wheel bearing and pack with grease Low brake fluid Fill and bleed brake system Siezed acutator maste...

Страница 79: ...6 ohms Replace burnt solenoid Wire connection broken Replace broken wire Swing SHORTED The 12 volt cycling solenoid is shorted directly to ground Measure solenoid coil resistance It should read 6 ohms...

Страница 80: ...ubleshooting Proximity switch A Switch not energizing Check for contact clearance Should be between 0 050 in 1 27mm and 0 065 in 1 651 mm Defective proximity switch Replace switch Wire connection brok...

Страница 81: ...OCATOR OFF ON IGNITION REMOTE CONTROL FLOW DIRECTION LOCAL FORWARD AUTOMATIC JOG RESET SET SCROLL JOG A CYLINDER STROKE JOG B REVERSE CENTER OFF REMOTE START E m ergency S t o p A B C DIGITAL DISPLAY...

Страница 82: ...K BLACK 1 2 3 4 5 6 7 8 1 2 3 4 5 6 7 8 J4 REMOTE LOCAL WHITE REMOTE CONNECTOR BLUE 1 2 3 JOG A JOG B BLK RED J1 CONTROLLER BLACK POTTED BOX BLACK RED WHITE BLUE YELLOW GREEN BROWN BLACK 1 2 3 4 5 6 7...

Страница 83: ...PAGE 82 MAYCO LS300P CONCRETE PUMP OPERATION MANUAL REV 1 02 20 17 HOPPER VIBRATOR LOCATOR OPTION E D H CONTROL BOX HOPPER F B A C G T o o r d e r g o t o D i s c o u n t E q u i p m e n t c o m...

Страница 84: ...ODULE 2 2 2 FUEL SOLONOID 12 AWG RED 12VDC 12VDC OUTPUT J3 4 E STOP J1 7 12VDC 12 AWG BRN 12VDC INPUT J1 10 J1 9 RED WHT CONTROLLER BLACK POTTED BOX FUEL SOLENOID SHUT DOWN 12VDC POWER OUT 12VDC RED C...

Страница 85: ...PAGE 84 MAYCO LS300P CONCRETE PUMP OPERATION MANUAL REV 1 02 20 17 HYDRAULIC SYSTEM LOCATOR DIAGRAM 33 C A B D E H F G J K I T o o r d e r g o t o D i s c o u n t E q u i p m e n t c o m...

Страница 86: ...0 17 PAGE 85 HYDRAULIC SYSTEM DIAGRAM NON OPERATOR SIDE OPERATOR SIDE MAIN B1 A1 GA ACC B2 A2 PRECHARGE TO 500 PSI SWING P2 T2 41 GPM M PORT B D1 3100 3200 PSI SWING MAIN C A B D E H G J K I F T o o r...

Страница 87: ...PAGE 86 MAYCO LS300P CONCRETE PUMP OPERATION MANUAL REV 1 02 20 17 WIRING DIAGRAM LOCATOR 1 EXTERNAL CONTROL BOX A A1 C D E B G H I J K T o o r d e r g o t o D i s c o u n t E q u i p m e n t c o m...

Страница 88: ...ROL BOX OUTSIDE CONTROL BOX YELLOW WHITE FUSE HOLDER A IGNITION SWITCH P2 F P2 CONTROLLER BLACK POTTED BOX 12 AWG RED FUEL SOLENOID SHUT DOWN 12VDC OUTPUT E STOP BLK 12VDC POWER OUT BRN D W ALTERNATOR...

Страница 89: ...PAGE 88 MAYCO LS300P CONCRETE PUMP OPERATION MANUAL REV 1 02 20 17 WIRING DIAGRAM LOCATOR 2 EXTERNAL CONTROL BOX 33 R M N O P Q S T T o o r d e r g o t o D i s c o u n t E q u i p m e n t c o m...

Страница 90: ...MALE INTERFACE CONNECTOR WHITE 8 7 6 5 4 3 2 1 J3 8 7 6 5 4 3 2 1 J4 12VDC 30 17 58 19 15 54 50A IGNITION SWITCH PROXIMITY SWITCH B INDICATOR RED ACTIVE BETWEEN GND 800 mV PROXIMITY SWITCH A PROXIMIT...

Страница 91: ...Curtis Gehl Pavers Heli Honda ICS PowerGrit IHI Partner Imer Clipper MMD Koshin Rice CH E General Equip ment Amida Coleman NAC Gradall Square Shooter Kent Stanley Tamco Toku Hatz Kohler Robin Wiscons...

Отзывы: