


ENG
15
10.
Parameter Settings
Please note that some options in Settings menu will not be available
It is recommended that if you are not professional, do not adjust the controller's
parameters.
Problems caused by incorrect parameter setting are not covered by the warranty!
The followings paramteres are AVAILABLE FOR SETTINGS, LOCKED or WE DO NOT
RECOMMEND FOR ADJUSTMENT
P01: Rear light brightness: 1 ‐ the darkest, 3 ‐ the lightest; ‐‐
AVAILABLE
P02: Mileage unit, 0: km; 1: mile; ‐‐‐
AVAILABLE
P03: Voltage rating: 24V, 36V, 48V, default 36V; : ‐‐‐
LOCKED
P04: Sleep mode time: 0 ‐ no sleep mode; 1‐60 ‐ sleep mode, minutes; ‐‐‐
AVAILABLE
P05: Power‐driven gear settings ‐‐‐
LOCKED
P06: Wheel diameter: unit ‐ inch; precision: 0.1; ‐‐‐
DO NOT RECOMMEND FOR ADJUSTMENT
P07: Number of measuring magnets: range 1‐100; ‐‐‐
DO NOT RECOMMEND FOR ADJUSTMENT
P08: Speed limit: maximum motor speed ‐‐‐
LOCKED
P09: Zero start, non‐zero start setting: 0 ‐ zero start; 1 ‐ nonzero start; ‐‐
AVAILABLE
P10: Drive mode settings:0 ‐ power drive; 1 ‐ electric drive, 2 ‐ power drive and electric drive
coexistence ‐‐‐
LOCKED
P11: Boost sensitivity settings: 1‐24 ‐‐‐
LOCKED
P12: Starting torque: range 0‐5, 0 ‐ the weakest, 5 ‐ strongest; ‐‐‐
LOCKED
P13: Help plate magnet type settings: 5 8 12 ‐‐‐
LOCKED
P14: Controller current limit settings: default 12A, range 1‐20A; (requires controller software
support) ‐‐‐
DO NOT RECOMMEND FOR ADJUSTMENT
P15: Motor drive signal percentage settings: (connected to PO8 speed limit function) full speed is
set to 100 ‐‐‐
DO NOT RECOMMEND FOR ADJUSTMENT
P16: Cruise control function: 1 ‐ activated, 0 – deactivated ‐‐
AVAILABLE
P17: Light settings: the lights are not lit automatically when the vehicle is on, 0 ‐ the lights are lit
automatically when the vehicle is on ‐‐‐
LOCKED
P18: Password protected start: 1 ‐ activated, 0 – deactivated ‐‐‐
LOCKED
P99: Settings reset ‐‐
AVAILABLE
When in P99 settings, press and hold the MODE button for 5‐6 seconds to Reset all the
parameters back to the initial settings
ODO: ODO clear (first press the
MODE
button and then press and hold 5‐6 seconds)
RIDING OPERATIONAL INSTRUCTIONS
Before Riding
Choose a suitable venue for riding.
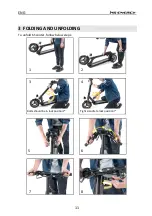
Unfold the electric scooter according to the instructions
(The metal pins in the
folding mechanism must be in proper position and the lock mechanism must
be tightened!)
.
Adjust the height of the handlebar tube according to your height.
Содержание NEUTRON n1
Страница 2: ......
Страница 3: ...005 19 Electric Scooter 0 1 2 0 034 5 0 1 2 0 034 6 1 0 005 20 Neutron n2 Plus...
Страница 4: ...HR 1...
Страница 24: ...SRB 1...
Страница 43: ...005 19 Electric Scooter 789 9 9 8 AB9 C9 9D AD EF 005 20 Neutron n2 Plus...
Страница 44: ...MK 1...
Страница 45: ...MK 2 3 1 4 2 10 3 11 4 LCD 12 5 15 6 16 7 17 8 18 9 19 10 19...
Страница 46: ...MK 3 MS Energy...
Страница 47: ...MK 4 1 1 2 3 120 4 16 5 6 7 8 9 3cm 5 C 3cm 10 km h...
Страница 48: ...MK 5 1 2 3 4 5 30 70 6 7 8 10 40C 20 30 9 e 120kg 120kg 10...
Страница 49: ...MK 6 11 e 12 13 14 15 16 17 18 8 19...
Страница 50: ...MK 7 20 21 22 23 24 25 26...
Страница 51: ...MK 8 27 28 29 30 31 32 33 34 35 40 70 C 36...
Страница 52: ...MK 9 37 38 39 100 100 40 41 E 1...
Страница 53: ...MK 10 2 3 3cm 4 5 6 7 25km h 8 9 30...
Страница 55: ...MK 12 3 Click 1 2 3 4 5 6 7 8...
Страница 56: ...MK 13 4 LCD LCD UART 1 ica D 2 GND 3 DS 4 RX 5 TX 1 2 3 8 5 6 7 4 1 2 3 4 5 6 7...
Страница 58: ...MK 15 4 km h 1ms 5 MODE M GEAR1 GEAR2 GEAR3 6 MODE M 7 5 8 kick start NON kick start NULA 9 USB USB USB...
Страница 60: ...MK 17 0 0 1 3 5 7 300...
Страница 61: ...MK 18 0 100 600 10 50 40 50 30 AC110V 220V 9...
Страница 64: ......
Страница 65: ...005 19 Electric Scooter SLO Navodila za uporabo Garancijska izjava 005 20 Neutron n2 Plus...
Страница 66: ...SL 1...
Страница 76: ...SL 11 3 SESTAVLJANJE IN RAZSTAVLJANJE e elite razstaviti e skuter sledite spodnjim navodilom 1 2 3 4 5 6 7 8...
Страница 85: ...005 19 Electric Scooter CZ N vod k pou it Z ru n list 005 20 Neutron n2 Plus...
Страница 86: ...CZ 1...
Страница 96: ...CZ 11 3 SLO EN A ROZLO EN Abyste elektrokolob ku rozlo ili n sledujte n e uveden pokyny 1 2 3 4 5 6 7 8...
Страница 105: ...005 19 Electric Scooter SK N vod pre pou vanie Z ru n list 005 20 Neutron n2 Plus...
Страница 106: ...SK 1...
Страница 116: ...SK 11 3 MONT A DEMONT Pre demont e sk tru postupujte pod a pokynov uveden ch ni ie 1 2 3 4 5 6 7 8...
Страница 125: ...005 19 Electric Scooter PL Instrukcja obs ugi Deklaracja gwarancyjna 005 20 Neutron n2 Plus...
Страница 126: ...PL 1...
Страница 136: ...PL 11 3 SK ADANIE I ROZK ADANIE Aby roz o y hulajnog wykonaj nast puj ce kroki 1 2 3 4 5 6 7 8...
Страница 145: ...Elektromos roller HU Haszn lati utas t s 005 20...
Страница 146: ...HU 1...
Страница 165: ...005 19 Electric Scooter 6 M 0 K 005 20 Neutron n2 Plus...
Страница 166: ...ENG 1...
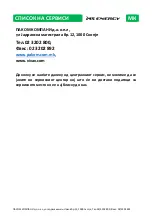
Страница 193: ...12 1000 02 3202 800 02 3202 892 12 1000 02 3202 800 02 3202 892 www pakom com mk www vivax com...
Страница 204: ...www ms start com...


