background image

Studiobot XL Quick Start Guide

7

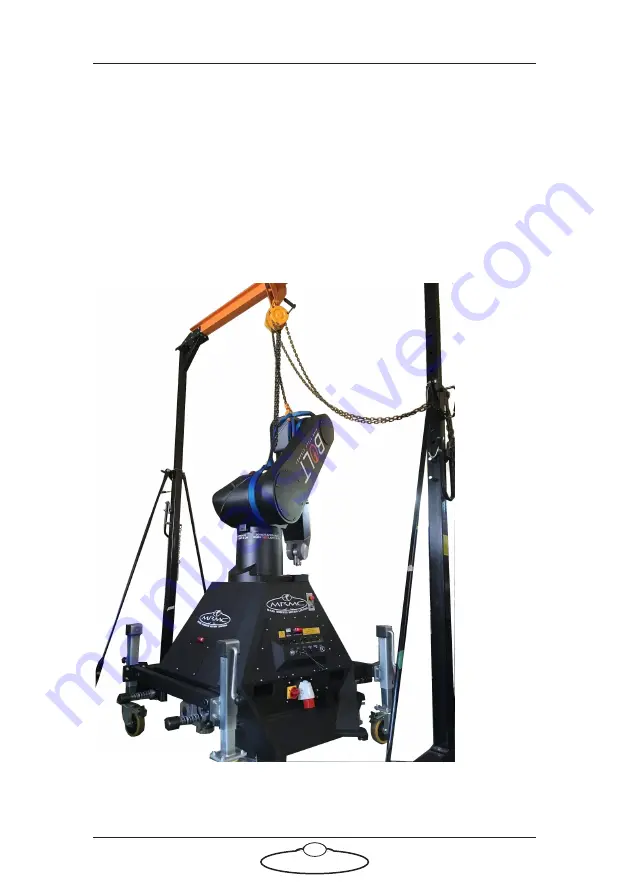
Mounting the Staubli arm

1.

Tie the supplied straps around the Staubli arm and insert the hook 
from the gantry hoist on to it.

2.

Wheel the Studiobot base under the gantry hoist.

3.

Use the gantry hoist to gently lift the arm and lower it in position on 
the base aligning the screw slots.

4.

Tighten the four screws to secure the arm on the Studiobot XL base.

5.

Remove the gantry hook and the straps from the arm.

Содержание MRMC-2011-01

Страница 1: ...Studiobot XL Quick Start Guide QSG Product Code MRMC 2139 01 Product Covered MRMC 2011 01...

Страница 2: ...this document is accurate and up to date Mark Roberts Motion Control continuously strives to improve their products and may make changes to the hardware firmware and software described in this docume...

Страница 3: ...the Camera Platform and Teleprompter 8 Connecting the cables 12 Teleprompter connections 14 Starting up the Studiobot XL system 14 Configuring the Proximity Scanner 18 Shutting down the Studiobot sys...

Страница 4: ...Studiobot XL Quick Start Guide iv...

Страница 5: ...is designed for reliable day in day out use in professional studio broadcast environments Studiobot XL is equipped with a robotic arm mounted on a movable pedestal with the robot controller mounted wi...

Страница 6: ...ses the safety concerns that are especially important around high speed high acceleration industrial grade robots which can cause severe injuries such as Studiobot XL Unlike traditional motion control...

Страница 7: ...y four wire including Ground The CS8 is set at the factory for the three phase voltage of the country of use The Robocam Atelier computer that controls Studiobot XL are auto switching and can run on 1...

Страница 8: ...eally use physical safety barriers and light guards curtains Keep stands lights and accessories out of the No Go Zone if possible If not possible then try to take as much care with their positioning a...

Страница 9: ...te flammable gas Keep the equipment dry The system has not been made weatherproof Do not use with wet hands Always run moves only when standing within easy reach of the emergency stop Always tell the...

Страница 10: ...hey fully briefed on the safety requirements and that they know not to change their position or do anything other than the rehearsed moves without fully warning the operator Any such person is to have...

Страница 11: ...he hook from the gantry hoist on to it 2 Wheel the Studiobot base under the gantry hoist 3 Use the gantry hoist to gently lift the arm and lower it in position on the base aligning the screw slots 4 T...

Страница 12: ...diobot to the location and lower the 4 x feet to secure to the ground 7 Once in place ensure that you fully secure the feet by tightening the locknut in the feet Mounting the Camera Platform and Telep...

Страница 13: ...t the camera platform on the arm 2 Now mount the teleprompter to the camera platform using the 4xM3 screws secure the teleprompter to the camera platform 3 Add the top bracket to the teleprompter as w...

Страница 14: ...Studiobot XL Quick Start Guide 10 5 Once firmly secure attach the pan and tilt connections...

Страница 15: ...Studiobot XL Quick Start Guide 11 Notes...

Страница 16: ...e 12 Connecting the cables Cable wrap J1201 ETH E STOP VIDEO 1 Tele Power ROBOT ETH 415 Volt Brake Release Plug TEACH PENDANT The Ethernet for the Camera can use or bypass the Ethernet hubs in the sys...

Страница 17: ...rt Guide 13 ROBOT ONLY E STOP Ethernet Power Supply 415 Volt 3 phase 5 wire including Neutral and Ground VIDEO SIGNALS Power Supply 120 240 Volts hub 5V Ethernet for Camera ETHERNET E STOP POWER 24V I...

Страница 18: ...d all the cables you power up the rig by switching on the components in the order described below 1 Make sure you have secured the area around Studiobot XL 2 Release the E stop on the Studiobot XL bas...

Страница 19: ...shows an A on its display 4 Power up the Robocam Atelier computer system and all of its components including the RT 14 interface box You can do this Hint The St ubli CS8 is inside the Studiobot XL ba...

Страница 20: ...d Ethernet connection running over the ROBOT ONLY cable is now working 6 On the Robocam Atelier PC start the Robocam Atelier application Robocam Atelier automatically loads the relevant firmware into...

Страница 21: ...al LCMs Hint If the Studiobot arm is in a backward or reversed starting position the arm might swing overhead or around the side to reach the home position possibly striking the walls ceiling or other...

Страница 22: ...ia a USB cable to the Laptop 2 Then Start the Safety Designer Software Laptop Desktop 3 Once the software has started click on Open Project 4 Browse for and select the scanner config file on the Lapto...

Страница 23: ...on the Device tile to high light it blue instead of grey 6 Then click on Connect on the top icon ribbon of the screen 7 Once connected there should be a Green tick on the device tile Double Click on t...

Страница 24: ...left of the screen to expand the options 9 Click Fields within the expanded options which will then display the currently set triangular or circular test detection field 10 The scanner will be displa...

Страница 25: ...exiting field by dragging the dotted line You can even delete the existing field by pressing Delete on the keyboard and then create a new field by selecting the create polygon icon then draw the desir...

Страница 26: ...Studiobot XL Quick Start Guide 22 13 Then click on Transfer to device 14 You might be asked for a Password to login which is SICKSAFE then click Login...

Страница 27: ...t XL Quick Start Guide 23 15 Then the following dialog box will be displayed click Yes to start in test mode 16 If you are still happy with the field created then click Verify to store the info in the...

Страница 28: ...ck Save as PDF at the bottom of the screen This is an important step and should not be skipped Once saved then click OK 18 Click Disconnect on the top ribbon of the screen 19 Then close the software w...

Страница 29: ...ocam Atelier although you might have to reset the soft limits to reach the transport position or by moving the arm manually For details see page 26 2 In the Robocam Atelier software disengage the robo...

Страница 30: ...ors might not be able to back off from this position without tripping out Putting the arm into transport position to make the Studiobot volume as small as possible so it will fit into a truck You can...

Страница 31: ...se Unit into socket J1204 on the arm base 5 Person 1 On the Brake Release Unit use the lower dial to select which Studiobot axis you want to move Brake Release 4 Unit 5 6 Person 2 By hand securely hol...

Страница 32: ...Studiobot XL Quick Start Guide 28 Notes...

Страница 33: ...Studiobot XL Quick Start Guide 29 Notes...

Страница 34: ...ion to the Studiobot controller the St ubli CS8 over the ROBOT ONLY cable Try a different cable The cable between the cifX boards in the Robocam Atelier PC and St ubli CS8 needs to be a high quality f...

Страница 35: ...ons in teach pendant by clicking OK 5 Put the dead man s handle to the middle position Studiobot won t move Make sure you have enabled Studiobot in Robocam Atelier The Staubli arm has its own hard lim...

Страница 36: ...r to take the axis back to the required position This will only let you move the axis that has crossed the limits and only in the direction that brings it back to a position within the soft limits Not...

Страница 37: ...Studiobot XL Quick Start Guide 33 Notes...

Страница 38: ...r You use this to connect the cifX board in the St ubli CS8 unit inside the Studiobot base to the cifX board in the Robocam Atelier PC via the umbilical cable The cifX Ethernet network is an industria...

Страница 39: ...Studiobot XL Quick Start Guide 35 Notes...

Страница 40: ...e configured to run on different voltages without affecting performance Change the CS8 PSU input to match the available three phase voltage 50 60 Hz as shown in the table Allowed three phase input vol...

Страница 41: ...Green Yellow Ground Optional power generator requirements 3 kVA Performance Note No NEUTRAL is used Axis Rangeoftravel Maximumspeed Rotate 160 35 sec Lift 136 5 35 sec Arm 30 to 150 35 sec Cam Tilt T...

Страница 42: ...Studiobot XL Quick Start Guide 38 Notes...

Страница 43: ...Studiobot XL Quick Start Guide 39 Notes...

Страница 44: ...Mark Roberts Motion Control Ltd Unit 3 South East Studios Blindley Heath Surrey RH7 6JP United Kingdom Telephone 44 0 1342 838000 info mrmoco com www mrmoco com...

Отзывы: