background image

Bolt Junior Quick Start Guide

31

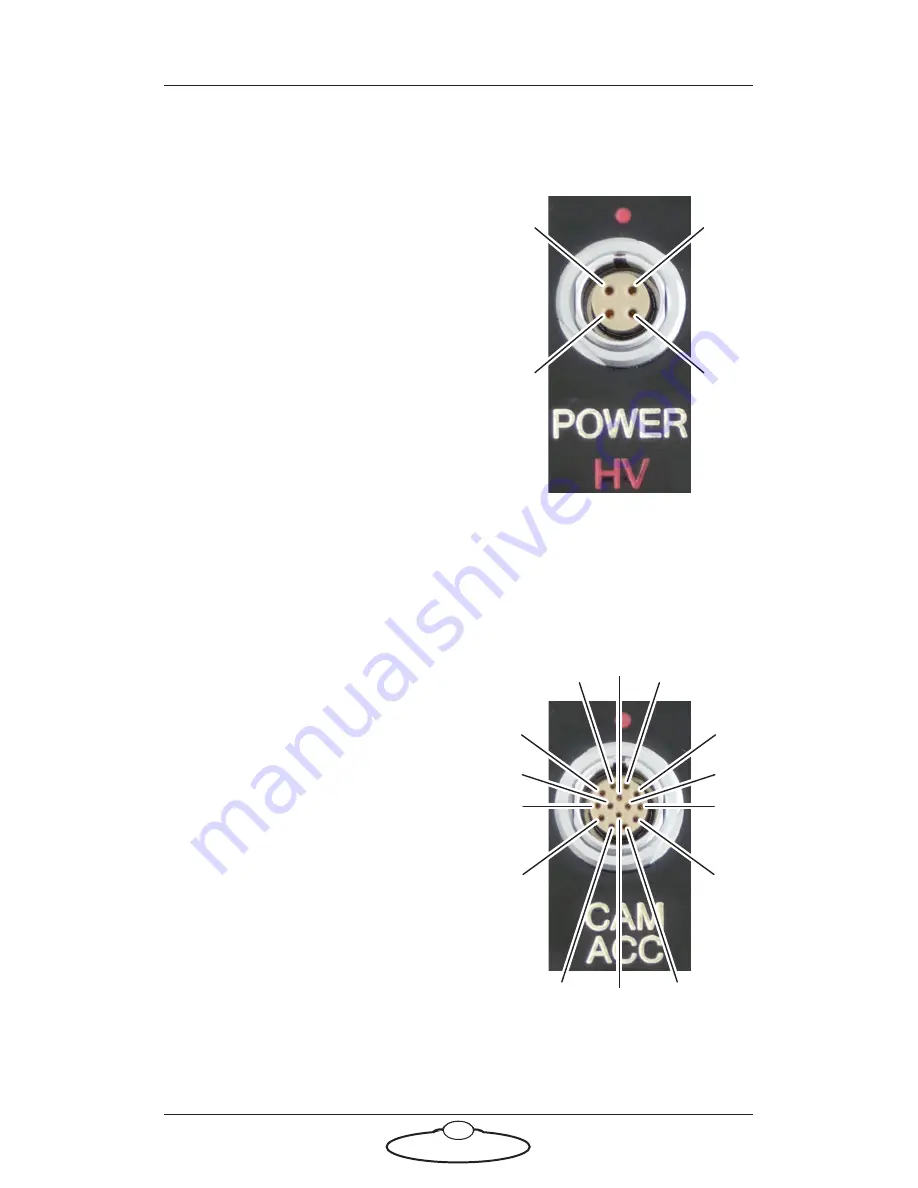
Power connector

The power input connector for the Ulti-box. For usage see page 29. 

1.

GND

2.

GND

3.

+35V

4.

+35V 


Camera Accessory connector

This is a multi-purpose camera accessory connector with connections for 
three stepper motors, two serial lens controls, two trigger in controls, and 
two trigger out controls. 

1.

Step1 

2.

Gp2In (Trigger In 2) 

3.

Step2 

4.

SerialTxB serial lens control

5.

Step3 

6.

SerialRxB serial lens control

7.

Dir3 

8.

GND 

9.

+5V 

10. Gp1In (Trigger In 1) 
11. Dir1 
12. Dir2 
13. Gp2Out (Trigger Out 2) 
14. Gp1Out (Trigger Out 1)

3

4

2

1

1

2

3

4

5

6

7

8

9

10

11

12

13

14

Содержание Bolt Junior

Страница 1: ...RS IN CAMERA ROBOTICS CRANES AND RIGS BROADCAST HEADS DSLR PRODUCT PHOTOGRAPHY RENTALS Bolt Junior COMPACT LIGHTWEIGHT HIGH SPEED ROBOT Quick Start Guide Product Code MRMC 1558 00 Part number MRMC 156...

Страница 2: ...s document is accurate and up to date Mark Roberts Motion Control continuously strives to improve their products and may make changes to the hardware firmware and software described in this document M...

Страница 3: ...lt Junior start up summary 16 Shutting down the Bolt Junior system 17 Bolt Junior shut down summary 18 Moving the Bolt Junior arm by hand 18 Appendix 1 Troubleshooting 22 Typical symptoms causes and a...

Страница 4: ...Bolt Junior Quick Start Guide iv...

Страница 5: ...Junior is designed for reliable day in day out use in professional studio and Outside Broadcast environments It has a small lightweight robotic arm which can be used either as camera rig or model move...

Страница 6: ...such as Bolt Junior Unlike traditional motion control equipment Bolt Junior can get to maximum speed in the blink of an eye too fast for someone to be able to quickly move out of the way You need to t...

Страница 7: ...can not be configured to run on less The computer stack that controls Bolt Junior that is the desktop computer and the power supply brick for the RT 14 interface box are auto switching and can run on...

Страница 8: ...arly mark the area around the robot in which no persons are allowed to enter As a bare minimum use brightly marked tape on the floor outside the reach of the robot to indicate the No Go Zone Ideally u...

Страница 9: ...nyone cross the robot s track when the track motor is powered up In fact it is a good idea to get into the routine of walking around the track instead of over it so that you don t cross the track out...

Страница 10: ...sparks that can ignite flammable gas Keep the equipment dry The system has not been made weatherproof Do not use with wet hands Always run moves only when standing within easy reach of the emergency s...

Страница 11: ...erson or Actor has to be within the no go zone during a move hand model etc ensure that they fully briefed on the safety requirements and that they know not to change their position or do anything oth...

Страница 12: ...IDEO 2 ETH 415 Volt These Ethernet ETH ports are for network connection to the track motor controller and to the Ulti box for LCMs via the Staubli arm ETHERCAT goes to the St ubli CS8 in the base only...

Страница 13: ...ernet Power Supply 415 Volt 3 phase 5 wire including Neutral and Ground VIDEO SIGNALS Power Supply 120 240 Volts hub 5V INtime dongle cable in USB port RT 14 Hand Held Box Ethernet for Camera ETHERNET...

Страница 14: ...Bolt Junior Quick Start Guide 10 Picture of Bolt Junior connections...

Страница 15: ...OWER output 24 48 Volts DC POWER input 24 48 Volts DC Video 2 Video 1 ETHERNET POWER input for camera 24 48 Volts DC J1202 Power input and Ethernet for the Ulti box Additional connectors for the camer...

Страница 16: ...Junior and the track as necessary and tell others on the set that you are now powering up the rig 2 Release the E stop on the Bolt Junior Base by turning the red button clockwise until the button pops...

Страница 17: ...king light see previous diagram If the cifX board lights do not show as above after about three minutes then close Flair and restart INtime as follows Hint The St ubli CS8 is housed inside the Bolt Ju...

Страница 18: ...lt Junior arm Any additional interface boxes that are attached to the computer stack 7 Release the E stop that is plugged into the computer stack by turning the button clockwise until the red button p...

Страница 19: ...home position rotated straight forward and tucked under 11 Set the soft limits for the rig axes in Flair as required Arm position limits Track limits Hint You use the Track button in Flair to toggle...

Страница 20: ...he E stop on the rig 3 Switch on Bolt Junior 4 Switch on the Flair PC 5 Check networking lights after three minutes Start Robot if needed 6 Start Flair 7 Release the E stop on the computer stack In Fl...

Страница 21: ...Flair software click on the Disengage Robot button 3 In the Flair software disengage the track by toggling off the Track button 4 Press down all E stop buttons On the computer stack On the Bolt Junio...

Страница 22: ...outside the soft limits the software might refuse to move the arm to get back inside the limits Recovering from a hardware lock up If momentum or a programming error moves the arm against its interna...

Страница 23: ...e power and be switched on 2 If the robot is connected to a running Flair PC click on the Disengage Robot button in Flair Hint Moving the Bolt Junior arm by hand is usually a two person job one to ope...

Страница 24: ...hen you release the brake 5 Person 1 Press and hold the Brake Release button 6 Person 2 Move the arm by hand 7 Person 1 Release the Brake Release button 8 Repeat steps 3 to 7 to move all the axes you...

Страница 25: ...Bolt Junior Quick Start Guide 21 Notes...

Страница 26: ...k the order in which you are powering up the devices page 12 Make sure you have allowed enough time for the Bolt Junior St ubli CS8 unit to completely power up with the cifX board lights displaying th...

Страница 27: ...Bolt Junior Quick Start Guide 23 Notes...

Страница 28: ...he camera This has a straight through connection to the VIDEO 2 OUT connector 9 4 ETHERNET Not used 5 10 ETHERNET connectors for communications between multiple Ethernet devices on the rig These two c...

Страница 29: ...2signal from the camera This has a straight through connection to the VIDEO 2 OUT connector 3 11 ETHERCAT connector You use this to connect the cifX board in the St ubli CS8 unit inside the Bolt Junio...

Страница 30: ...n the Ulti box that is mounted on the Bolt Junior arm 2 VIDEO 1 IN input connector for the video 1 signal from the camera This has a straight through internal connection to the VIDEO 1 OUT connector 7...

Страница 31: ...ted on the arm This has a straight through internal connection to the Ulti box output connector 1 This connector uses a special two into one cable that attaches to the ETHERNET and 48V OUT connectors...

Страница 32: ...the axes connectors such as PAN TILT and DATA are not ordinarily used in the context of Bolt Junior as Bolt Junior itself provides these features 1 PAN connector for the Pan servo motor on a head For...

Страница 33: ...on a controller such as the MSA 20 Handwheels or Large Format Panel LFP The RIG HEAD connector on an RT 14 interface box which is in turn connected to a PC running Flair Motion Control Software Note...

Страница 34: ...B 4 Z 5 N C 6 MOTOR_B 7 MOTOR_A 8 LIMIT 9 5V 10 GND Program serial connector Serial connector for connection to a controller using a Serial RS232 connection and for updating the firmware in the Ulti b...

Страница 35: ...accessory connector with connections for three stepper motors two serial lens controls two trigger in controls and two trigger out controls 1 Step1 2 Gp2In Trigger In 2 3 Step2 4 SerialTxB serial len...

Страница 36: ...connector for connection to a controller using a DataLink connection DataLink In Up Link connector for connection to a DataLink device higher up in the DataLink daisy chain For usage see page 29 1 Wa...

Страница 37: ...Bolt Junior Quick Start Guide 33 Notes...

Страница 38: ...ements 10 kVA Dimensions BoltJunior Weight excluding Base 114kg Weight Base 180kg Power Supply Unit 50kg 110 2lbs Weight anchor weights for track when track is not bolted to the ground 100kg on each c...

Страница 39: ...Bolt Junior Quick Start Guide 35 Notes...

Страница 40: ...Mark Roberts Motion Control Ltd Unit 3 South East Studios Blindley Heath Surrey RH7 6JP United Kingdom Telephone 44 0 1342 838000 info mrmoco com www mrmoco com...
Отзывы: