Makeblock mBot Скачать руководство пользователя страница 1

1

Contents

Introduction.........................................................................................................................................

4

Part I General questions......................................................................................................................

5

How to connect Makeblock robot with mBlock.........................................................................

5

How to upgrade firmware for Makeblock robot with mBlock.................................................

10

How to reset default program manually with mBlock..............................................................

12

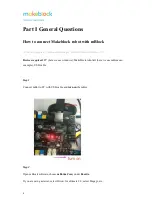
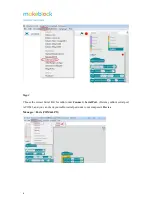
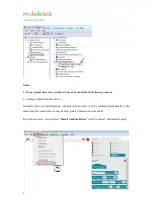
How to upload my program to the Makeblock robot with mBlock.........................................

13

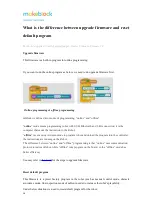
What is the difference between upgrade firmware and reset default program.........................

16

Why my Makeblock robot doesn't move when I set low motor speed.....................................

18

A Comparison among Bluetooth connection, 2.4G connection and USB connection.............

19

What troubleshooting I can try if my Makeblock robot cannot connect to my phone App.....

21

Part II mBot.......................................................................................................................................

22

How to replace motor shaft for mBot.......................................................................................

22

Why the Ultrasonic Obstacle Avoidance Mode doesn’t work on mBot...................................

23

Why the Line Follower Mode doesn't work on mBot..............................................................

24

How to connect 2.4G wireless serial to my mBot....................................................................

27

How to change the speed of mBot with IR remote controller..................................................

28

Issues related to Battery............................................................................................................

29

Useful links for mBot................................................................................................................

31

Part III Ranger...................................................................................................................................

33

Why the motors are not working properly as they should be...................................................

33

Can I use 2.4G wireless module for my Ranger.......................................................................

35

Why the Ranger cannot avoid objects in object avoidance mode............................................

36

What should I do if the Nervous Bird could not keep balanced?.............................................

37

Questions related to Bluetooth connection on Mobile devices................................................

38

What should I do if the Makeblock App says “synchronization fails”....................................

42

Why my Ranger moves once I turn it on..................................................................................

44

Содержание mBot

Страница 1: ...App 21 Part II mBot 22 How to replace motor shaft for mBot 22 Why the Ultrasonic Obstacle Avoidance Mode doesn t work on mBot 23 Why the Line Follower Mode doesn t work on mBot 24 How to connect 2 4G...

Страница 2: ...my Ultimate 2 0 motors are not working properly 66 questions related to Bluetooth connection on Mobile devices 68 Can I use 2 4G wireless module to control my Ultimate 2 0 72 What should I do if the...

Страница 3: ...hing 100 Part VII XY Plotter 103 Why the stepper motor doesn t run or runs abnormal 103 Why I cannot draw correct pictures 107 Why it runs abnormal when testing home 110 Why the laser doesn t light on...

Страница 4: ...mCore Orion Auriga and MegaPi boards and the related PC software in this document is mBlock 3 latest 3 4 12 If you haven t downloaded the software click here to download and install If you still have...

Страница 5: ...Ultimate Ultimate 2 0 Devices required PC here we use windows Makeblock robot kit here we use mBot as an example USB cable Step 1 Connect mBot to PC with USB cable and turn on the mBot Step 2 Open mBl...

Страница 6: ...6 Step 3 Choose the correct Serial Port for mBot under Connect Serial Port Here my mBot s serial port is COM3 and you can check your mBot serial port under your computer s Device Manager Ports COM LPT...

Страница 7: ...Failing to install Arduino driver Normally when we install mBlock software Arduino driver will be installed automatically at the same time But sometimes we may need to install Arduino driver manually...

Страница 8: ...board mCore has not been turned ON this cause is only for mBot mCore c The Bluetooth connection from the robot may capture the serial port Remove the Bluetooth module from the robot while using the U...

Страница 9: ...would be mapped into COM ports Even if they are not present they still appear in the Serial Port list So uninstall these paired Bluetooth devices will resolve this issue Solution disable or uninstall...

Страница 10: ...ired PC here we use windows Makeblock robot kit here we use mBot as an example USB cable Step 1 Refer to FAQ to connect your Makeblock robot to mBlock Step 2 Go to Connect Upgrade Firmware wait until...

Страница 11: ...used by using defective modules faulty serial port chip or faulty main board 1 Please remove all the modules from main board including RJ 25 cables then upgrade firmware again 2 If it is still the sam...

Страница 12: ...Ranger Starter Ultimate Ultimate 2 0 Devices required PC here we use windows Makeblock robot kit here we use mBot as an example USB cable Step 1 Refer to this FAQ to connect your Makeblock robot to m...

Страница 13: ...e 2 0 Devices required PC here we use windows Makeblock robot kit here we use mBot as an example USB cable Step 1 Refer to this FAQ to connect your Makeblock robot to mBlock Step 2 Edit your own progr...

Страница 14: ...14 Step 4 Then the program will start uploading wait until it shows Upload Finish Notes 1 In case you fail to upload a new program please refer to below steps to do some troubleshooting by yourself...

Страница 15: ...irmware and upload program fail try to change the USB cable USB port or change a PC to have a check e Try to change some new batteries According to our test and research it is suggested to use recharg...

Страница 16: ...hat sends the instruction to the Robot offline means using Arduino mode to program robot and upload the program into the controller the instructions are running on the Robot The difference between onl...

Страница 17: ...e uploaded a program to mBot before and now you want to use Makeblock App to control it then you need to reset default program Surely if it is your first time to control it with Makeblock App and fail...

Страница 18: ...e real running speed depends on the voltage and speed value Here we take mBot as an example The setting speed is 50 and the maximum speed is 255 The battery is 3 7V and it is fully charged The rated v...

Страница 19: ...2 4G module included a 2 4G wireless dongle Do online program only No interference when there are several robots in 2 4G connection cannot work with Phone App mCore Auriga MegaPi Bluetooth connection...

Страница 20: ...ny computers especially laptops can support Bluetooth as it has built in Bluetooth dongle But sometimes there may be incompatibility between computer and Bluetooth module And this method is not sugges...

Страница 21: ...o mBlock App is under construction which supports mBot Ranger Codey Rocky Neuron Motion Block Halocode soon If you find Bluetooth cannot be connected to Makeblock App please refer to below chart to do...

Страница 22: ...to replace motor shaft for mBot There is spare motor shaft in the mBot package please find it and refer to the video tutorial in this link to replace it if your shaft is broken https www youtube com...

Страница 23: ...Ultrasonic Obstacle Mode onboard light should be green on 4 Refer to this FAQ to reset default program to have a try 5 Make sure the battery on mBot can provide enough power According to our test and...

Страница 24: ...se test if the line follower sensor is faulty referring to the below steps Step 1 Put the two sensors of the Me Line follower above Detection range 1 2cm a white desk or white paper and check if the t...

Страница 25: ...t but the line follower mode doesn t work there are several possible reasons that we should check a The default program may not function properly in mBot please refer to FAQ3 to reset default program...

Страница 26: ...hange a RJ25 cable to have a check e The power from battery is not enough Please change the battery to have a check According to our test and research it is suggested to use rechargeable Li ion batter...

Страница 27: ...after you clicked on Connect that means the 2 4G is still disconnected In this case please restart the mBlock software have a try 3 Program for mBot and run it online With 2 4G wireless serial connect...

Страница 28: ...rough IR remote controller with the factory default program the 1 9 keys on the IR remote controller are set to adjust the speed of mBot 1 for slowest and 9 for fastest We can also write our own progr...

Страница 29: ...e mCore A 3 7V 6V 2 While the lithium battery of mBot is being charged is there any protection A Yes It has over current and over charge protection 3 What is size of mCore battery holder and its cover...

Страница 30: ...ere any special phenomenon if the robot cannot get enough power from battery A Currently there is no visible indicator for low power from battery But according to our test and feedback please check an...

Страница 31: ...ock Programming Tutorial by 5 Years Old Andy https www youtube com watch v 89VNohLyXeM 3 Tutorial for Combined Line Following and Object Avoidance on mBot http learn makeblock com en tutorial for comb...

Страница 32: ...himo im doc 7D1Z1WfJa1c5XFJj Others 1 Use mBot with App Inventor http learn makeblock com en use mbot with app inventor 2 Makeblock mBot Protocol http learn makeblock com en makeblock orion protocol 3...

Страница 33: ...o test e Try some new batteries f It may not move if the speed is too slow like 20 or 30 So try speed at 200 Situation 2 Ranger cannot move straightly two motors have different speed Due to the motors...

Страница 34: ...ange the M1 and M2 connection Situation 4 Ranger doesn t move constantly and sometimes there is sound from the main board a The speed level maybe too low try a higher like 200 to test b Battery cannot...

Страница 35: ...possible to replace the Bluetooth connection with a 2 4G wireless module Yes As the module connection interface is the same with Ranger Bluetooth module II How to use 2 4G wireless connection Refer to...

Страница 36: ...d to Port 10 required You should feel a slight click when the RJ 25 cable is properly inserted 4 Check whether the red indicator of the ultrasonic module is on If not the problem is caused by wiring 5...

Страница 37: ...id follow the guidance strictly to assemble it 2 Make sure power is enough as self balancing robot requires to be working with full power If you are sure assembling is perfect but it still fails to be...

Страница 38: ...e is plugged properly Download and install the latest Makeblock App and refer to below steps to connect Ranger 1 Power on Ranger and there is a blue LED keeping slow flashing on the Bluetooth module 2...

Страница 39: ...9 III What is the troubleshooting if my Ranger fails to connect Makeblock App through Bluetooth If you tried above steps to connect Bluetooth but failed please follow below chart to check step by step...

Страница 40: ...Note Battery is very important for any abnormal phenomenon happens to the robot you are strongly suggested to change new battery If you fail to connect in mBlock App you can also refer to the above ch...

Страница 41: ...The Bluetooth connection to the Ranger is unstable For the issue that the Bluetooth connection is unstable between Robot and Makeblock App it may be caused by the power issue or the Bluetooth module...

Страница 42: ...42 What should I do if the Makeblock App says synchronization fails Problem When I try to connect Bluetooth in Makeblock App the screen says synchronization fails as below picture...

Страница 43: ...43 Solution Connect Ranger to PC open mBlock 3 or 5 and do reset default program...

Страница 44: ...turn on the power it will move automatically and won t listen to the command Reset default program or upgrade firmware won t help this issue Solution 1 Through Makeblock App turn on the robot though...

Страница 45: ...ne follower module is connected to Port 9 but Ranger still cannot follow the line please reset default program on mBlock software environment It might be the line follower faulty or other hardware iss...

Страница 46: ...If the led corresponding to each sensor lit up when above a white paper desk and turn off when remove from the white paper desk means the line follower sensor is ok Otherwise the sensor should be faul...

Страница 47: ...It may not move if the speed is too slow like 20 or 30 So try speed at 100 Situation 2 Starter cannot move straightly two motors have different speed though set to same value Due to the motors instal...

Страница 48: ...board please switch the places of the two motors 2 When given move forward command it moves backward while move backward command it moves forward The reason is the two thin wires white and black comin...

Страница 49: ...ces That is the only difference as IR version starter includes the Me Infrared Receiver Decode and IR Remote Controller while the Bluetooth version starter doesn t includes these two parts but a Me Bl...

Страница 50: ...roid phone and put the Infrared head on the IR remote controller toward to the camera on the Android phone then press the key on the IR remote controller Meanwhile through the camera on Android phone...

Страница 51: ...ch means the infrared receiver cannot communicate with the remote II Program for the IR controller instead of using default program First of all learn the Code of each key Then you can write your pers...

Страница 52: ...52...

Страница 53: ...Bluetooth module on Starter Here is Starter Bluetooth Module with RJ 25 connector While the 2 4G module interface is different So we cannot use 2 4G module to replace the Bluetooth module That is too...

Страница 54: ...refer to below steps to connect Starter 1 Connect the Me Bluetooth module to Port 5 on Orion board 2 Power on the Starter and there is a blue LED keeping slow flashing on the Me Bluetooth module 3 Op...

Страница 55: ...irmware is not compatible with Makeblock App please connect it to mBlock 3 and reset default program III What is the troubleshooting if my Starter fails to connect Makeblock App through Bluetooth If y...

Страница 56: ...n work with the Bluetooth on our product Since the iPad 2 doesn t support BLE protocol it cannot work with our APPs which need connect with Bluetooth The APPs of our product work with iPad 3 and above...

Страница 57: ...rechargeable Li ion battery or rechargeable nickel metal hydride nickel cadmium which can be bought from amazon or local shop Or alkaline battery with good quality like Energizer DURACELL Besides plea...

Страница 58: ...test and research it is suggested to use rechargeable Li ion battery or rechargeable nickel metal hydride nickel cadmium which can be bought from amazon or local shop Or Alkaline battery with good qu...

Страница 59: ...Starter you need to check if the main board is working or not Below are the steps 1 Please open the Arduino software through the mBlock software 2 On Arduino software go to Tools Board and choose the...

Страница 60: ...rt then choose the correct serial port for your robot You can check your robot main board serial port under your computer s Device Manager Ports COM LPT 4 Go to File Examples find and open the example...

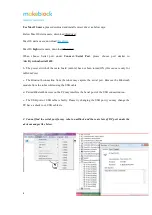
Страница 61: ...61 5 Upload the program to the Robot and see if it can be upload successfully...

Страница 62: ...t means the main board is working ok 2 If there is an error like below it means the board has lost its bootloader Normally you need a new board in this case If you have two Orion boards and you are ex...

Страница 63: ...Here are the suggestions from other users https forum makeblock com t 12v rechargable battery 707 12 https forum makeblock com t mbot ranger best high capacity lipo battery 5103 7 Power adapter specif...

Страница 64: ...IR version Starter If you have IR version starter instead of Bluetooth version you can program for the Robot Arm with the mBlock software Program for the arm actually you only need to program the 37...

Страница 65: ...nally if you want to control the arm and gripper with IR remote controller you need program the IR controller and refer to this post http forum makeblock com t trouble programming ir buttons in 3 2 31...

Страница 66: ...t move straightly two motors have different speed Due to the motors installation difference it is normal that two motors don t have exactly same speed If they differ a lot please check a If there is a...

Страница 67: ...67...

Страница 68: ...ock App and refer to below steps to connect Ultimate 2 0 1 Power on the Ultimate 2 0 and there is a blue LED keeping slow flashing on the Bluetooth module 2 Open the Makeblock APP on mobile device and...

Страница 69: ...irmware is not compatible with Makeblock App please connect it to mBlock 3 and reset default program III What is the troubleshooting if my Ultimate 2 0 fails to connect Makeblock App through Bluetooth...

Страница 70: ...suggested to change new battery IV Why Ipad 2 and below doesn t support Bluetooth from Makeblock The Bluetooth module on our product supports BLE protocol while for Apple products only the products p...

Страница 71: ...ck App it may be caused by the power issue or the Bluetooth module is not well plugged So you may change the battery for the Ultimate 2 0 to have a try since it is easy to lead disconnect issue on Blu...

Страница 72: ...control my Ultimate 2 0 I Is it possible to replace the Bluetooth connection with a 2 4G wireless module Yes As the module connection interface is the same II How to use 2 4G wireless connection You c...

Страница 73: ...otors remember to use the two 9V 185RPM motors Here is the guidance of self balancing robot including assembling video https openlab makeblock com topic 5729b96b591c0ad43a4764b2 2 Make sure power is e...

Страница 74: ...oose B Here are the suggestions from other users https forum makeblock com t 12v rechargable battery 707 12 https forum makeblock com t mbot ranger best high capacity lipo battery 5103 7 Power adapter...

Страница 75: ...son should be that we changed its form mode to self balancing robot in Makeblock App and the powered it off then when we reassemble it to other form like robotic arm tank it will run once we power it...

Страница 76: ...h home position referring to the following steps 1 Manually move the carriage to a position any position where X 0 Y 0 2 Power on the Laserbot and connect it to PC with USB cable 3 Upgrade firmware fo...

Страница 77: ...77 5 Go to test if the LaserBot works with home position refer to steps below If the carriage goes to Home position X 0 Y 0 properly means both the X axis and Y axis are working...

Страница 78: ...y but the laser doesn t work Laser doesn t turn on while the fan rotates fine This test requires to connect the laser directly to the power supply Please use the adapter which comes with the kit to do...

Страница 79: ...ouch the interface metal outside check if the laser turns on Notes If the wire didn t touch with the inner metal part of the DC connector the laser won t work Sometimes if we spin the wire metallic pa...

Страница 80: ...part to test it again have a try put the black wire metallic part touch the inner metal part of the DC connector then touch the interface metal outside with red wire metallic part check if the laser t...

Страница 81: ...usion If both the laser and the small fan don t work during above test the module wire which should connect to the power is faulty If the fan works but the laser doesn t turn on it should be the laser...

Страница 82: ...axis or Y axis without stopping Reason The limit switches on X axis or Y axis connect to the wrong pins on MegaPi Troubleshooting 1 In the self test check if the icon X and Y turns into green when pr...

Страница 83: ...pressing Y axis limit switch which means both X axis and Y axis limit switch connecting to the wrong pins Please check if the X Axis limit switch connects to A6 on MegaPi and Y Axis limit switch conn...

Страница 84: ...84 2 Check both X axis and Y axis limit switch make sure the pin doesn t connect to anything as I circled below...

Страница 85: ...you have followed step 1 and 2 but it is still the same issue please switch the position of limit switches Put the X axis limit switch on Y axis and the Y axis limit switch on X axis then test step 1...

Страница 86: ...axis is connected to correct motor port Port 1 on MegaPi The motor which controls Y axis is connected to Port 2 on MegaPi 2 Make sure the wire connection is plugged into the particular port properly...

Страница 87: ...ith the LaserBot kit please check if the LaserBot has been installed the wrong motor driver 1 The picture shown below shows that the LaserBot has been supplied with encoder motor drivers The correct m...

Страница 88: ...88 II Testing on mLaser 1 Click Enter mLaser 2 After update firmware successfully remove the USB cable Open mLaser again connect serial port on Serial until it shows connected...

Страница 89: ...89 3 Click control panel then click Y Y X X check if the laser head could move to the expected direction If one of them doesn t move then swap the driver and do the test again...

Страница 90: ...cuts or engraves the image in different size on X axis or Y axis as the picture shown below the image s Y axis is stretched here are troubleshooting you could try 1 Update firmware 2 Swap the two moto...

Страница 91: ...91 3 If the other axis of the image is stretched after switched the driver position one of the motor drivers is faulty...

Страница 92: ...ease note to allow app downloaded from anywhere Note if the driver can t be installed properly please follow the video instruction to set allow apps downloaded from anywhere 2 For other Mac users incl...

Страница 93: ...93...

Страница 94: ...t page after installation is still Chinese We have reported this issue to related personnel and you could follow the instruction below to enter the main interface before the problem solved The followi...

Страница 95: ...95 3 Select Enter mLaser...

Страница 96: ...96 4 Go to the language setting at the top right corner...

Страница 97: ...97 5 Close mLaser and reopen it You will find the menu is in English and you could test LaserBot now...

Страница 98: ...nterface of the mLaser appears black rather than white in older computer systems Reason The graphics driver of the computer is out of date Troubleshooting 1 Please update the computer graphics driver...

Страница 99: ...Mac Please follow the instruction to solve this issues http www tech recipes com rx 45404 mac downloaded app is damaged and cant be opened erro r solved For Mac OS Sierra here is a video tutorial for...

Страница 100: ...board paper etc or the graphics are not clear here are the trouble shoot we could try together 1 Adjust the laser light according to this video tutorial Figure 1 2 When you engrave an image you can mo...

Страница 101: ...101 Figure 2 Figure 3 When you cut an image you need choose the correct Material then you can adjust the Laser Intensity The picture figure 4 below shows an example of using wood as the material...

Страница 102: ...102 Figure 4...

Страница 103: ...stepper motor doesn t run or runs abnormal 1 Make sure it is powered on with 12VDC and power switch is turned on 2 Check if you have updated firmware It is required to update firmware whenever switch...

Страница 104: ...104 3 Make sure you have selected the correct serial port Here my XY plotter s serial port is COM4 and you can check your XY Plotter serial port under your computer s Device Manager Ports COM LPT...

Страница 105: ...105 4 Check the setting on stepper motor driver When using mDraw the subdivide should be HHH and Benbox requires HLL...

Страница 106: ...cted to Port 2 on Orion board If necessary please change the connection and test how it performs 6 Check wiring of the stepper motor It should be in the order of blue red green and black 7 It is very...

Страница 107: ...re Troubleshooting 1 Make sure the color of the wiring is in correct order Blue Red Green Black if not kindly change it If the problem still exists please exchange the Port1 and Port2 on the main boar...

Страница 108: ...108 Situation 2 wrong size proportion in X axis and Y axis Troubleshooting...

Страница 109: ...109 1 Make sure the timing belt of X axis and Y axis are tight 2 Make sure the headless screws are tightly installed 3 Make sure the motors driver wiring is correct...

Страница 110: ...ter 2 Connect USB from Orion to computer and connect COM in mDraw then go to setting page as below picture 3 Test the four limit switch S1 S2 S3 S4 by pressing and releasing separately check if the st...

Страница 111: ...111 Note It is important to check which slot the limit switch connects...

Страница 112: ...onnection on limit switch and the top plug interface is unplugged 3 Test limit switch itself in mBlock software connect Orion in mBlock 3 update firmware program below codes and check how the panda sa...

Страница 113: ...d do firmware update for the main board before running the codes II It always clash with boundary when test home 1 The limit switch only works when press home I mean it helps to locate instead of help...

Страница 114: ...will be on if it is not try to update firmware again 3 Change the positive and negative cable connection of M2 and test again 4 Test Laser separately by connect 12V power to the laser directly as bel...

Страница 115: ...i Red in black out Only put red wire metallic part inside of the DC connector interface the laser is off Then make the black wire metallic part touch the interface metal outside check if the laser tur...

Страница 116: ...116 Note Do not connect laser directly to 12V for a long time...

Страница 117: ...117 Why the laser cut discontinued lines 1 Make sure it focuses correctly and generates the lightest laser 2 Make sure the material is absolutely flat 3 Make sure M2 connection is tightly connected...

Страница 118: ...eck the Pen servo is connected to RJ25 adapter slot 2 3 Test Pen up and Pen down click pen up pen should be remove from paper and click on pen down pen should just get in touch with paper 4 If the ser...

Страница 119: ...119...

Страница 120: ...ate firmware Every time we switch from mDraw to Benbox we need to do firmware update in the later software 2 Adjust the subdivision When use mDraw it should be HHH and it should be HLL for Benbox 3 Ad...

Отзывы: