background image

18

The UV lamp is located on the underside of the homogeneous film to ensure that the UV light is

fully exposed to all space in the operating area. UV lamp has a delayed opening function, press the

UV light button, the operator quickly evacuate the scene, after 90S UV lamp is light to protect the

eyes and skin, and avoid injury caused byaccidental exposure.

E. fluorescent lamp

LED fluorescent lamp is adopted, located on the upper side of the homogeneous film to ensure that

the average illumination in the operating area is ≥ 500Lux.

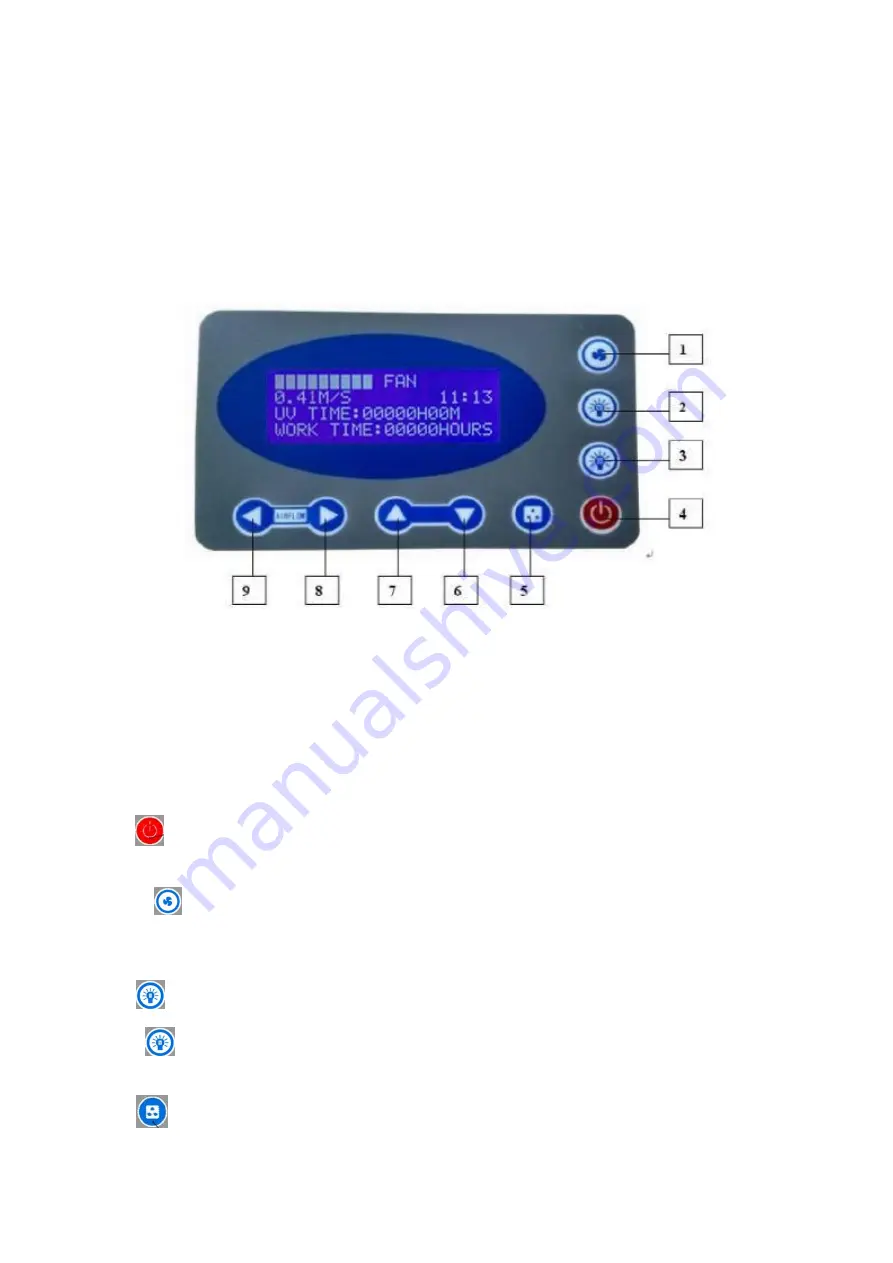
F. Control panel

Figure 15

1. Fan button

2. Fluorescent lamp button 3. UV lamp button

4. Power button

5. Socket

button

6. UV lamp timing increase button 7. UV lamp timing decrease button

8. Airflow

decrease button

9. Airflow increase button

a) Gear display

The airflow velocity, gear, etc in working of the equipment can be known from the gear display

b) Touch the button lightly

The operation of the equipment is achieved by lightly touching the button.

1

Is the power button: the main switch to control the other function buttons. The system

can switchbetween standby mode and operating mode.

2

”Is the fan button: the control button of the working state of the fan. Fan has a

memory function, that is, at the time of starting up the fan, it can display the gear when it was shut

down last time, by which, there is no need to adjust the fan gear every time.

3

”The control button of the fluorescent lamp

4

”The control button of UV lamp.(UV lamp, fan , fluorescent lamp, that is when the

fluorescent lamp, fan are started up, UV lamp will be shut down automatically)

5

”Is the socket button: The socket will change between power on and power off

Содержание FH-12-DB

Страница 1: ...Dispensing Booth FH 12 18 24 DB User Manual 3 Hagavish st Israel 58817 Tel 972 3 5595252 Fax 972 3 5594529 mrc mrclab com MRC 10 22...

Страница 2: ...ode Protection Area Drawing 15 2 1 3 Protected objects 15 2 1 4 Technical Parameters Performance Indicators 16 2 2 Product Structure 16 2 3 Precautions for Use 20 2 4 Daily Maintenance 20 2 5 Storage...

Страница 3: ...o ensure the safe and reliable operation of the product please specify someone as the operation manager of the product when the product fails please immediately report to the manager and contact our c...

Страница 4: ...e outer box is intact if not please take pictures 1 1 Unpacking Program I Disassembled with a wrench Figure 1 Program II Disassembled with an electric drill Figure 2 Quick unpacking diagram Remove the...

Страница 5: ...sories and information are complete FH 12 DB Packing List Item Quantity Position 1 Main Body 1pc Wooden Package 2 Power Cord 1pc 3 Fuse 5A 1pc 4 Fuse 10A 1pc 5 UV Lamp T8 30W 1pc 6 Anti static Curtain...

Страница 6: ...ard 1pc 10 304 Cross Recessed Pocket Hexagon Head Combination Screw with Flat Gasket and Spring Gasket M4 30 12 sets 11 Hexagon Socket Head Cap Screws M10 25 8 sets 12 Stainless Steel Nut M10 14 sets...

Страница 7: ...ard 1pc 10 304 Cross Recessed Pocket Hexagon Head Combination Screw with Flat Gasket and Spring Gasket M4 30 12 sets 11 Hexagon Socket Head Cap Screws M10 25 8 sets 12 Stainless Steel Nut M10 14 sets...

Страница 8: ...e the open or close of the door is affected and avoided to place oppositely or in the corner of the wall At least 400mm must be left in each side of the dispensing booth for the purpose of installatio...

Страница 9: ...t M4 12 bolts attached to the rear panel with a flat blade screwdriver and remove the rear panel as is shown Figure 4 Note The rear cabinet of FH 12 DB FH 18 DB dispensing booth has two rear panels an...

Страница 10: ...hNo 17 wrench the two positioning M10 25 bolts at the bottom side play the role of positioning which do not need nuts for fastening The top is fastened with hexagon socket head cap screws M10 25 The i...

Страница 11: ...the upper front cabinet is aligned with the mounting hole on the rear cabinet the left and right side of the upper front cabinet are flush with the left and right side panels and fix with 8 groups of...

Страница 12: ...ounting holes of upper front cabinet and rear cabinet Take 6 sets of M10 25 bolts 6 groups of flat gaskets 10 6 group of spring gaskets 10 to fasten the connections of upper rear cabinet with upper fr...

Страница 13: ...above Conduct the next installation after the connection is completed Figure10 Take the trachea in the rear cabinet trachea passes through the air hole and insert the trachea into the quick plug in t...

Страница 14: ...an accident during the installation process accidents 5 Installation of Homogeneous Film Figure 11 Firstly remove the UV lamp holder from the card slot no need to disconnect the UV lamp Take the homog...

Страница 15: ...al pressure gauge is beating the socket has power etc if not please refer to 3 1 for conduct troubleshooting After the test is completed install the rear panel the upper rear cover panel installed in...

Страница 16: ...high cleanliness in the working area 2 1 2 Working Principle Airflow Mode Protection Area Drawing Figure13 2 1 3 Protected objects Effect of dispensing booth is to protect the experimental material t...

Страница 17: ...500 lux Power of UV lamp 30W 40W 2 30W Power of LED fluorescent 4 14W 4 16W 4 16W 2 14 W Differential pressure gauge 3pcs Working Voltage 220V 10 60 50Hz Dispensing booths with different dimensions m...

Страница 18: ...m is to keep clean air enter into the operating area continuously to ensure that the airflow velocity and cleanliness in the operating area can meet the standard requirements C Differential pressure g...

Страница 19: ...crease button 9 Airflow increase button a Gear display The airflow velocity gear etc in working of the equipment can be known from the gear display b Touch the button lightly The operation of the equi...

Страница 20: ...splays the velocity in the current state the right display the time the adjustment of the time will be described below UV display the working time of the UV lamp WORK TIME displays the working time of...

Страница 21: ...the upper front cabinet of the dispensing booth the equipment has been tested in the factory and well adjusted the user is not allowed to adjust arbitrarily When the dispensing booth is in the sterili...

Страница 22: ...nsure that the filter paper is intact prohibit the filter paper is damage because of hand touch b Before installation let the new high efficiency filter face the bright spot to see whether there are l...

Страница 23: ...isinfection lamp holder T8 30W DB 07 Fan SC355A DB 08 1 set of control panel Control panel of the dispensing booth FH 18 DB Replacement Parts List No Name Specification DC 01 Protective Tube 5A DC 02...

Страница 24: ...fication DD 01 Protective Tube 5A DD 02 Protective Tube 10A DD 03 UV lamp T8 30W DD 04 LED fluorescent lamp whole 4 16W 2 14W DD 05 disinfection lamp holder T8 30W DD 06 Fan SC400A DD 07 1 set of cont...

Страница 25: ...anel UV lamp does not light Fan fluorescent lamp Check whether the fan fluorescent lamp are closed Lamp holder Check whether the fluorescent lamp connect well with the lamp holder Check according to t...

Страница 26: ...screwdriver replace a new fuse in the protective tube holder and tighten the protective tube holder clockwise When the live line protective tube needs to be replaced unscrew the protective tube holder...

Страница 27: ...ly rule out please immediately notify MRC maintenance department for your safety please do not repair equipment by yourself The maintenance work of this equipment can only be borne by trained and reco...

Страница 28: ...y period is caused by user s improper use MRC does not undertake maintenance obligations After the warranty period MRC is responsible for maintenance and charges the corresponding maintenance costs Th...

Страница 29: ...28 5 Appendix A Circuit diagram...

Отзывы: