2 4 0 8 M K 3 F R O N T P A N E L O P E R A T I O N
58
■
If the MOTU PCI WDM Audio Driver is
installed in Windows, you have to shut down the
computer to put the 2408mk3 I/O into stand-alone
operation.
■
Unplug the Audio Wire cable from the 2408mk3
(although this is not generally recommended).
Stand-alone format conversion
In stand-alone mode, the 2408mk3 I/O acts as a
digital audio format converter. It lets you transfer
audio from ADAT optical to Tascam TDIF, or vice
versa, up to 24 channels at a time. It also lets you
transfer ADAT or Tascam to SPDIF, or vice versa.
Several basic track shifting options are provided.
The SELECT button
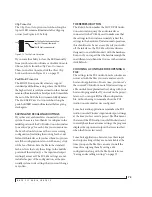
In stand-alone mode, the SELECT button lets you
cycle through the four LEDs to its left, as shown
below. These LEDs blink continuously to confirm
that the 2408mk3 is in stand-alone mode.
Figure 5-2: The SELECT button cycles through the four LEDs, each of
which lets you make a format conversion setting with the SET button.
The METERS setting switches the LEDs in the ANALOG OUT section
over to output metering, as described in “Analog metering” on
page 56.
No clock
In stand-alone operation, you specify a clock
source as explained in the next section. However, if
you choose an external clock source, and the
2408mk3 does not detect a clock signal, the 44.1
and 48 kHz sample rate lights flash to alert you that
no signal can be detected. For example, if you’ve
chosen SPDIF as the clock source (as explained in
the next section), but there is no SPDIF signal
detected, the 44.1 and 48 kHz LEDs will flash.
Clock
The CLOCK setting determines the digital audio
clock source for the 2408mk3 when it is operating
as a stand-alone format converter. Press the
SELECT button repeatedly until the CLOCK LED
is illuminated. Then press the SET button
repeatedly to make your clock setting choice.
Notice that for the
Internal
setting, you also specify
the sample rate (44.1, 48, 88.2 or 96 kHz). For the
Dig
(Digital) setting, you choose between low and
high sample rates (44.1/48 and 88.2/96, respec-
tively). The same is true for the
Wrd
(word clock)
setting.
For further information about what clock settings
to choose, see “Sync for 2408mk3 stand-alone
operation” on page 52.
Sample rates (44.1, 48, 88.2, 96)
The top row of LEDs let you specify the sample rate
for a stand-alone transfer for the following clock
sources: Internal (
Int
), Digital (
Dig
) and Word
Clock (
Wrd
). Just press the SET button repeatedly
to cycle through the desired sample rates.
For the
Int
setting, the SET button cycles through
all four possible sample rates, letting you choose
the desired rate.
For the
Dig
and
Wrd
settings, however, the SET
button cycles through low and high sample rate
settings only (44.1/48 and 88.2/96, respectively).
Choose the pair that corresponds to the sample
rate of the incoming clock source.
Содержание PCI-424
Страница 35: ...6 ...
Страница 43: ...14 ...
Страница 45: ...16 ...
Страница 53: ...P A C K I N G L I S T A N D P C S Y S T E M R E Q U I R E M E N T S 24 ...
Страница 83: ...I N S T A L L I N G T H E P C I 4 2 4 H A R D W A R E 54 ...
Страница 103: ...M O T U P C I A U D I O C O N S O L E 74 ...
Страница 111: ...C U B A S E N U E N D O A N D O T H E R A S I O S O F T W A R E 82 ...
Страница 115: ...S O N A R A N D O T H E R W D M S O F T W A R E 86 ...
Страница 119: ...E X P A N D I N G Y O U R P C I 4 2 4 S Y S T E M 90 ...
Страница 125: ...R E D U C I N G M O N I T O R I N G L A T E N C Y 96 ...
Страница 131: ...C U E M I X C O N S O L E 102 ...
Страница 148: ...6 ...
Страница 156: ...14 ...
Страница 158: ...16 ...
Страница 166: ...P A C K I N G L I S T A N D M A C I N T O S H S Y S T E M R E Q U I R E M E N T S 24 ...
Страница 194: ...I N S T A L L I N G T H E P C I 4 2 4 H A R D W A R E 52 ...
Страница 230: ...A U D I O D E S K 88 ...
Страница 246: ...E X P A N D I N G Y O U R P C I 4 2 4 S Y S T E M 104 ...
Страница 258: ...C U E M I X C O N S O L E 116 ...


