background image

4-2

6802987C94-A

July 2011

Chapter 4: MCD 5000 Deskset Settings

F

IGURE

 4-1  

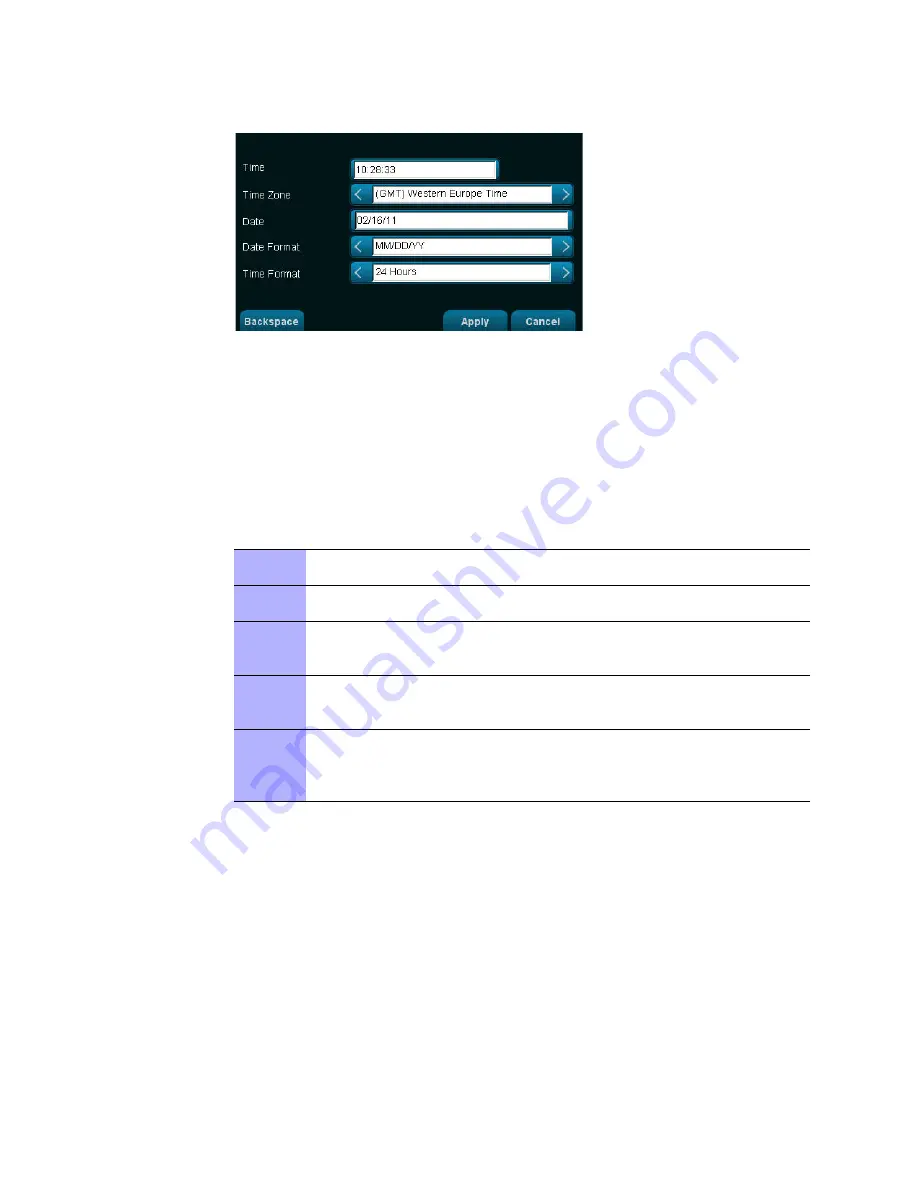
Settings - Time and Date Screen

Display Settings

The Settings-Display Screen is used to the adjust brightness and contrast of the MCD 5000 
Deskset screen.

Procedure 4-2

 describes and 

Figure 4-2

 shows how to adjust the display settings of the MCD 

5000 Deskset.

P

ROCEDURE

 4-2  

 Adjusting the Display

1

From the MCD 5000 Deskset Home Screen, press and release 

Menu 

>

 Settings

.

2

Use the 

Navigation Keys 

to select 

Display

. Press and release the 

OK Button

.

3

Use the up and down arrows of the 

Navigation Keys

 to move between the 

Brightness

 and 

Contrast

 sliders.

4

Use the left and right arrows of the 

Navigation Keys 

to set Brightness and 

Contrast intensity or use 

Default

 to return all values to a factory setting.

5

Press and release 

Apply

 to confirm your settings and return to the MCD 5000 

Deskset Home Screen or use 

Cancel

 to cancel changes and return back to the 

MCD 5000 Deskset Home Screen.

Содержание MCD 5000 Deskset

Страница 1: ...a 3 3 4 2ELEASE 53 2 5 2011 Motorola Solutions Inc All rights reserved ULY 6802987C94 6802987C94 A ...

Страница 2: ...This Page Intentionally Left Blank ...

Страница 3: ... operation of law in the sale of a product Disclaimer Please note that certain features facilities and capabilities described in this document may not be applicable to or licensed for use on a particular system or may be dependent upon the characteristics of a particular mobile subscriber unit or configuration of certain parameters Please refer to your Motorola contact for further information Trad...

Страница 4: ...II 6802987C94 A July 2011 This Page Intentionally Left Blank ...

Страница 5: ...6802987C94 A July 2011 III DOCUMENT HISTORY DOCUMENT HISTORY Version Description Date 6802987C94 A Original release of the MCD 5000 Deskset Guide July 2011 ...

Страница 6: ...IV 6802987C94 A July 2011 Document History This Page Intentionally Left Blank ...

Страница 7: ...kset Description Overview 1 1 MCD 5000 Deskset System Overview 1 3 Overview 1 3 Understanding MCD 5000 Deskset Buttons and Hardware 1 5 Top View Features 1 5 Bottom Side and Side Panel Features 1 7 Chapter 2 Installation Operational Cautions 2 1 Desktop Mount 2 2 Adjusting the Handset Rest 2 2 Adjusting the MCD 5000 Deskset Footstand 2 2 Wall Mount 2 3 Connection to Power Accessories and Network 2...

Страница 8: ... 3 20 Understanding MCD 5000 Deskset Icons and Indications 3 22 Status Bar Icons 3 22 Activity Log Icons 3 23 Message Box Indications 3 23 Understanding the Emulated Radio Screen 3 24 MCD 5000 Deskset Soft Keys 3 24 MCD 5000 Deskset Status Bar 3 25 MCD 5000 Deskset Activity Log 3 25 Emulated Radio LCD Display 3 25 Emulated Radio Buttons Soft keys 3 25 ASTRO Consolette W9 Emulated Radio Screen 3 27...

Страница 9: ...ode 3 44 Chapter 4 MCD 5000 Deskset Settings Time and Date 4 1 Display Settings 4 2 Audio Settings 4 3 Local Settings 4 4 Performance 4 6 Versions 4 7 Appendix A Troubleshooting Service and Support Information A 4 Repair and Replacement Parts A 4 Field Replacement Kits A 4 Appendix B Accessories MCD 5000 Deskset Accessories Description B 3 MCD 5000 Deskset RGU Power Supply Unit B 3 Desktop Paddle ...

Страница 10: ...VIII 6802987C94 A JULY 2011 CONTENTS This Page Intentionally Left Blank ...

Страница 11: ...ure 3 6 Change PIN Screen 3 14 Figure 3 7 Unlock Screen 3 15 Figure 3 8 MCD 5000 Deskset Home Screen After Connecting to a Radio 3 17 Figure 3 9 MCD 5000 Deskset Activity Log 3 18 Figure 3 10 Background Color Indications of Emulated Radio LCD Display 3 20 Figure 3 11 MCD 5000 Deskset Activity History Screen 3 21 Figure 3 12 Emulated Radio Screen 3 24 Figure 3 13 ASTRO Consolette W9 Emulated Radio ...

Страница 12: ...gs Versions Screen 4 7 Figure B 1 AC In line Adapter US cord not shown B 3 Figure B 2 Desktop Paddle Microphone B 3 Figure B 3 Footswitch Two Foot Pedals B 4 Figure B 4 Headset Jack Box RJ 45 View B 5 Figure B 5 Figure 3 7 Headset Base with PTT Switch B 5 Figure B 6 Headset Base without PTT Switch B 5 ...

Страница 13: ...6802987C94 A JULY 2011 XI MCD 5000 DESKSET USER GUIDE This Page Intentionally Left Blank ...

Страница 14: ...XII 6802987C94 A JULY 2011 LIST OF FIGURES This Page Intentionally Left Blank ...

Страница 15: ...ble 3 1 MCD 5000 Deskset Status Bar Icons and Indications 3 22 Table 3 2 Activity Log Icons and Indications 3 23 Table 3 3 Type of Message Box Indications 3 23 Table 3 4 Radio Icons Shown on the Emulated Screen of the MCS2000 III Radio 3 30 Table 3 5 Radio Icons Shown on the Emulated Radio Screen 3 31 Table 4 1 Performance screen Icons 4 6 Table A 1 Troubleshooting A 1 Table A 2 Field Replacement ...

Страница 16: ...XIV 6802987C94 A JULY 2011 LIST OF TABLES This Page Intentionally Left Blank ...

Страница 17: ...000 Deskset to a Radio 3 32 Procedure 3 17 Disconnect the MCD 5000 Deskset from a Radio 3 33 Procedure 3 18 Listen to the Radio Channel Activity 3 34 Procedure 3 19 Mute or Listen to Audio Activity of All Connected MCD 5000 Desksets 3 34 Procedure 3 20 View a List of Users Connected to the Same Radio 3 34 Procedure 3 21 Respond to a Call with the Handset 3 36 Procedure 3 22 Respond With the Handse...

Страница 18: ...XIV 6802987C94 A JULY 2011 LIST OF PROCEDURES This Page Intentionally Left Blank ...

Страница 19: ...scription provides an overview and features of the MCD 5000 Deskset and the MCD 5000 Deskset System Chapter 2 Installation describes the installation and connection of the MCD 5000 Deskset and components Chapter 3 Operation describes the operation of the MCD 5000 Deskset Chapter 4 MCD 5000 Deskset Settings describes the settings of the MCD 5000 Deskset Appendix A Troubleshooting provides troublesh...

Страница 20: ...em Information Assurance Guide 6802987C98 MCD 5000 Administrator Control Panel ACP User Guide 6802987C99 MCD 5000 Deskset Model F2380A Quick Reference Card 6802987C54 MCD 5000 Radio Gateway Unit RGU Model F7979AQuick Reference Card 6802987C53 TABLE 0 2 Related Information About Radios and Other System Related Units Related Information MC3000TM Digital Deskset Operator and Installation Manual 68803...

Страница 21: ...damage only accident hazards IMPORTANT IMPORTANT contains information that emphasize points or remind readers of something or to indicate minor problems in the outcome of what they are doing NOTE Notes contain information about exceptions or preconditions refer the reader elsewhere for additional information remind the reader how to complete an action when it is not part of the current procedure o...

Страница 22: ...XVIII 6802987C94 A July 2011 About this Guide This Page Intentionally Left Blank ...

Страница 23: ...eds of digital and analog radio users who require multiple dispatch points with enhanced talk listen and inter dispatcher intercom The MCD 5000 Deskset is the approximate size and shape of an office telephone set with a telephone like handset that includes a PTT Push to Talk Button The handset microphone and speaker become active when the handset is lifted from the housing base The housing include...

Страница 24: ...onnected to the MCD 5000 Deskset to enable hands free PTT and radio channel monitor ability The MCD 5000 Deskset supports the following features Perform radio calls Emulate and Control Radio features including SB9600 interface Perform intercom calls between all MCD 5000 Desksets connected to the same radio in the system Generate and view emergency calls Monitor radio and parallel MCD 5000 Deskset ...

Страница 25: ...a Windows based utility used to configure all parameters and settings of the MCD 5000 Deskset and the radio gateway The CT can be located remotely anywhere on the IP network or locally using Ethernet connection IP Network This is the customer provided WAN LAN IP Network Two Way Radio Devices Provide the access to the customer LMR system The Radios control panel appear at the MCD 5000 Deskset as a ...

Страница 26: ...et in the system 2 Maximum of Users per MCD 5000 Deskset System in a non OMC system is a multiply of number of Desksets 100 and number of users per Deskset 8 In a stand alone configuration no network connection the MCD 5000 Deskset can directly connect to a single digital radio FIGURE 1 2 MCD 5000 Deskset System without an OMC System Resource MCD 5000 Deskset System without OMC MCD 5000 Deskset Sy...

Страница 27: ...eskset System Overview FIGURE 1 3 MCD 5000 Deskset System with an OMC MCD 5000 Deskset MCD 5000 Radio Gateway Unit RGU Two Way Radio Devices IP Network Operation and Management Center OMC MCD 5000 Configuration Tool CT Administrator Control Panel ACP MCD 5000 Deskset ...

Страница 28: ... MCD 5000 Deskset No Item Description 1 Handset For audio transmit and receive with a microphone in the mouthpiece and an audio speaker in the earpiece and a built in PTT 2 Internal Speaker For hands free public audio receive 3 Internal Microphone 1 For hands free audio transmit 4 Transmit Button For transmitting on the radio channel 5 Transmit LED Indicating that the MCD 5000 Deskset is transmitt...

Страница 29: ...en and Emulated Radio Screen 14 LCD display For displaying digital radio messages or test and configuration messages radio icons soft keys and VU meter readings 15 Radio Soft keys Radio Func tion Buttons Radio programmable buttons or radio soft keys buttons 16 Mode Up and Mode Down But tons For moving up and down through the MCD 5000 Deskset or radio menu of modes channels or functions that appear...

Страница 30: ...E External LAN connection includes input from Power over Ethernet RJ45 con nector 4 Footswitch Connection for Footswitch that contains PTT and Monitor Buttons 3 PIN KK Molex connector 5 DskMIC JckBx Connection for Desktop Microphone or Headset Jack Box RJ45 connector 6 Logger Connection for Analog logging recorder RJ45 connector 7 Radio Comm Connection for RS 232 Digital signaling to a radio RJ45 ...

Страница 31: ... the Power Supply Unit from the 12V DC connector or the LAN cable from the EXTERNAL LAN PoE connector 12 PTT Button Handset Push to Talk PTT Button 13 Footstand Release Latch Used to lock the footstand in position after adjusting the MCD 5000 Deskset angle 14 Cable Holder Used for routing cables from the MCD 5000 Deskset connectors 15 Handset Port Connecting Handset RJ22 connector TABLE 1 3 Bottom...

Страница 32: ...1 10 6802987C94 A July 2011 Understanding MCD 5000 Deskset Buttons and Hardware Chapter 1 MCD 5000 Deskset Description This Page Intentionally Left Blank ...

Страница 33: ...doors use Do not expose the unit to water rain or snow Do not connect the MCD 5000 Deskset to any exposed outdoor line or cable Before using read all the instructions and cautionary markings on the unit To reduce the risk of damage to the wire or plug pull by the plug rather than by the cable when disconnecting the MCD 5000 Deskset Power supply from the power source outlet Do not operate the MCD 5...

Страница 34: ...w to adjust the Handset Rest FIGURE 2 1 Adjusting the Handset Rest Adjusting the MCD 5000 Deskset Footstand Procedure 2 2 describes and Figure 2 2 shows how to adjust the MCD 5000 Deskset Footstand PROCEDURE 1 1 Adjust the Handset Rest 1 Set the handset aside and pull the square plastic tab from the handset rest 2 Rotate the Square Plastic Tab 90 degrees 3 Lock the tab into the Handset Rest and re...

Страница 35: ...et can be mounted onto any plaster concrete or wood wall surface provided the appropriate hardware is used Procedure 2 3 describes and Figure 2 3 shows how to mount the MCD 5000 Deskset on a wall 3 Adjust the angle between the MCD 5000 Deskset and the mount surface 4 Release Footstand Release Latch to lock the MCD 5000 Deskset Footstand in place PROCEDURE 2 3 Mount the MCD 5000 Deskset on a Wall 1...

Страница 36: ...e 4 Footswitch provides two pedals one pedal controls General Transmit and the other controls the Monitor feature 5 Headset supports connection of a single earpiece and microphone 6 Headset Base Headset Base with PTT Button provides connectivity to the headset with PTT functionality The Headset Base without PTT Button provides connectivity to the headset 4 At the points drill two holes in the wall...

Страница 37: ...he External LAN PoE Headset Footswitch and Desk Paddle Microphone cables NOTE The MCD 5000 Deskset cables are color coded Use the colored matching cables for connecting the MCD 5000 Deskset to other resources 4 Use DC power supply and or PoE LAN PSE IMPORTANT The MCD 5000 Deskset can be powered by the PoE LAN PSE connection without the need of DC power supply The MCD 5000 Deskset may also be power...

Страница 38: ...D 5000 Deskset Power Supply Unit MCD 5000 Bottom Side EXTERNAL LAN PoE INTERNAL LAN Footswitch Desk Paddle Microphone Digital Radio Hyper Terminal Headset 220 110 VAC Headset Jack Box Analog Logging Recorder Transmit PTT Pedal Monitor Pedal Headset Base with PTT Button Cable Holder Monitor Button Transmit PTT Button ...

Страница 39: ... numeric keys 0 9 colored in white and alphanumeric keys A Z colored in green FIGURE 3 1 MCD 5000 Deskset Keypad The following keypad functions can be used To toggle a letters number repeatedly press and release a keypad key for example A B C 2 To toggle between upper case and lower case letters in alphanumeric mode press and release To type numbers in alphanumeric mode press and hold the appropri...

Страница 40: ...rast To adjust LCD settings refer to Display Settings on page 4 2 Adjusting Volume Volume can be adjusted for the following speakers Internal Speaker hands free speaker Handset Earpiece Headset Earpiece NOTE Volume adjustment simultaneously controls all speakers connected to the MCD 5000 Deskset Procedure 3 1 describes how to increase volume Procedure 3 2 describes how to decrease volume PROCEDURE...

Страница 41: ... login or unlock the MCD 5000 Deskset Remember Me Login This option is used when the MCD 5000 Deskset is required to remain unlocked during operation User Name and PIN are required only for initial login PROCEDURE 3 3 Turn On the Internal Speaker 1 When the internal speaker is turned off press and release the Speaker Button NOTE If the internal speaker is turned on when the handset or headset is u...

Страница 42: ...login to the MCD 5000 Deskset FIGURE 3 2 Login Screen Figure 3 3 shows the MCD 5000 Deskset Home Screen following login PROCEDURE 3 7 Authentication Login to the MCD 5000 Deskset 1 On the Login Screen enter your User Name and PIN Use Backspace to correct typing errors of PIN IMPORTANT When the MCD 5000 Deskset is connected to a system without an OMC upon three consecutive unsuccessful entry trials...

Страница 43: ...6802987C94 A July 2011 3 11 MCD 5000 Deskset User Guide Basic MCD 5000 Deskset Operations FIGURE 3 3 MCD 5000 Deskset Home Screen Following Login ...

Страница 44: ... Screen enter your User Name and PIN Use Backspace to correct typing errors of PIN IMPORTANT When the MCD 5000 Deskset is connected to a system without an OMC Upon three consecutive unsuccessful entry trials the MCD 5000 Deskset locks for predefined period of 5 minutes When the MCD 5000 Deskset is connected to a system with an OMC the number of entry trials and lock time is defined in the OMC serv...

Страница 45: ...e user Procedure 3 10 describes and Figure 3 6 how to change the MCD 5000 Deskset PIN PROCEDURE 3 9 Logoff the MCD 5000 Deskset 1 Press and release the Menu Button to return to the MCD 5000 Deskset Home Screen 2 From the MCD 5000 Deskset Home Screen press and release Quit the Lock Logoff Screen is displayed see Figure 3 5 3 Press and release Logoff the Login Screen is displayed PROCEDURE 3 10 Chan...

Страница 46: ...ust conform to the following rules o The PIN must have 4 and 15 digits o The PIN expires after 60 days The MCD 5000 Deskset displays a warning to replace the PIN 10 days before expiration o The user may not reuse the previous 10 PINs o The user may not change PINs more than once a day except in the case of an administrator or privileged user Privileged users may be required to reset a user s forgo...

Страница 47: ... to lock the MCD 5000 Deskset Unlock the MCD 5000 Deskset Procedure 3 12 describes and Figure 3 7 shows how to unlock the MCD 5000 Deskset FIGURE 3 7 Unlock Screen PROCEDURE 3 11 Lock the MCD 5000 Deskset 1 Press and release the Menu Button to return to the MCD 5000 Deskset Home Screen 2 Press and release Quit the Lock Logoff screen is displayed see Figure 3 5 3 Press and release Lock the Unlock S...

Страница 48: ...ted to the MCD 5000 Deskset and returns to the MCD 5000 Home Screen see Figure 3 3 Procedure 3 13 describes how to update the radio resources information PROCEDURE 3 13 Update the Radio Resources Information 1 From the MCD 5000 Deskset Home Screen see Figure 3 3 press and release Quit the Lock Logoff screen is displayed see Figure 3 5 2 Press and release Update the MCD 5000 Home Screen is displaye...

Страница 49: ...s of the MCD 5000 Deskset Home Screen are dedicated to manage the MCD 5000 Deskset The MCD 5000 Deskset soft keys menu includes the following soft keys Menu used for setting the MCD 5000 Deskset see MCD 5000 Deskset Settings on page 4 1 Connect used to connect or disconnect the MCD 5000 Deskset to a radio see Connecting to a Radio on page 3 32 Activity Hist used to display a history log of the MCD...

Страница 50: ... Table 3 2 When History Log includes more than 3 occurrence a scroll bar will show on the left hand side of the screen The occurrence sources may be received from MCD 5000 Deskset s Field Radio s MCD 5000 Deskset System Configuration tool Procedure 3 14 describes and Figure 3 9 shows how scroll the Activity Log shown on the MCD 5000 Deskset Home Screen FIGURE 3 9 MCD 5000 Deskset Activity Log NOTE...

Страница 51: ...ing Blue Radio connected normal Gray with amber cross on top Network problem between the MCD 5000 Deskset and the connected RGU RGU connected to the radio is not connected to a network MCD 5000 Deskset is not connected to a network RGU connected to the radio is turned off Amber Incoming Emergency Alarm Yellow Acknowledged incoming Emergency Alarm FIGURE 3 10 Background Color Indications of Emulate...

Страница 52: ...ID Emergency Alarm Emergency Alarm Acknowledge Emergency Alarm Clear In the MCD 5000 Deskset Activity History Screen all events are classified in four tabs according to following criteria Activity Logs recorded activity of all MCD 5000 Desksets connected to the same radio as of the current MCD 5000 Deskset System Log of MCD 5000 Deskset System events Emergency Log of inbound and outbound emergency...

Страница 53: ...6802987C94 A July 2011 3 21 MCD 5000 Deskset User Guide MCD 5000 Deskset Activity History FIGURE 3 11 MCD 5000 Deskset Activity History Screen ...

Страница 54: ...o the radio Emergency Alarm was initiated from MCD 5000 Deskset VU Meter Virtual volume level received by the MCD 5000 Deskset from the radio Emergency Alarm initiated from MCD 5000 Deskset was acknowledged by a MCD 5000 Deskset user Current volume level of the internal speaker of the MCD 5000 Deskset Emergency Alarm was initiated from a field radio Current volume level of the handset earpiece of ...

Страница 55: ... Alarm was initiated from MCD 5000 Deskset Radio connected to the MCD 5000 Deskset System Emergency Alarm initiated from the MCD 5000 Deskset was acknowledged by a MCD 5000 Deskset user MCD 5000 Deskset packet loss alert Emergency Alarm initiated from the MCD 5000 Deskset was cleared by a MCD 5000 Deskset user MCD 5000 Deskset high packet loss alert Emergency Alarm was initiated from a field radio...

Страница 56: ...t Soft Keys MCD 5000 Deskset Status Bar MCD 5000 Deskset Activity Log Emulated Radio LCD Display Emulated Radio Buttons Soft Keys FIGURE 3 12 Emulated Radio Screen NOTE When the MCD 5000 Deskset is connected to a radio use the Menu Button to toggle between these Emulated Radio Screen see Figure 3 12 and the MCD 5000 Deskset Home Screen see Figure 3 8 MCD 5000 Deskset Soft Keys The upper blue soft ...

Страница 57: ... MCD 5000 Deskset Activity Log The MCD 5000 Deskset Activity Log is identical to the MCD 5000 Deskset Activity Log displayed on the MCD 5000 Deskset Home Screen For MCD 5000 Deskset Activity Log description refer to MCD 5000 Deskset Activity Log on page 3 18 When Activity Log includes more than 3 occurrence a scroll bar will show on the left hand side of the screen NOTE The Activity Log can be set...

Страница 58: ...ns to the MCD 5000 Deskset buttons by button letter Figure 3 13 on page 3 27 ASTRO Consolette W9 Emulated Radio Screen Figure 3 14 on page 3 28 MCS2000 III Emulated Radio Screen Figure 3 15 on page 3 29 CDM 1550 LS LS Emulated Radio Screen Please refer to the specific digital radio type user documentation for specific instructions about all buttons and associated LCD display operations ...

Страница 59: ...d Radio Screen Figure 3 13 shows the emulated radio screen of the ASTRO Consolette W9 FIGURE 3 13 ASTRO Consolette W9 Emulated Radio Screen A B C D E F G H I J L M N P K R O Q B B D F E C H J L G N P R O Q Sel Sel Mode Mode Home A More More NOTE The O key operates as Monitor button if configured in the radio Menu Home I M K ...

Страница 60: ...o FIGURE 3 14 MCS2000 III Emulated Radio Screen 1 2 3 4 5 6 7 8 9 0 Sel Call Page Opt Menu Scan Phon H L Zone A B C D E F G H I Sel Menu Up Down F G E I A B C D Up Down Sel Menu More More R Callers Press to see a list of users connected to the radio Turns Tx Monitor on off TX Monitor Alert tones Alert 1 2 3 NOTE The C soft key operates as Monitor Button if configured in the radio H ...

Страница 61: ...creen CDM 1550 LS LS Emulated Radio Screen Figure 3 15 shows the emulated screen of the CDM 1550 LS LS radio FIGURE 3 15 CDM 1550 LS LS Emulated Radio Screen A B C D E F Sel E A B D G H Sel Menu Home C F G H NOTE The A soft key operates as Monitor button if configured in the radio Menu Home ...

Страница 62: ...prioritized Auto Group Scan has been activated Priority 1 Scan flashing Indicates activity on a Priority 1 talkgroup or channel during System Scan Priority 2 Scan steady When the green LED is on it indicates activity on a priority 2 talkgroup or channel during System Scan When the green LED is off it indicates prioritized Auto Group Scan has been activated Telephone Interconnect Talkaround Direct ...

Страница 63: ... Audio Indicates that the audio will sound through the earpiece Scan When the green LED is blinking it indicates that the System PassPort Scan or All Group Scan feature has been activated When the green LED is off it indicates that non prioritized Auto Group Scan has been activated Priority 1 Scan flashing Indicates activity on a Priority 1 talkgroup or channel during System Scan Priority 2 Scan s...

Страница 64: ...reen press and release Connect Result The Radio Resources Screen is displayed If your MCD 5000 Deskset is already connected to a radio the currently connected radio automatically disconnects 2 Press and release Recent to view the recently used radios or All to view all radio resources 3 To search a radio press and release Find and enter a prefix of the radio name The list selection will automatica...

Страница 65: ...nitiated by other radios sharing the same channel is automatically heard When the Monitor Button is pressed and a tone is heard the frequency is used by other radio operators NOTE Radio channel monitoring only applies to conventional radio systems not trunking radio systems Only one radio channel can be monitored at a time To use Monitor Button on Footswitch or Desk Paddle Microphone the Monitor B...

Страница 66: ...Microphone see Figure 2 4 2 Any radio communication audio on the channel will be heard on the internal speaker Alternately if the handset is off hook audio is heard in the handset earpiece If headset is used audio is heard in the headset earpiece 3 To turn monitor off press and release on one of the following items Transmit PTT Pedal of the Footswitch Transmit PTT Pedal of the Desk Paddle Micropho...

Страница 67: ...eaker is on To visually verify that radio channel transmission can be initiated or answered look at the Busy LED yellow LED If the Busy LED is on a parallel MCD 5000 Deskset is being used and MCD 5000 Deskset cannot transmit until the Busy LED is off The MCD 5000 Deskset can be connected to a radio configured for a conventional or trunked radio system A conventional system uses discrete frequencie...

Страница 68: ...ransmit and the Internal Speaker Receive 1 Lift the handset off hook 2 To enable the internal speaker with the handset off hook press the Speaker Button once The Speaker LED turns on 3 Press and hold the PTT Button in the middle of the handset The Transmit LED turns on while the button is pushed 4 Speak into the mouthpiece 5 Release the PTT Button to end transmission and allow audio from the inter...

Страница 69: ...Button to listen to a response on the internal speaker The Transmit LED turns off when the button is released PROCEDURE 3 24 Respond with the Desk Paddle Microphone or Footswitch 1 Ensure the handset is on hook in the Handset Rest 2 Press and hold the Transmit Button on the Desk Paddle Microphone or footswitch The internal microphone is disconnected and the Transmit LED turns on while the button i...

Страница 70: ...Emulated Radio Screen Chapter 3 Operation 2 Speak into the mouthpiece 3 Release the PTT Button to end transmission The Transmit LED on the MCD 5000 Deskset turns off when the button is released PROCEDURE 3 25 Respond to a Call When Using a Headset ...

Страница 71: ...ng base intercom transmission Base intercom transmission can be performed from your MCD 5000 Deskset only when the Base Intercom LED is off Initiate a Base Intercom Transmission Procedure 3 26 describes how initiate a base intercom transmission PROCEDURE 3 26 Initiate a Base Intercom Transmission 1 Verify that the Busy LED and the Base Intercom LED are off 2 Press and hold the Base Intercom Button...

Страница 72: ...hts yellow Procedure 3 27 describes how respond to an intercom call PROCEDURE 3 27 Respond to an Intercom Call 1 Upon an incoming base intercom transmission the Base Intercom LED inside the Base Intercom Button lights yellow and the caller voice is heard 2 Press and hold the Base Intercom Button and speak into the internal microphone NOTE Audio can only be received if the Base Intercom Button has ...

Страница 73: ...ses parallel MCD 5000 Desksets attached to the same radio to display an alarm notification and beep The Emergency Alarm state remains until the alarm is acknowledge by one of the parallel MCD 5000 Deskset users Clearing the Emergency Alarm set all MCD 5000 Desksets back to normal operation Procedure 3 28 describes and Figure 3 18 shows how to generate an outbound Emergency Alarm PROCEDURE 3 28 Gen...

Страница 74: ...ame radio display alarm indications and emit an alarm sound Procedure 3 29 describe and Figure 3 19 shows how to respond to an Inbound Emergency Alarm FIGURE 3 19 Inbound Emergency Alarm Message Figure 3 20 shows the alarm indications displayed on the MCD 5000 Deskset screen until one of the parallel MCD 5000 Deskset users acknowledge ACK the alarm PROCEDURE 3 29 Respond to an Inbound Emergency Al...

Страница 75: ...ing The MCD 5000 Deskset returns to normal operation only after all alarms are cleared All active Emergency Alarm are logged and can be viewed and managed from the Emergency Stack screen To access the Emergency Stack screen press Emer in the Emulated Radio Screen The Emergency Stack contains up to 50 emergency related events registered by the MCD 5000 Deskset such as Emergency Active Emergency Ack...

Страница 76: ...isor soft key The MCD 5000 Deskset which its transmit operation was taken over by a Superior displays the yellow supervisor icon NOTE When the system includes MCD 5000 and MC3000 MCD 5000 Desksets the Supervisor Take Over feature between the MCD 5000 and MC3000 MCD 5000 Desksets is not supported PROCEDURE 3 31 Clear an Acknowledged Emergency Alarm 1 From the MCD 5000 Deskset Home Screen see Figure...

Страница 77: ...ress and release Supervisor Result The yellow supervisor icon is shown on all parallel MCD 5000 Desksets indicating that Supervisor Take Over mode is on 2 Press and release the PTT Button on the handset or the Transmit Button Result The green Supervisor icon changes to red indicating that the MCD 5000 Deskset is in Supervisor Take Over mode In Supervisor Take Over mode the MCD 5000 Deskset obtains...

Страница 78: ...3 46 6802987C94 A July 2011 Supervisor Take Over Mode Chapter 3 Operation This Page Intentionally Left Blank ...

Страница 79: ...e and Date PROCEDURE 1 1 Set Time and Date 1 From the MCD 5000 Deskset Home Screen press and release Menu Settings 2 Use the Navigation Keys to select Time and Date Press and release the OK Button 3 Use the up and down arrows of the Navigation Keys to move between entry fields 4 Use the left and right arrows of the Navigation Keys to set the Time Zone Date Format and Time Format fields 5 Use the k...

Страница 80: ...e MCD 5000 Deskset Home Screen press and release Menu Settings 2 Use the Navigation Keys to select Display Press and release the OK Button 3 Use the up and down arrows of the Navigation Keys to move between the Brightness and Contrast sliders 4 Use the left and right arrows of the Navigation Keys to set Brightness and Contrast intensity or use Default to return all values to a factory setting 5 Pr...

Страница 81: ...the MCD 5000 Deskset Home Screen press and release Menu Settings 2 Use the Navigation Keys to select Audio Press and release the OK Button 3 Use the upper soft keys to select an audio source 4 Use the up and down arrows of the Navigation Keys to move between the microphone input and speaker output 5 Use the left and right arrows of the Navigation Keys to set Microphone and Volume sliders to adjust...

Страница 82: ...Turn off monitor a period of time after which the MCD 5000 Deskset LCD display automatically turns off The monitor will not turn off if PROCEDURE 4 4 Adjusting Headset AGC 1 From the MCD 5000 Deskset Home Screen press and release Menu Settings 2 Use the Navigation Keys to select Audio Press and release the OK Button 3 Use the upper soft keys to select the Headset 4 Press and release AGC 5 Use the ...

Страница 83: ...ocal Settings Screen PROCEDURE 4 5 Set Local MCD 5000 Deskset Performance 1 From the MCD 5000 Deskset Home Screen press and release Menu Settings 2 Use the Navigation Keys to select Local Press and release the OK Button 3 Use the up and down arrows of the Navigation Keys to move between entry fields 4 Use the left and right arrows of the Navigation Keys to change settings 5 Use the left and right ...

Страница 84: ...2 Use the Navigation Keys to select Performance Press and release the OK Button 3 Press and release Close to return to the MCD 5000 Deskset Home Screen TABLE 4 1 Performance screen Icons Icon Description Packet loss your transmission may not have received properly CPU Utilization DSP Usage An overloaded DSP can cause the MCD 5000 Deskset to slow down DSP spikes happen rarely and pass quickly In ca...

Страница 85: ...are update DB Version Version of MCD 5000 Deskset Data Base SIP Version Version of Session Initiation Protocol FPGA Version Version of Field programmable Gate Array GUI Package Version Version of Graphical User Interface GUI Date Date of last GUI Package change IP Address MCD 5000 Deskset internet protocol address Procedure 4 7 describes and Figure 4 6 shows how to view the MCD 5000 Deskset versio...

Страница 86: ...4 8 6802987C94 A July 2011 Chapter 4 MCD 5000 Deskset Settings This Page Intentionally Left Blank ...

Страница 87: ...et screen by lifting the handset or by pressing any button When entering User Name and Password after MCD 5000 Deskset lock the Invalid Login screen is displayed The MCD 5000 Deskset was locked by other user To unlock the MCD 5000 Deskset contact the user who had locked the MCD 5000 Deskset or a administrator The MCD 5000 Deskset screen appears very dark under any circumstances You might have chan...

Страница 88: ...ected to MCD 5000 CT application then go to Time and date set tings screen and configure manually Check MCD 5000 Deskset connection to net work Can not connect to radio When pressing Connect on a radio resource in the list The MCD 5000 Home Screen is displayed and Can t connect to No reply message appears Check that the relevant radio is installed connected properly and turned on After short durat...

Страница 89: ...main window the activity log in the middle of the window is empty Go to Local settings window and change the Activity Log to Show When needed radio resource is not shown in permitted radio list after pressing Connect soft key on the MCD 5000 Home Screen Check that needed radio group is assigned to the logged in user Press Update key in Lock Logoff screen TABLE A 1 Troubleshooting Symptom Cause Sol...

Страница 90: ...ices Telephone Numbers For ordering 800 422 4210 US and Canada orders 847 538 8023 International orders For Fax Orders 800 622 6210 US and Canada orders 847 576 3023 International orders For help identifying an item or part number 800 422 4210 select choice 3 from the menu Field Replacement Kits Table A 2 describes the field replacement kits of the MCD 5000 Deskset TABLE A 2 Field Replacement Kits...

Страница 91: ...r The MCD 5000 Deskset can be used with the audio accessories given in the following table NOTE Handset is supplied with the MCD 5000 Deskset TABLE B 1 MCD 5000 Deskset Accessories No Part Number Accessory Type 1 FHN7290 MCD 5000 Deskset K Style Handset includes coiled cable 2 FHN7469 MCD 5000 Deskset RGU Power Supply with USA Power Cord 3 RMN5068 Desktop Paddle Microphone 4 BLN6732 2 pedal Footsw...

Страница 92: ...ectional microphone ear lip style 6 CDN6289 Mirage Noise canceling Top over the ear style 7 CDN6291 Supra Binaural Noise canceling Top headband style without tone control 8 CDN6292 Tristar Noise cancelling Top unidirectional microphone ear bud style 9 CDN6293 Encore Monaural Noise canceling Top unidirectional microphone with tone control headband style 10 CDN6294 Encore Binaural Noise canceling To...

Страница 93: ...cable length 1 5 m integral to power supply Part number FHN7469 refers to MCD 5000 Deskset RGU Power Supply with USA Power Cord and FHN6726 refers to MCD 5000 Deskset RGU Power Supply without Power Cord FIGURE B 1 AC In line Adapter US cord not shown Desktop Paddle Microphone The desktop paddle microphone supports PTT buttons and Monitor The recommended Desktop Paddle Microphone part number is RMN...

Страница 94: ...PTT is an operation mode where the PTT button is pressed twice once for originating the PTT session and second for releasing the PTT in the MCD 5000 Deskset System the PTT button has to be kept pressed otherwise the PTT released MCD 5000 Headset Jack Box A headset may be used with the MCD 5000 Deskset to allow the MCD 5000 Deskset user to listen and receive audio on the selected radio channels and...

Страница 95: ...FRU CABLE MCD 5000 DESKSET TO HEADSET JACK BOX FIGURE B 4 Headset Jack Box RJ 45 View Headset Base with PTT Switch Provides connectivity to the headset with PTT functionality Recommended part number CDN6281 FIGURE B 5 Figure 3 7 Headset Base with PTT Switch Headset Base without PTT Switch Provides connectivity to the headset Recommended part number CDN6282 FIGURE B 6 Headset Base without PTT Switc...

Страница 96: ...B 6 6802987C94 A July 2011 MCD 5000 Deskset Accessories Description Chapter B Accessories This Page Intentionally Left Blank ...

Страница 97: ...ssion 12 5W Max 37VDC to 57VDC Powered via POE PD meeting 802 3af Standard for Powered Desksets class 0 Frequency Response 3dB from 300 3000 Hz 1kHz ref Hum and Noise Less than 50 dBm below rated outputs Audio Distortion Less than 3 THD 1000 Hz full volume Receive Audio Input with auto level 40dBm to 12dBm 0 01 Vrms to 3 08 Vrms Transmit Audio Output 40dBm to 12dBm 0 01 Vrms to 3 08 Vrms Crosstalk...

Страница 98: ...5 A Mark UL Mark for P S only US federal government Environmentally Preferable Specification EPP Program Non certified Standard Compliance Requirements CSA UL MOTOROLA W18 certification CMM Vocoders G 711 and G 729 Regulatory EMC FCC part 15 class A Safety EN60950 1 Green Product RoHS WEEE Mark Specification Details ...

Страница 99: ...trol 4 B BSP Binary Space Partitioning 7 C CT Configuration Tool 3 D DB Data Base 7 DC Direct Current 4 DSP Digital Signal Processor 6 F FPGA Field programmable Gate Array 7 G GUI Graphical User Interface 7 L LAN Local Area Network 4 LCD Liquid Crystal Display 2 O OMC Operation and Management Center 3 ...

Страница 100: ...sonal Computer 4 PIN Personal Identification Number 9 PoE Power over Ethernet 4 PTT Push to Talk 1 R RGU Radio Gateway Unit 3 RX Receive 35 S SIP Session Initiation Protocol 7 U UHF Ultra High Frequency xvi V VHF Very High Frequency xvi VU Volume Units 18 ...

Отзывы: